.png)
Integrations
MyParcel.com has made it easy for you to integrate numerous sales channels to your shipping account. With these integrations you can either print labels directly from your web-shop or import your orders from your marketplaces.
Marketplaces
Effortlessly connect and import orders from your chosen marketplaces, then print labels directly from the MyParcel.com shipping platform.
Shipping rules are required in order to assign a carrier and service to the imported orders.
1. Connecting your marketplace
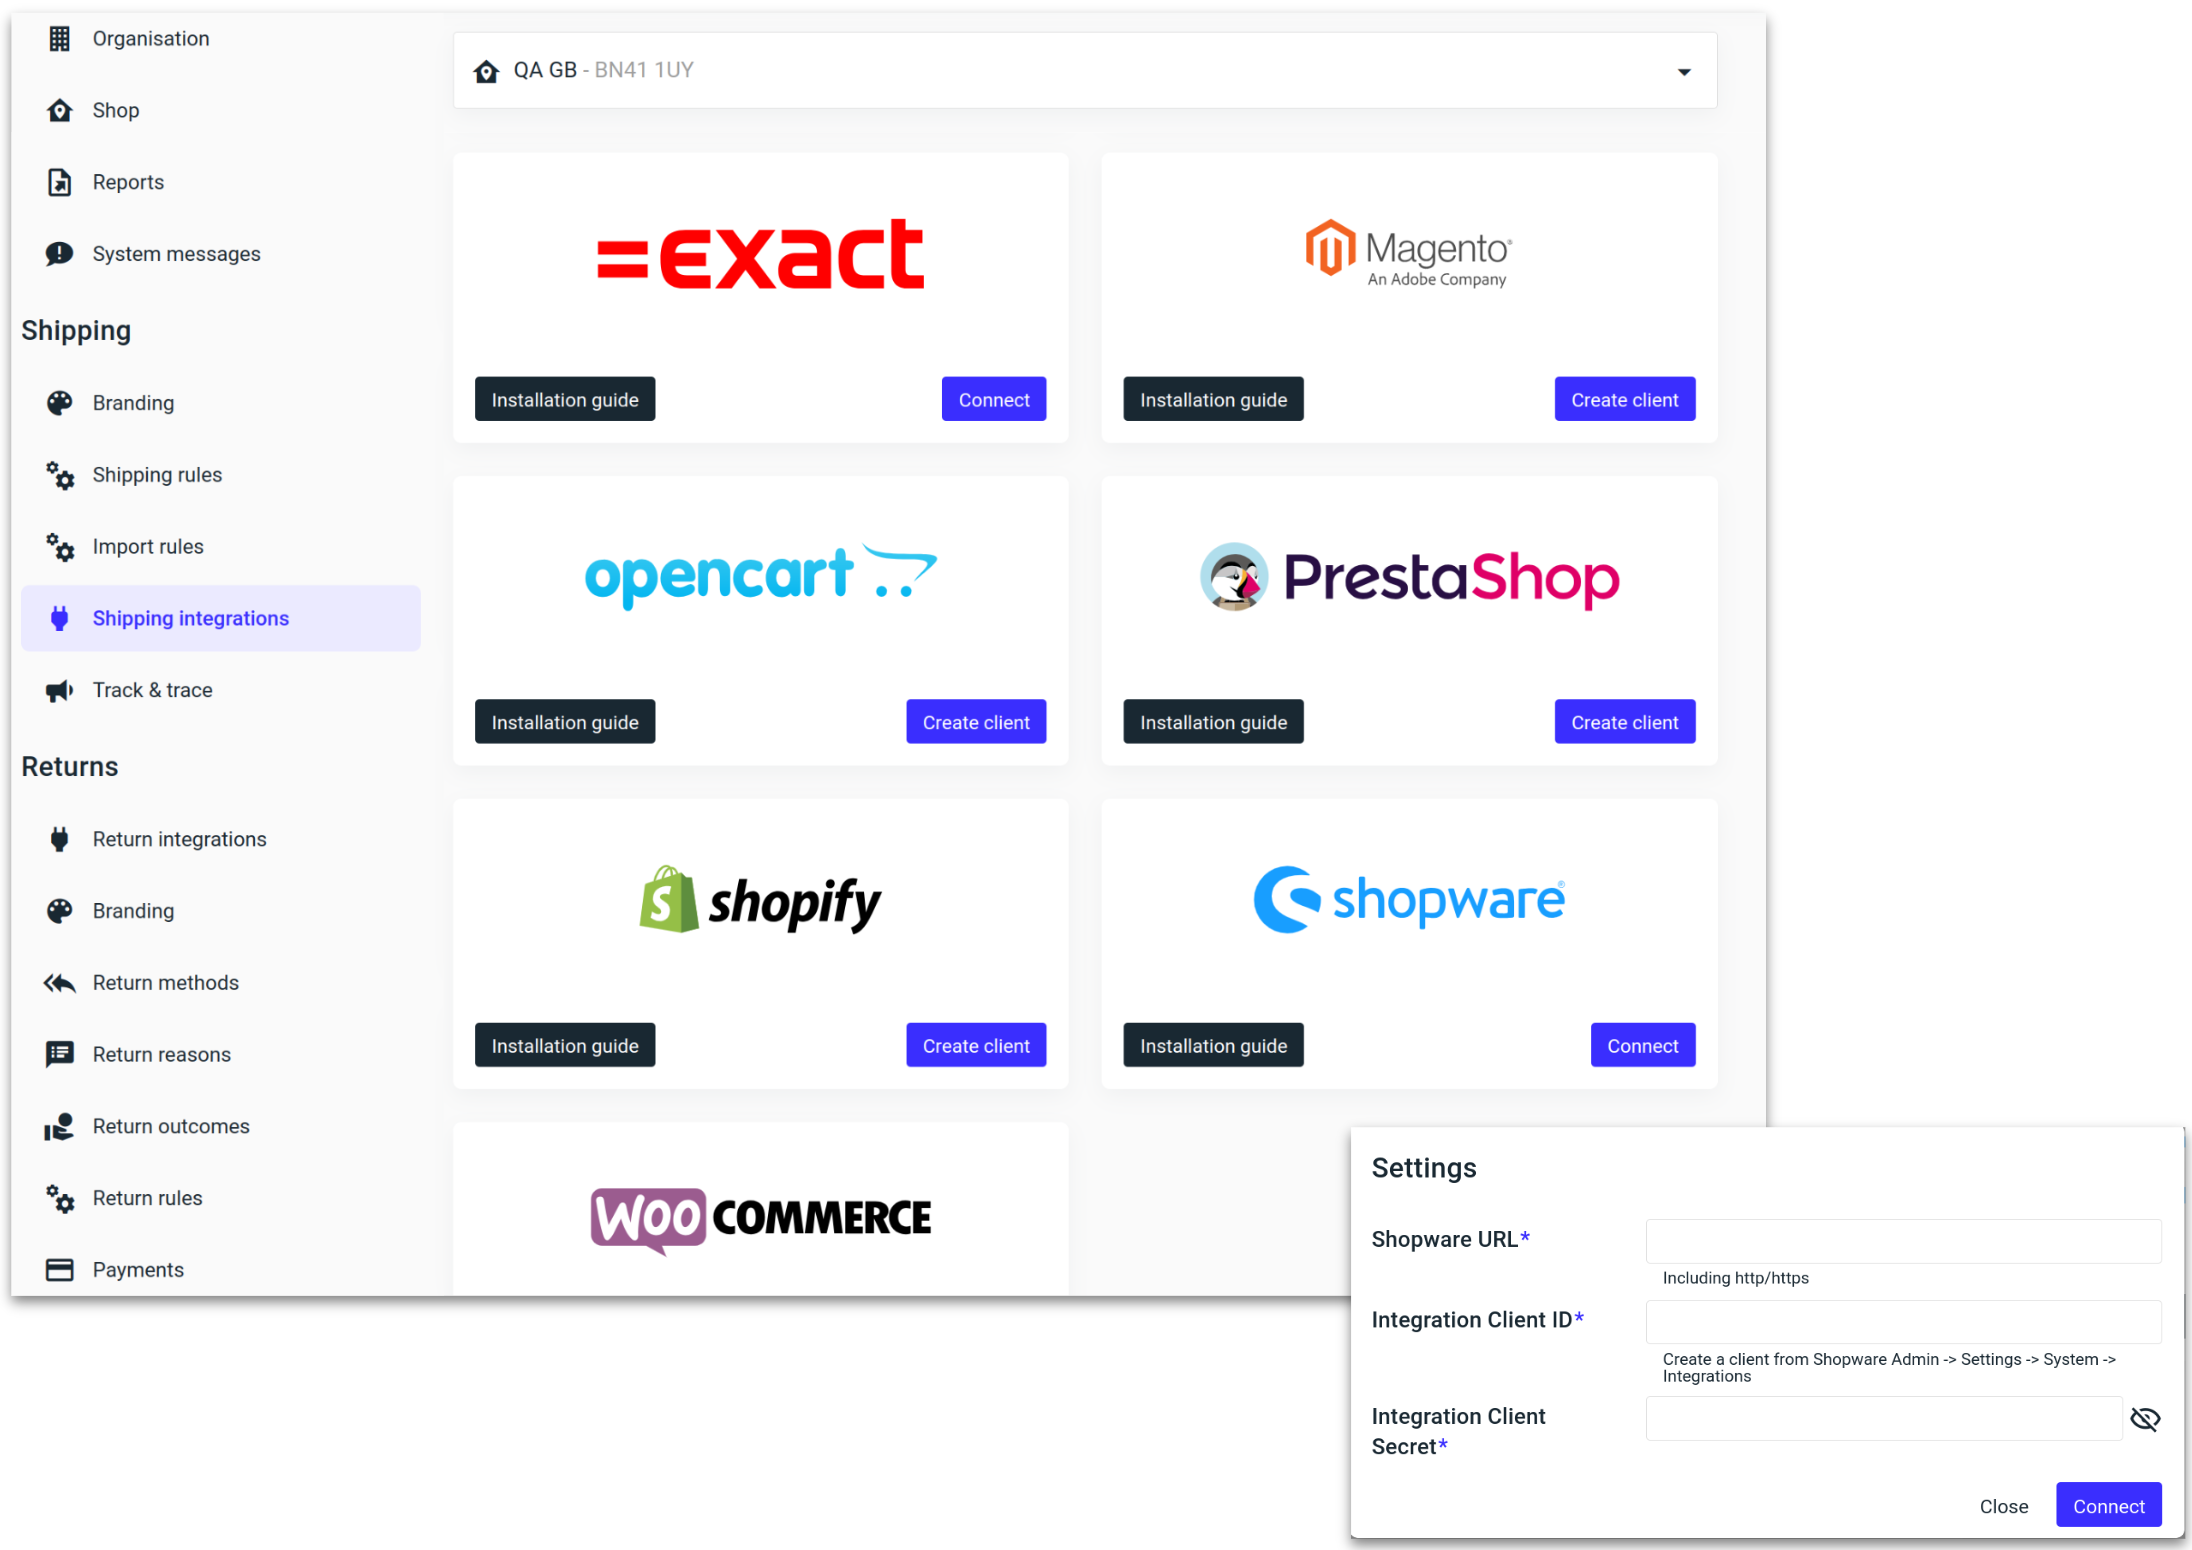
Navigate to the Shipping integrations setting in MyParcel.com and click on the “Connect” button underneath the marketplace you would like to connect.
If you have multiple shops, ensure that the correct shop is selected from the drop-down menu.
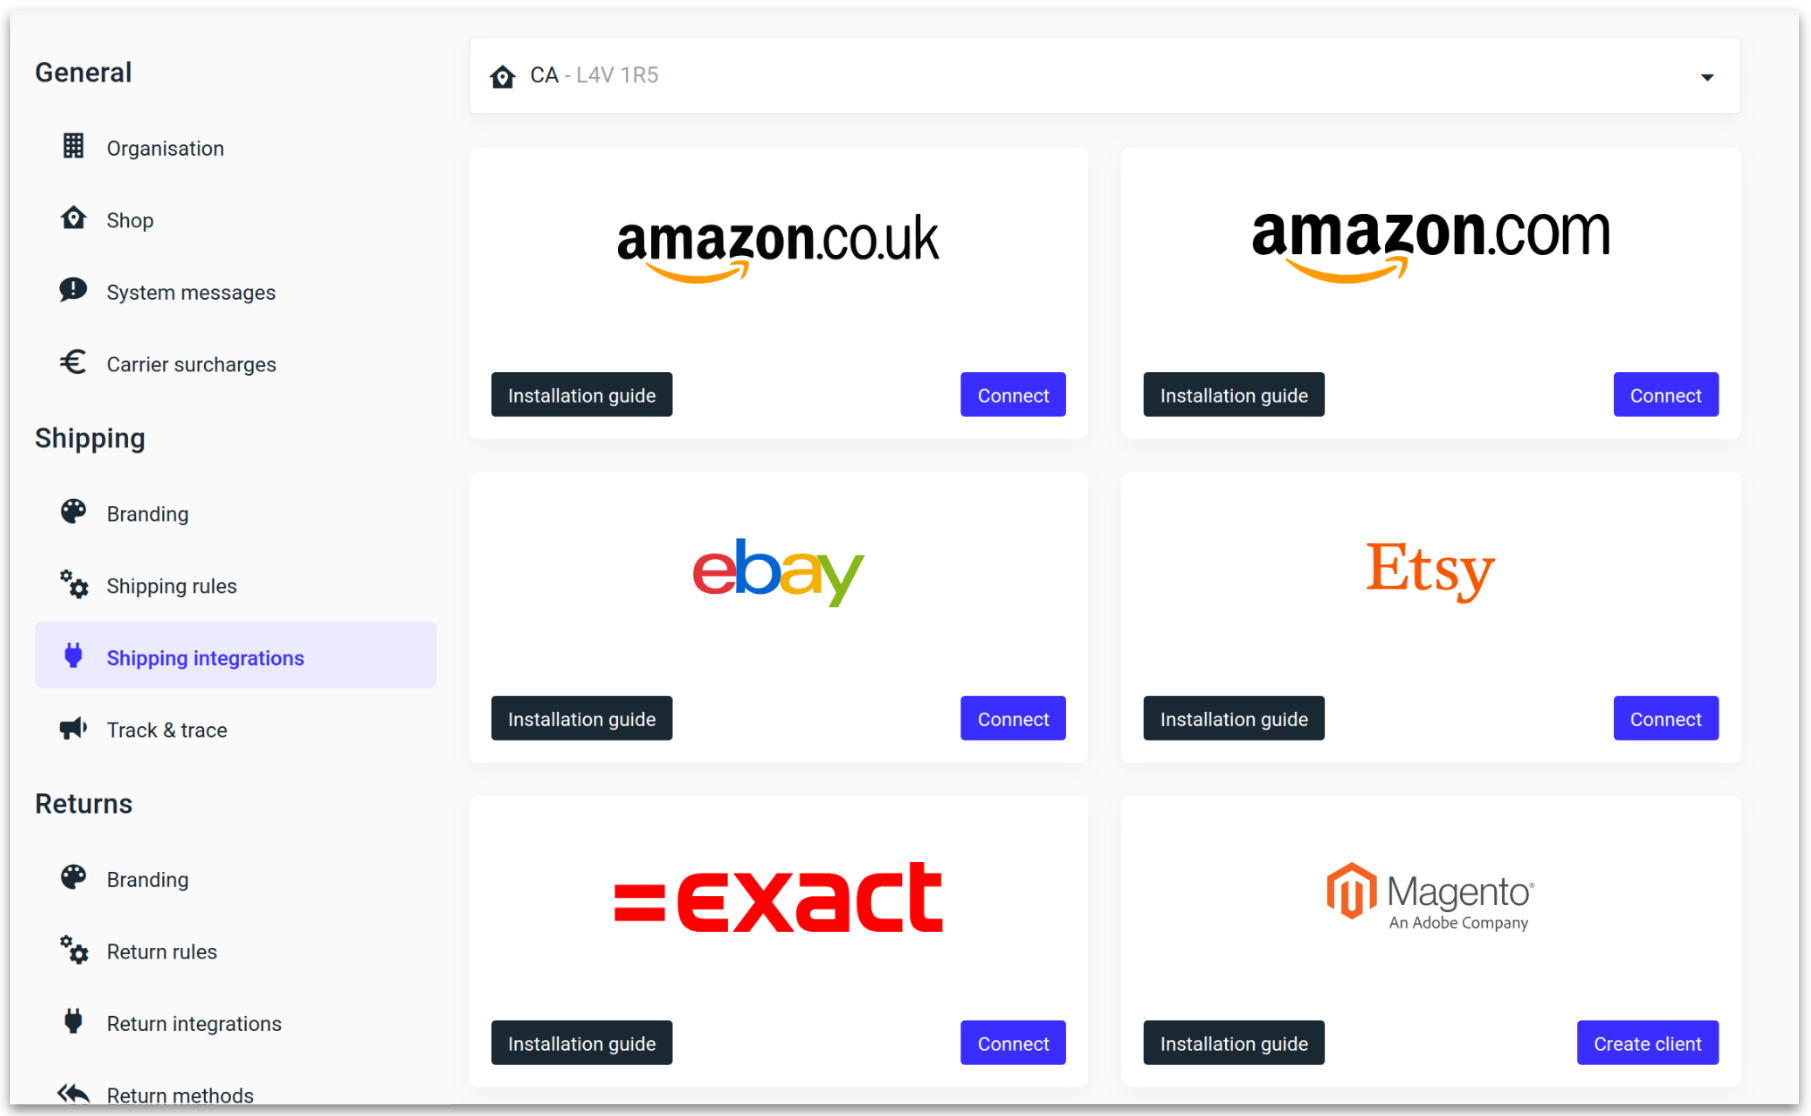
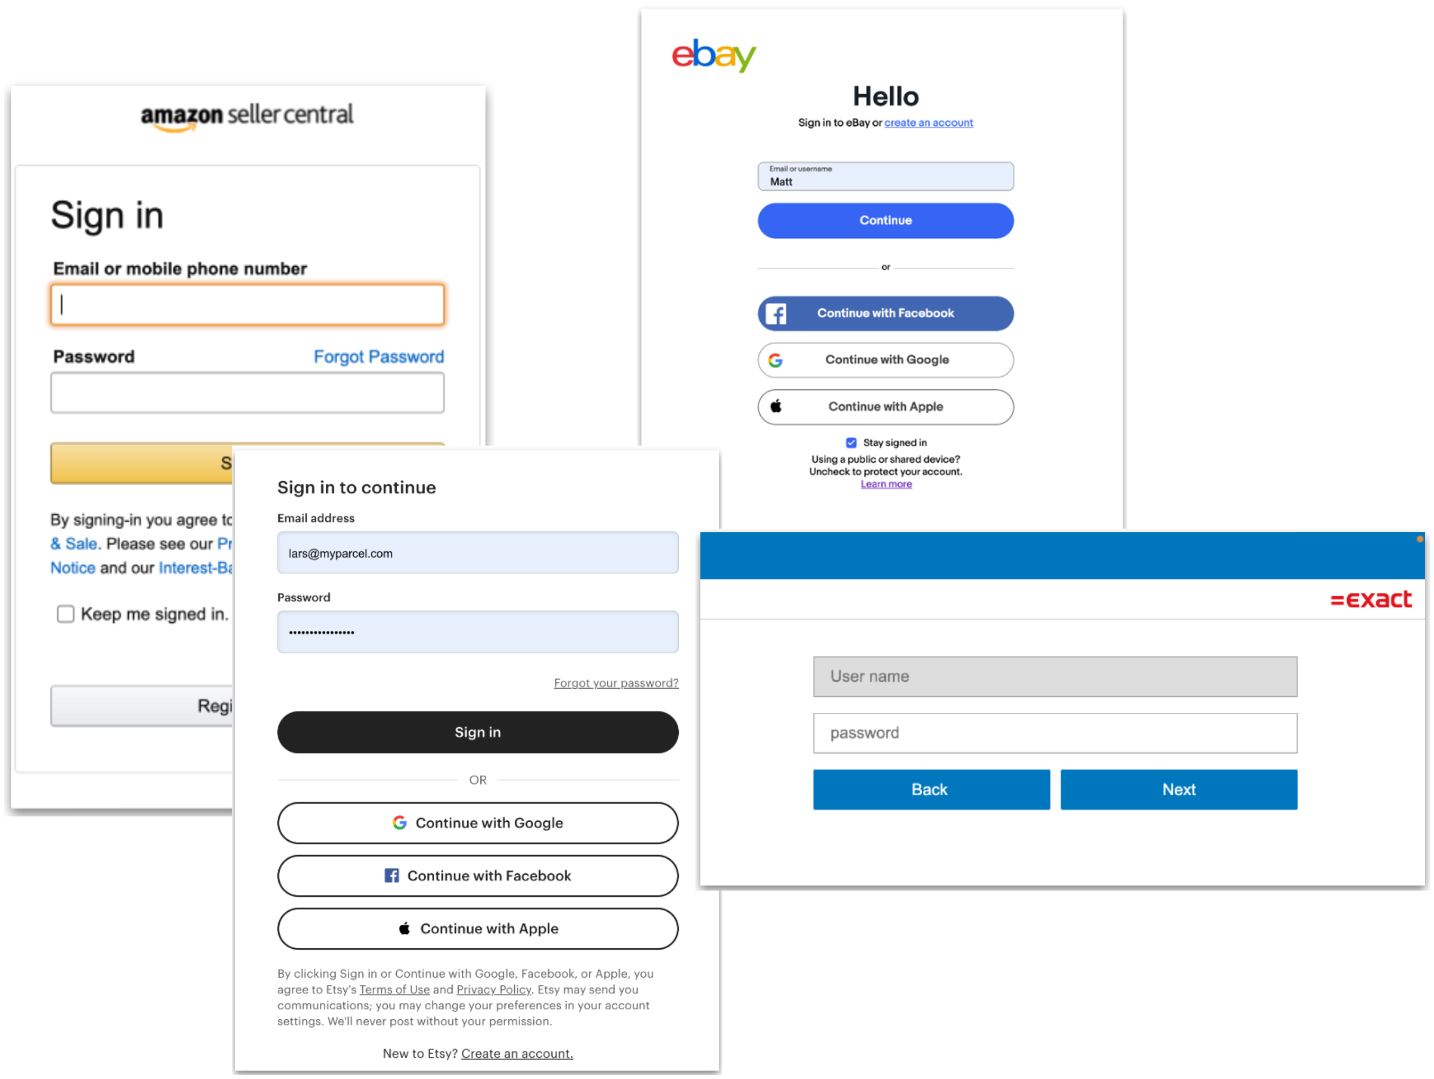
Fill in your login details to approve the connection between MyParcel.com and the chosen marketplace.
Once you have confirmed the connection, you’ll be redirected back to the shipping integrations page and you’re ready to start importing.
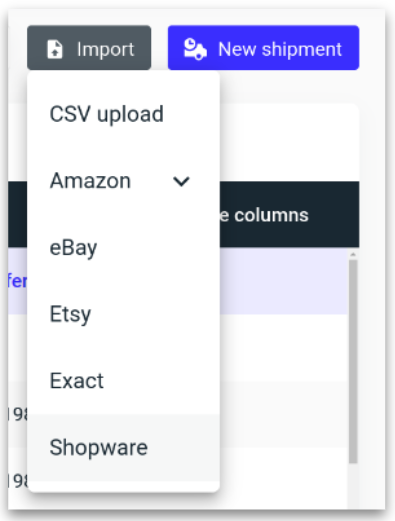
2. Importing orders from your marketplace
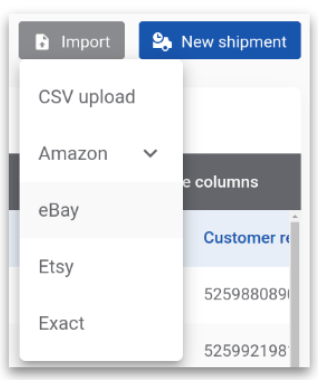
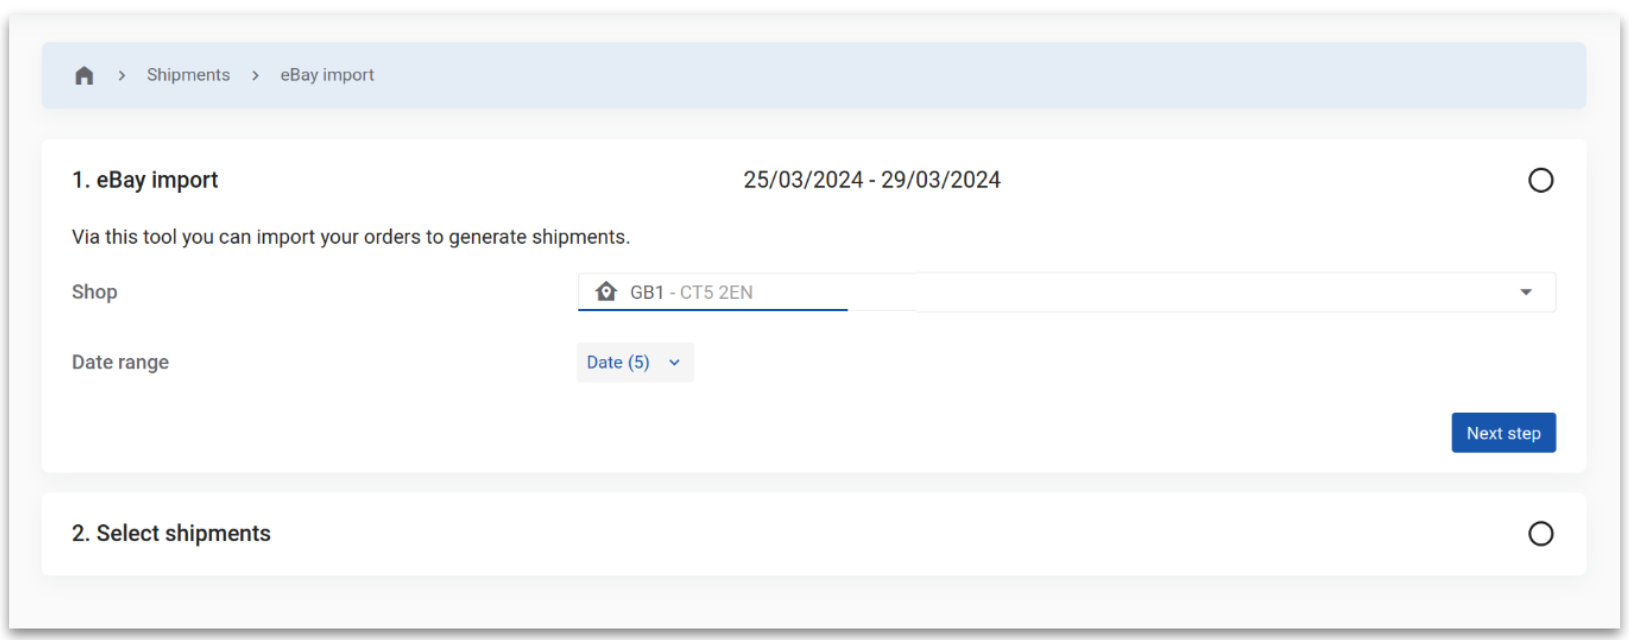
Select the “Import” button on the right hand side of the Shipment overview, followed by the clicking the name of the relevant marketplace.
Select the shop you want to import orders for.
Select a date range of the orders you want to import and then click the “Next step” button.
You can import orders multiple times per day, as long as they have not been marked as Shipped or PartiallyShipped.
Your marketplace orders will now be displayed. Select the required orders and click “Import.”
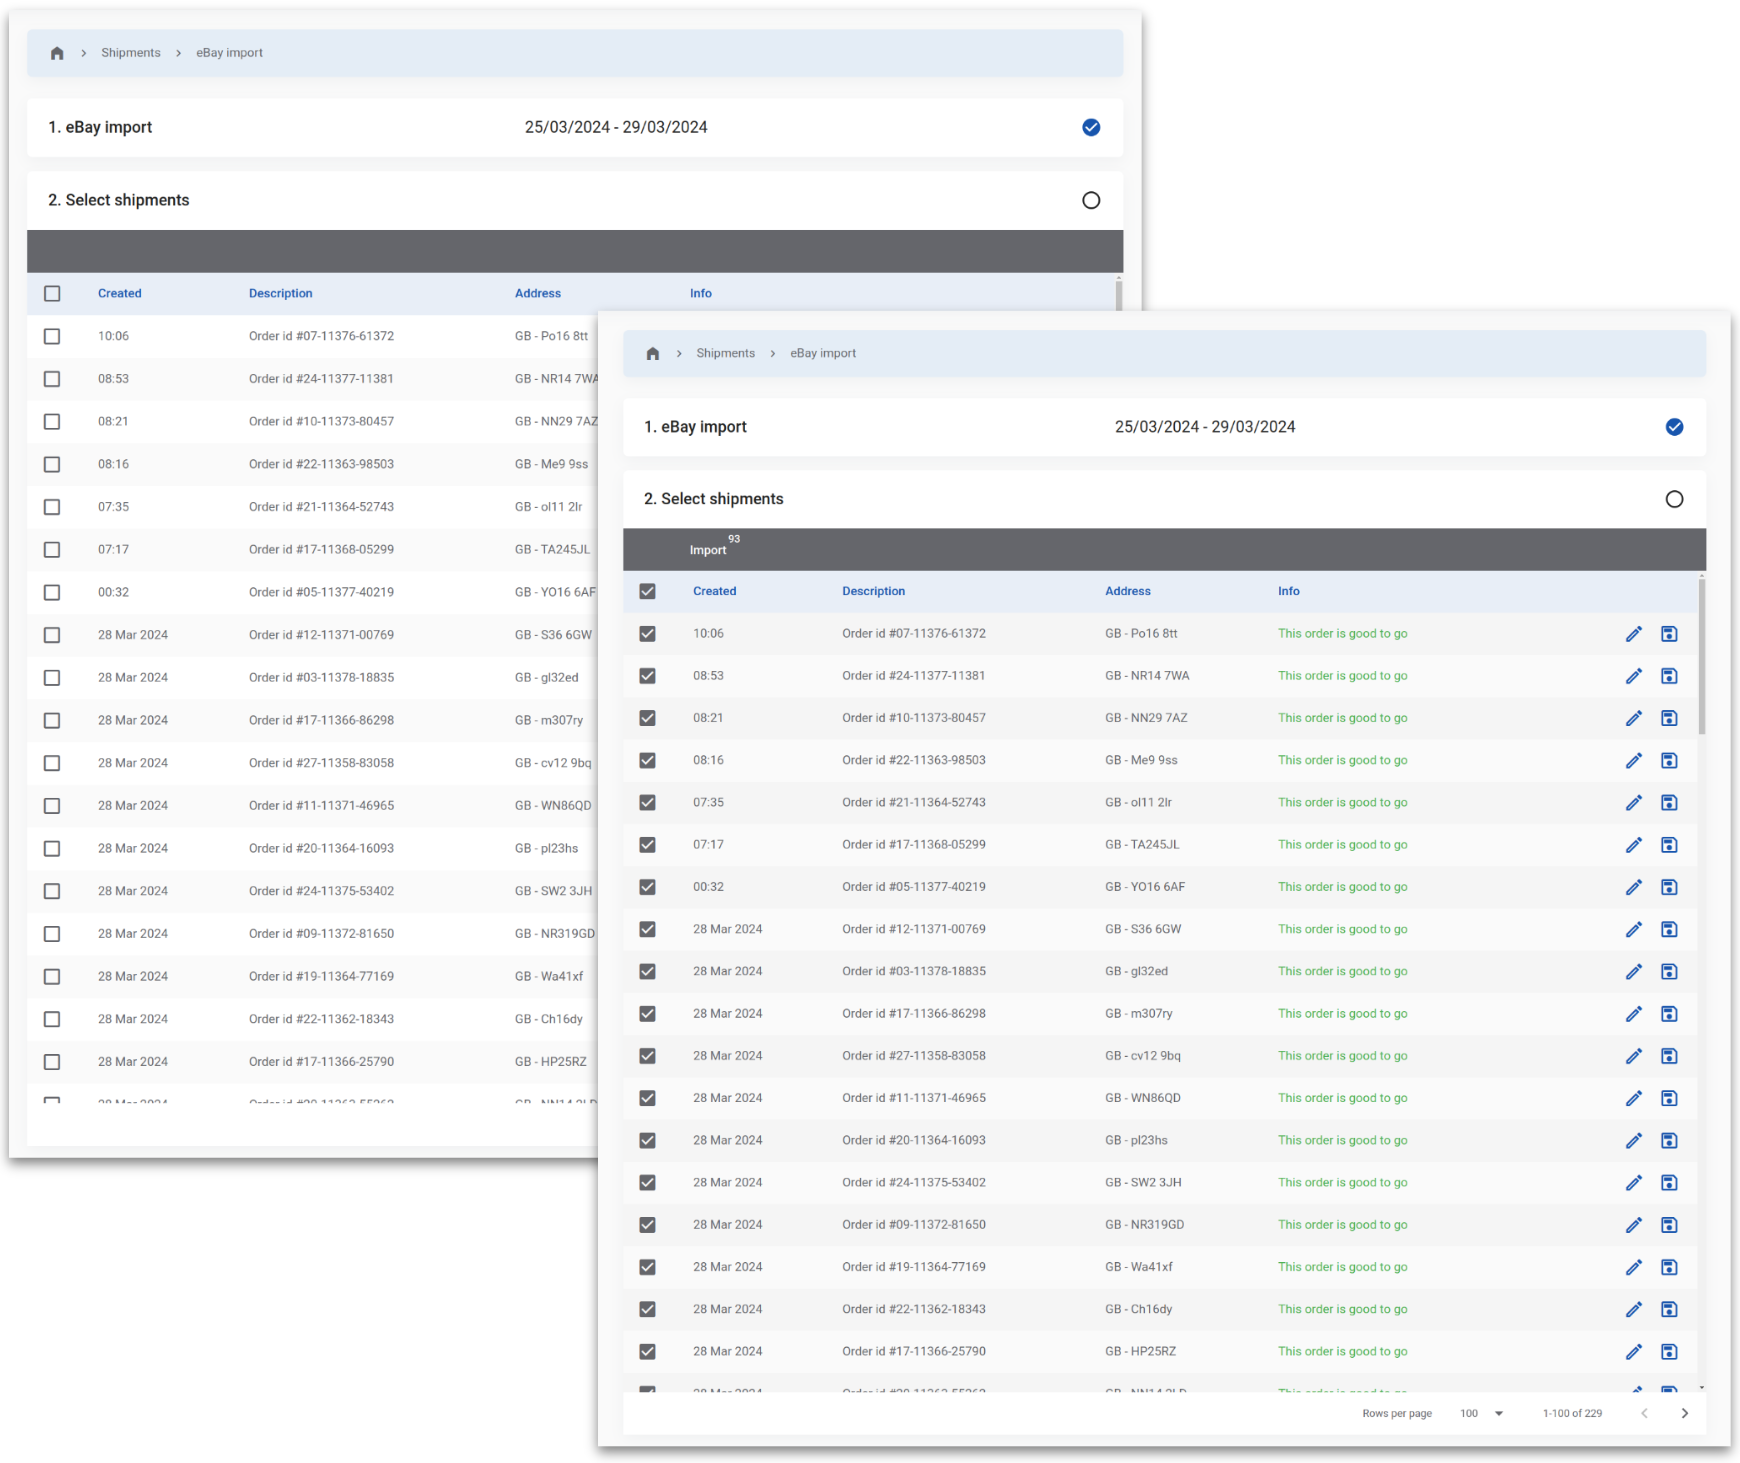
Only orders with a status of PartiallyShipped and Unshipped will be synced using the import function. Any order without these statuses will not be synced.
Any orders which might not be needed, such as drop-shipments can be unchecked. This will prevent them from being registered with the carrier.
Any orders missing data can be edited using the pencil icon prior to importing.
Frequently asked questions
Do all my products require a weight? | Yes | Yes | Yes | Yes |
|---|---|---|---|---|
Does the integration import SKU codes? | Yes | Yes | No | No |
Does the integration import HS codes? | No | No | No | No |
Is the tracking number sent back to the marketplaces? | No | Yes | Yes | No |
Are the tracking statuses sent back to the marketplaces? | No | No | Yes | No |
Can you set up shipping options? | No | Yes | No | No |
How are IOSS shipments handled? | The IOSS number of the marketplace is always transmitted with the information for the order when synced. | |||
Webshops
Easily connect and print your shipping labels directly from your online store.
Shipping rules are required in order to print labels from your online store.
Magento
1. Installing plugin
You can install the MyParcel.com plugin from here
2. Connecting Magento
Connecting Magento is done in 2 steps:
Generate the Client ID & Secrect in MyParcel.com.
Configure the MyParcel.com Magento plugin.
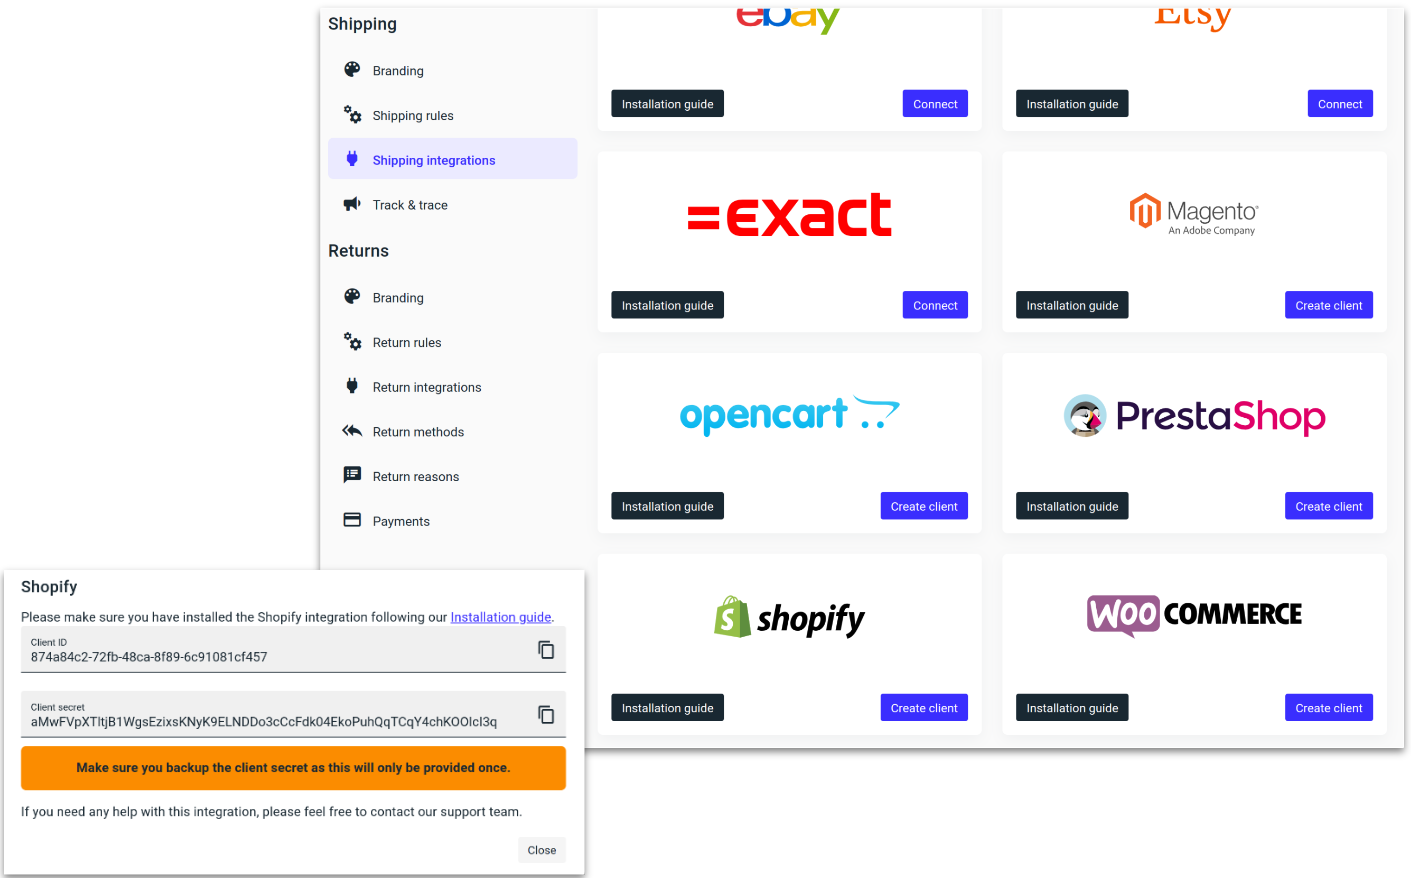
Generate the Client ID & Secrect in MyParcel.com by navigating to the Shipping integration setting in MyParcel.com and click “Create client” under Magento.

Configure the MyParcel.com Magento plugin.
Got to “Stores”, followed by “Configuration.”
In the Configuration menu, go to “MYPARCEL.COM.”
Paste the Client ID and Client Secret into their respective fields.
Check and set the Default Values, followed by clicking “Save Config.“
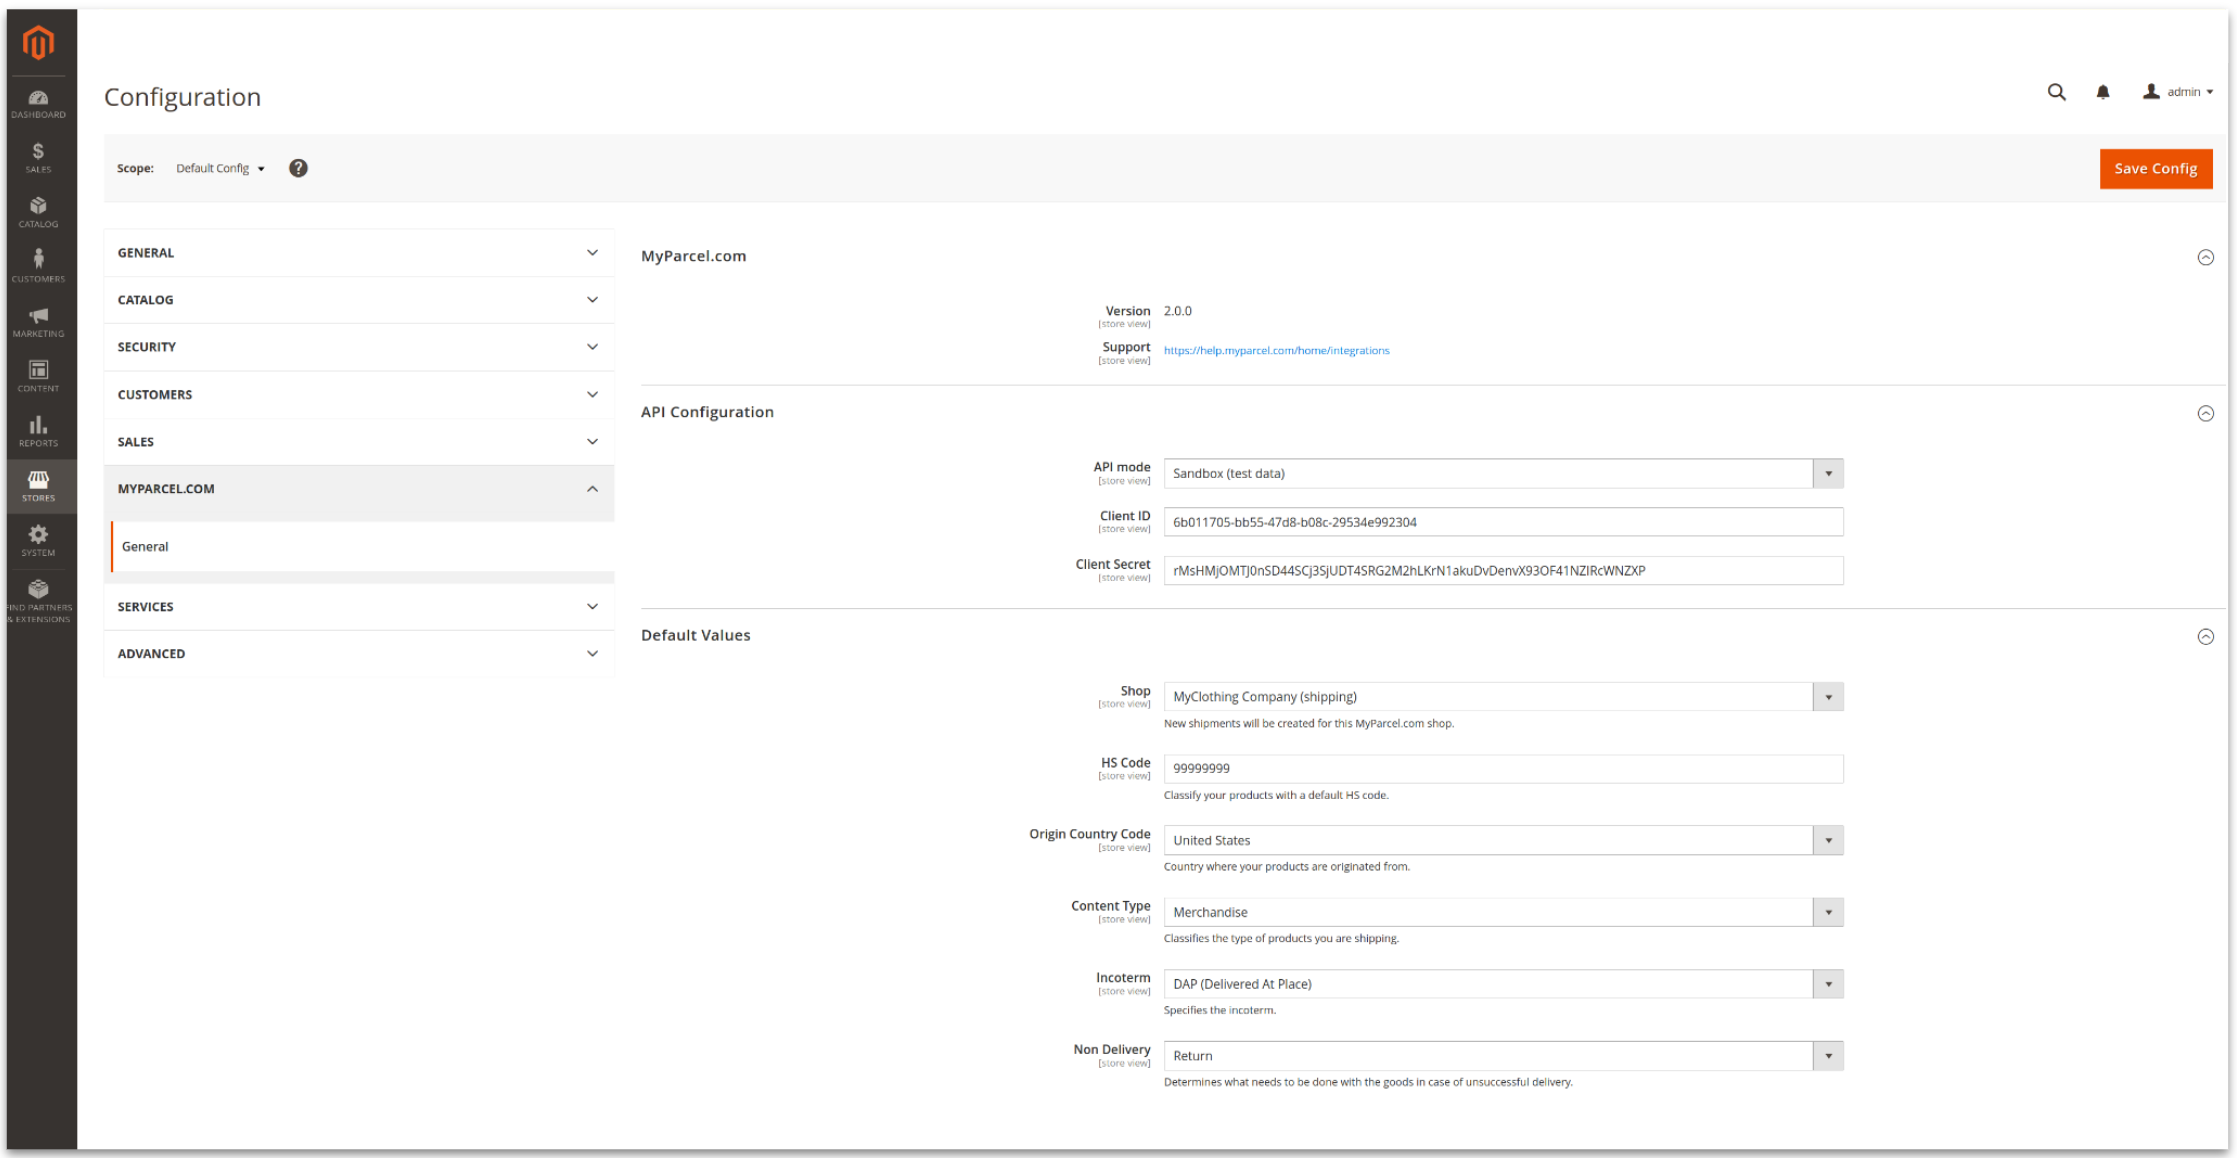
Magento is now connected and ready to process shipments.
3. Checkout shipping options
Set up Automation rules to match the selected shipping method chosen by your customer.
Got to “Stores”, followed by “Configuration.”
In the Configuration menu, go to “Sales,” followed by “Delivery Methods.”
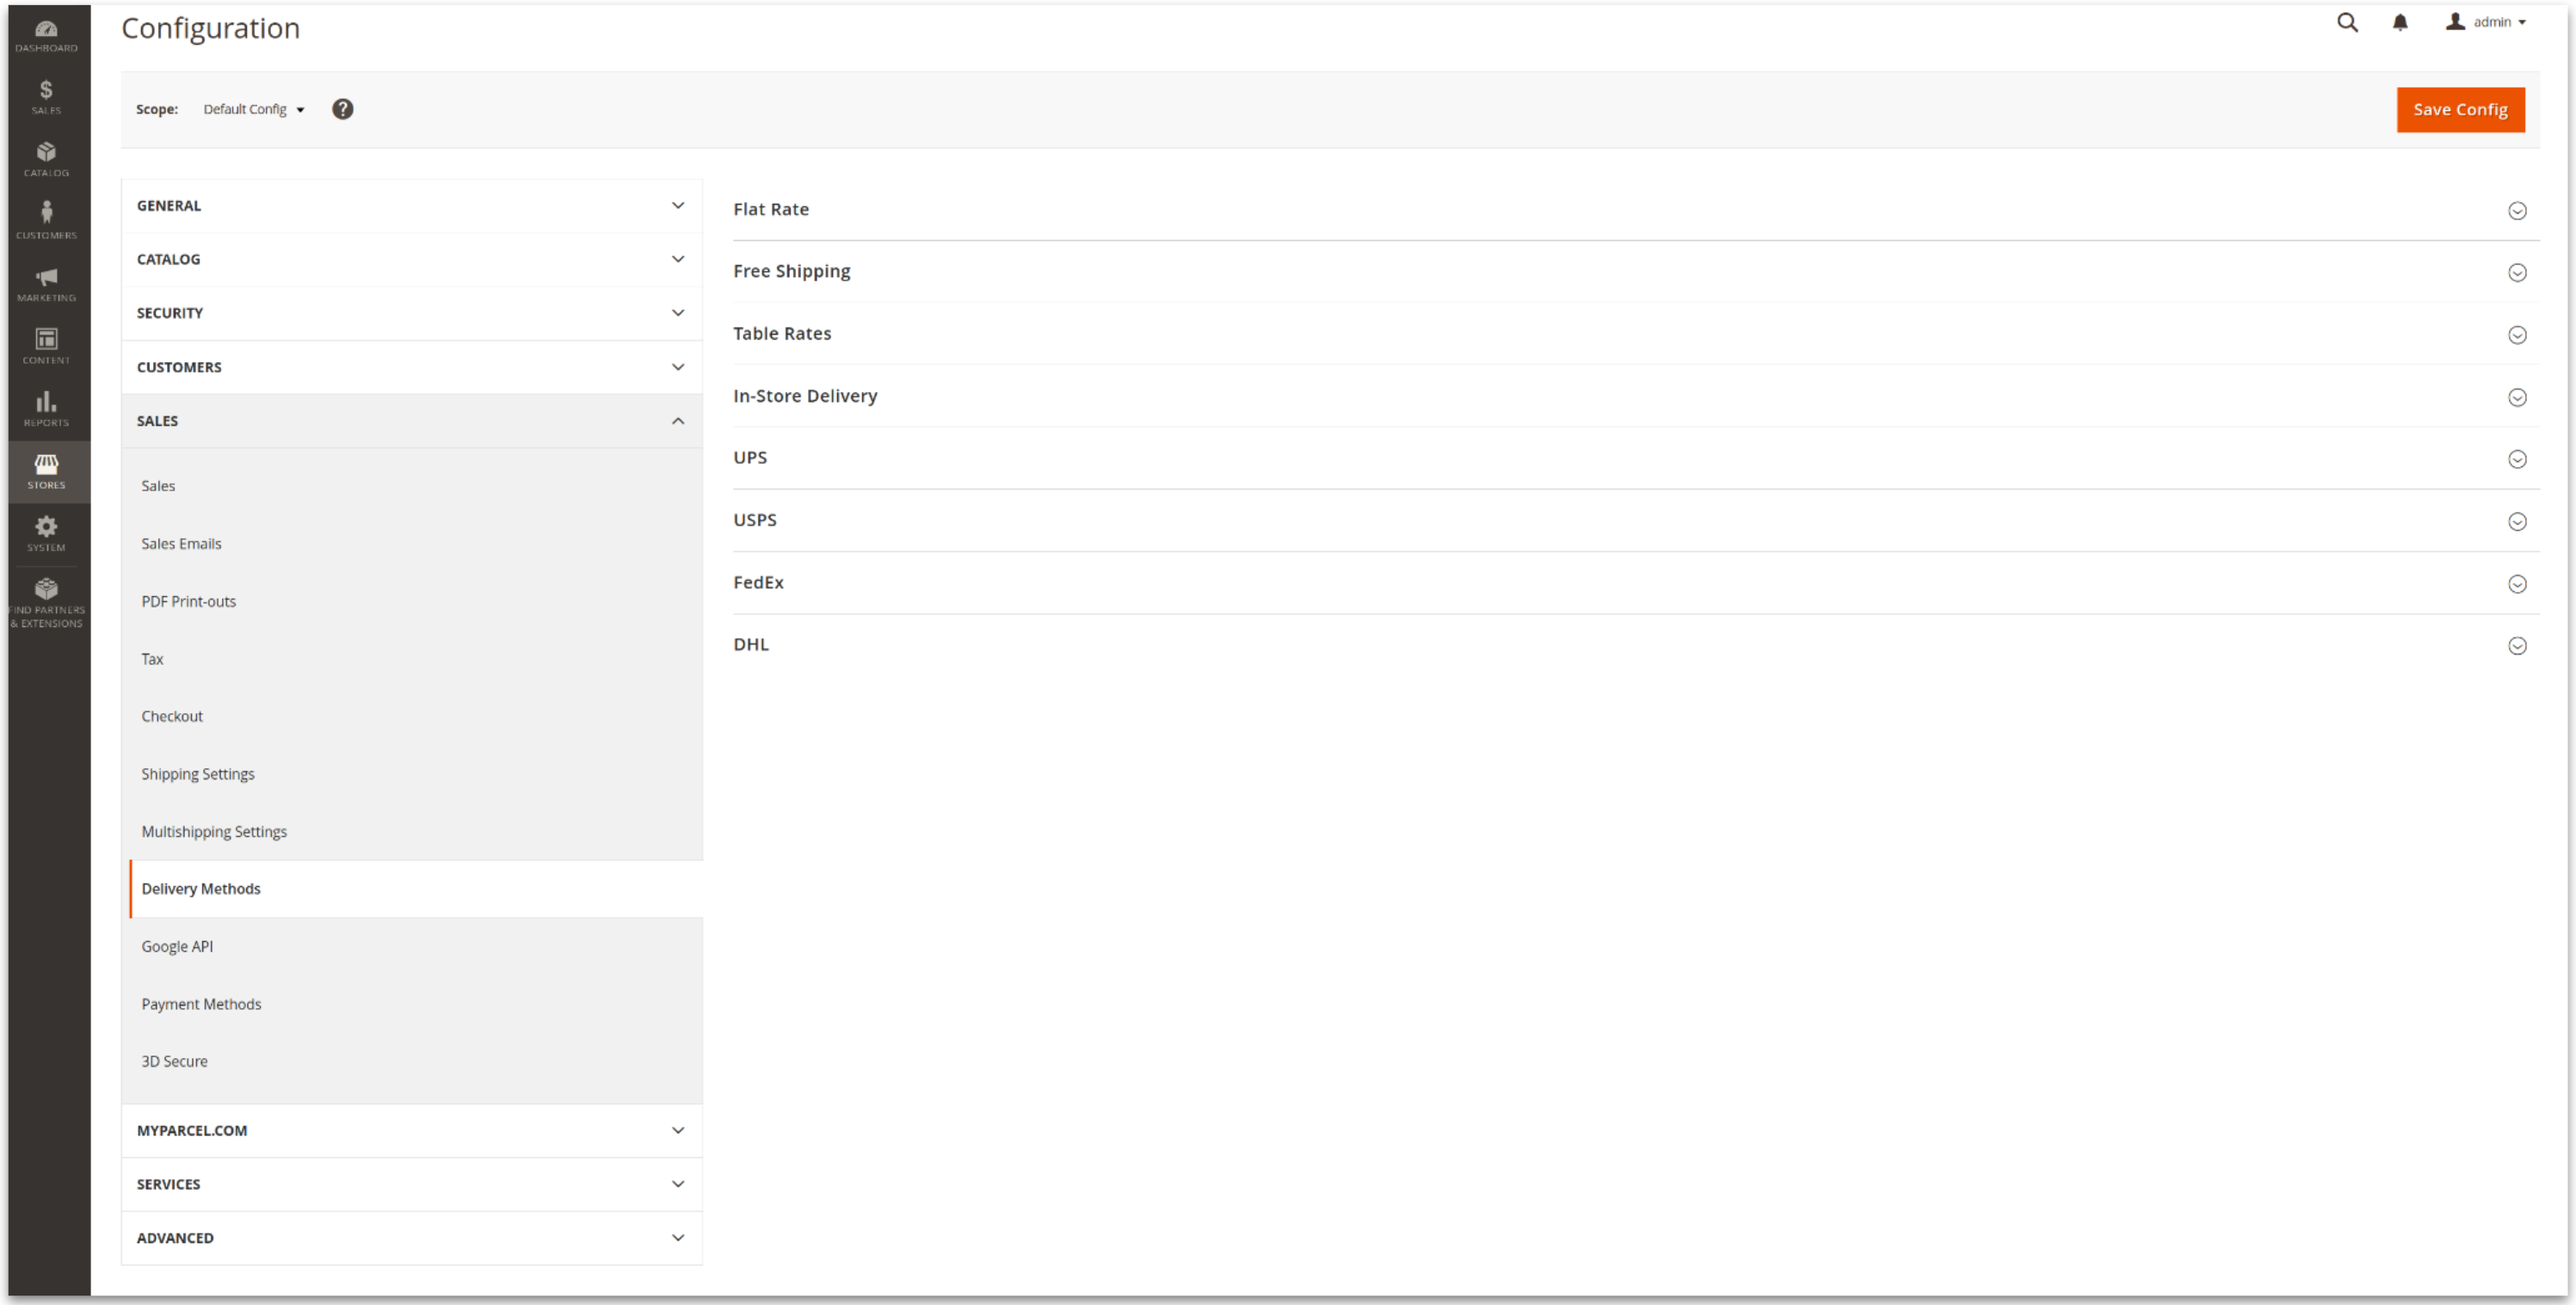
The Title field (name of the service) should be used with the MyParcel.com Automation rule tags.
4. Printing labels in Magento
Printing labels directly from Magento can be done in easy 2 steps:
Select orders to be shipped and save to MyParcel.com - Orders are assigned a carrier and service, the tracking number and label are sent back to Magento
Print carrier labels.
Select the checkboxes of orders that are ready to be shipped.

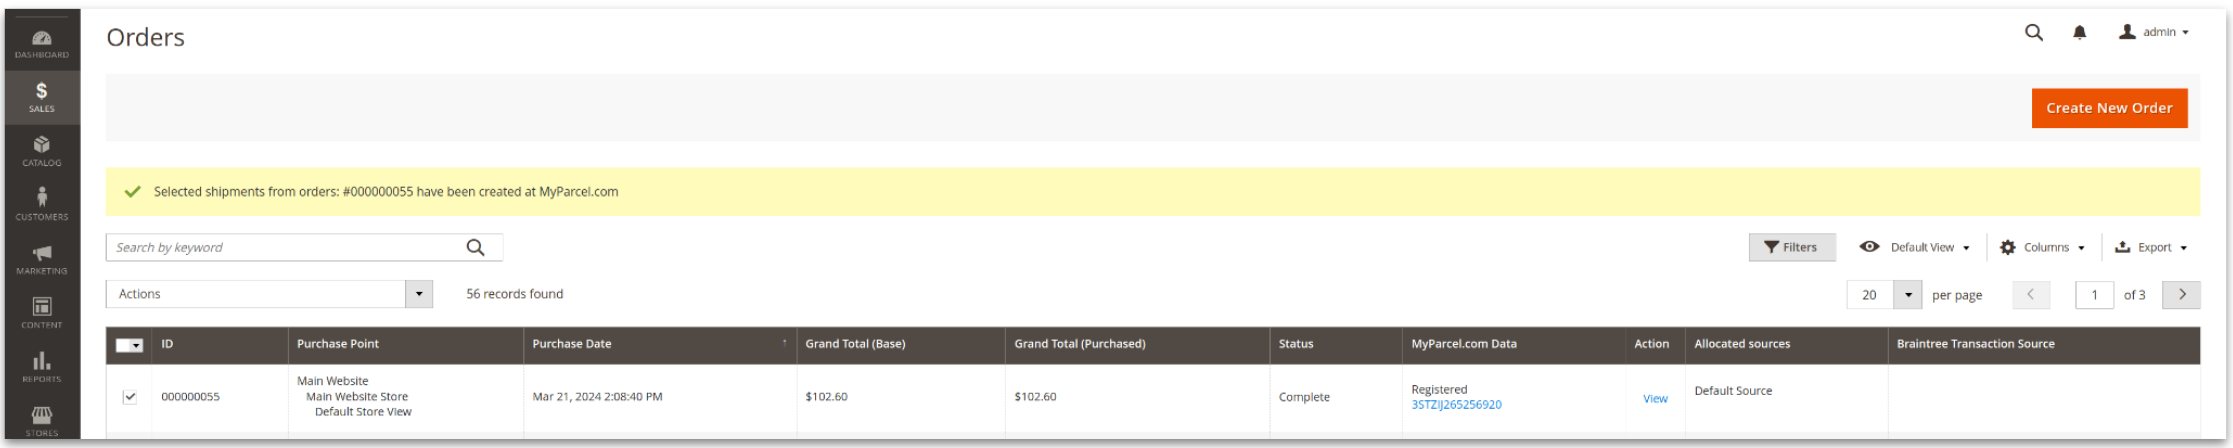
Now go the the Actions drop down field and select “Save orders to MyParcel.com.”
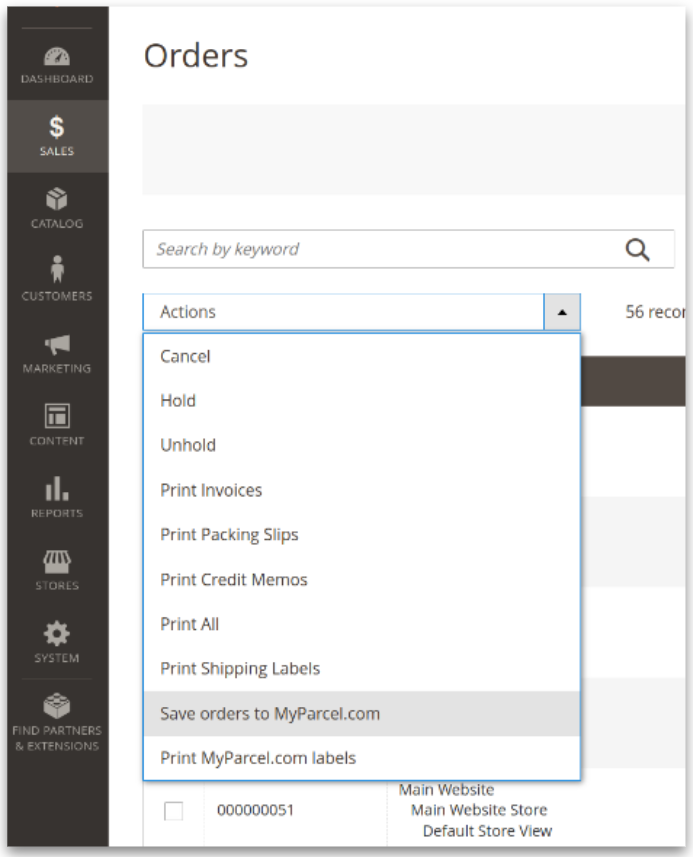
The orders will now have a registered carrier service attached.
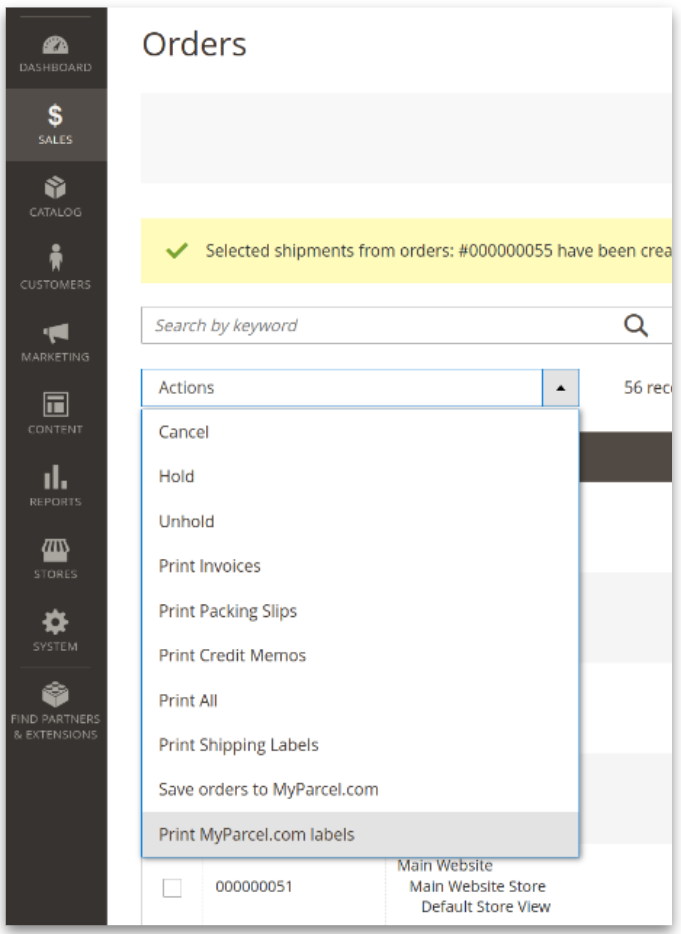
Select those same orders again
Now go the the Actions drop down field and select “Print MyParcel.com labels.”
Shopify
1. Installing app
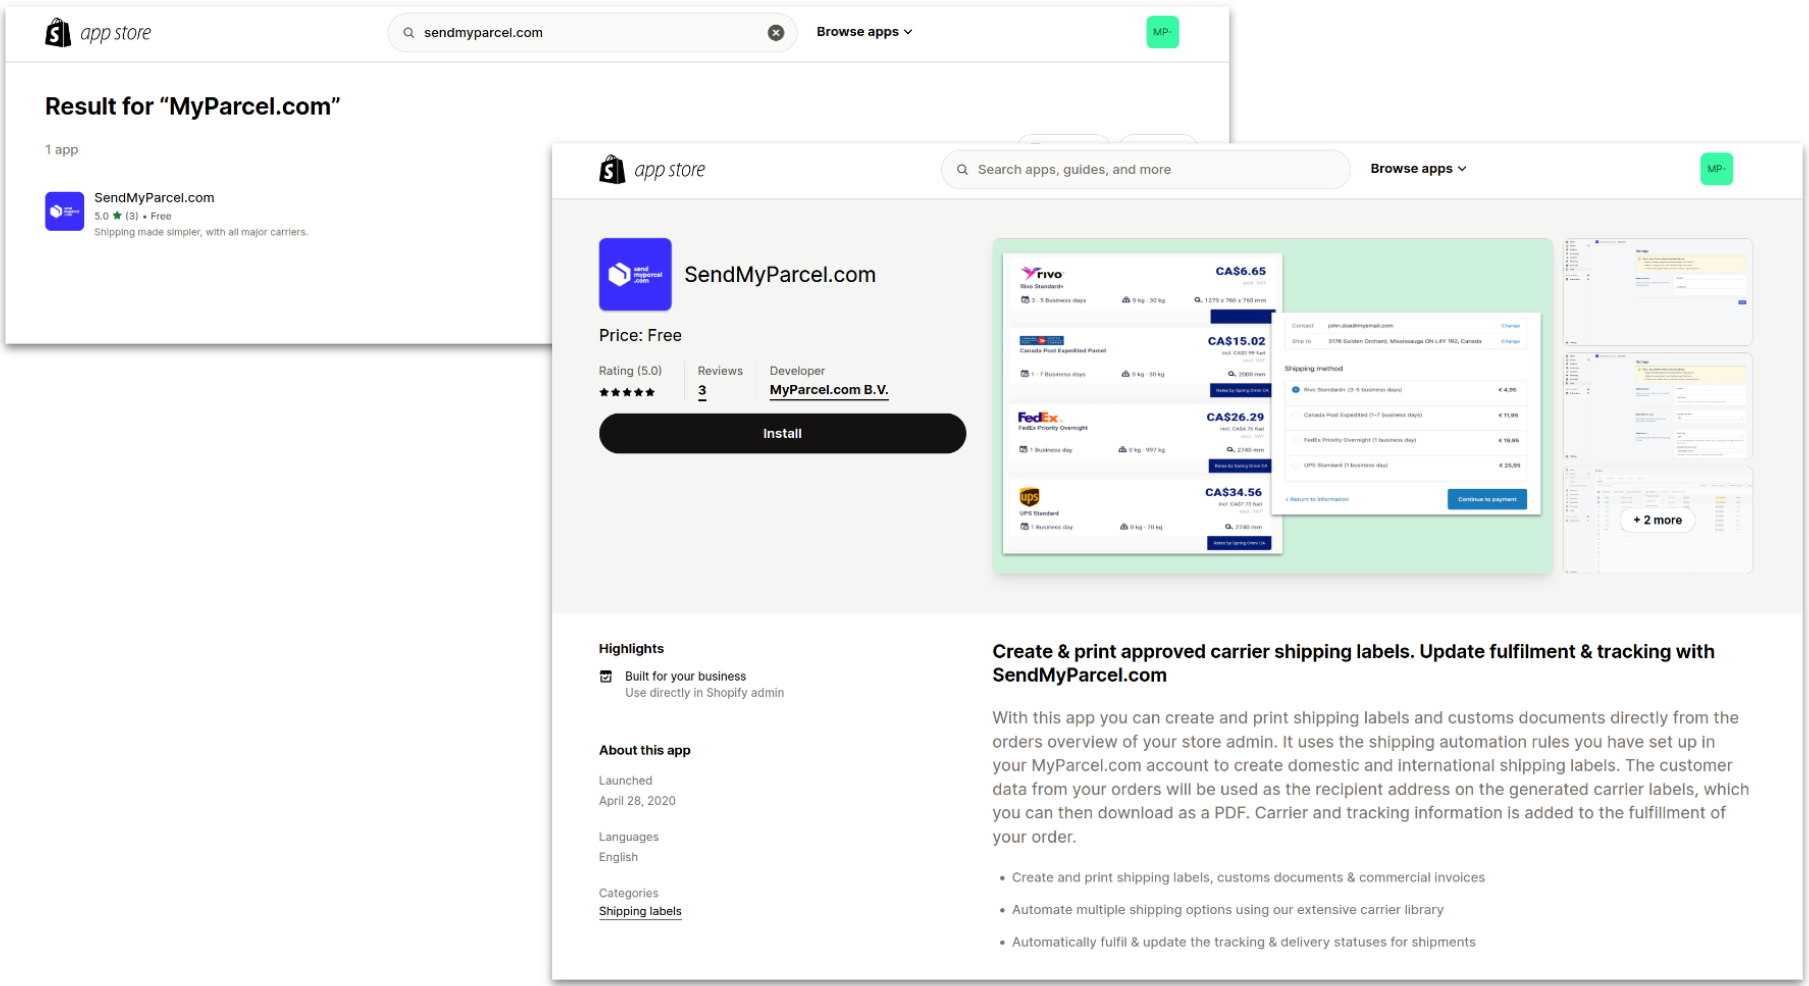
Navigate to ‘Apps and sales channels’ in the Shopify settings, followed by clicking “Shopify App Store.”
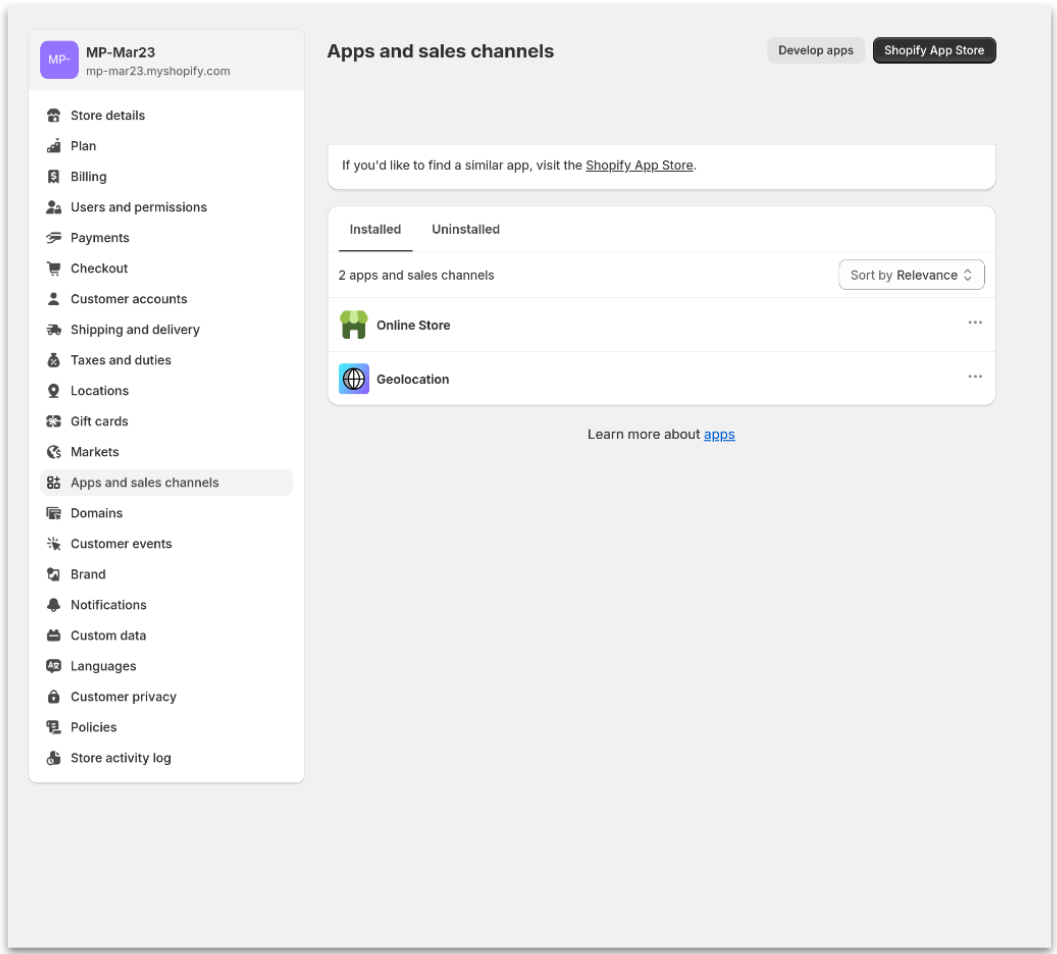
In the app store, search for SendMyParcel.com, followed by “Install.”
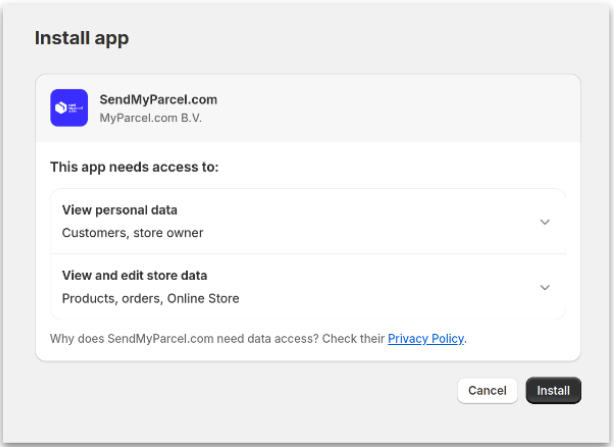
A pop up will now ask you to approve the apps access, click “Install.”
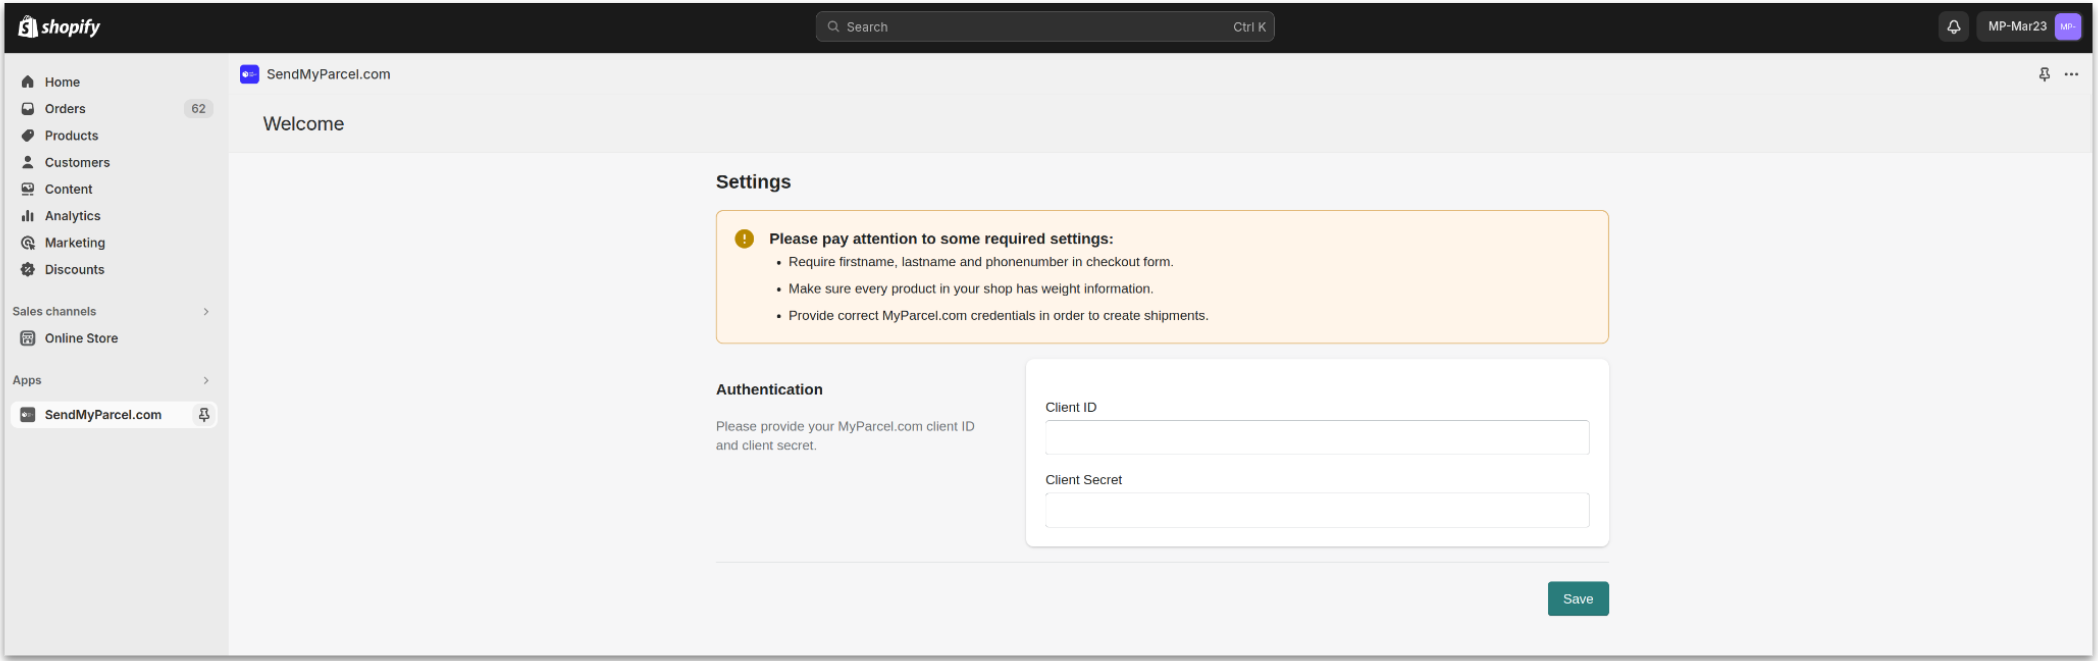
You will now be redirected to the app settings, ready to connect to MyParcel.com.
2. Connecting Shopify
Connecting Shopify is done in 2 steps:
Generate the Client ID & Secrect in MyParcel.com .
Configure the MyParcel.com Shopify app.
Generate the Client ID & Secrect in MyParcel.com by navigating to the Shipping integration setting in MyParcel.com and click “Create client” under Shopify.
Configure the MyParcel.com Shopify plugin.
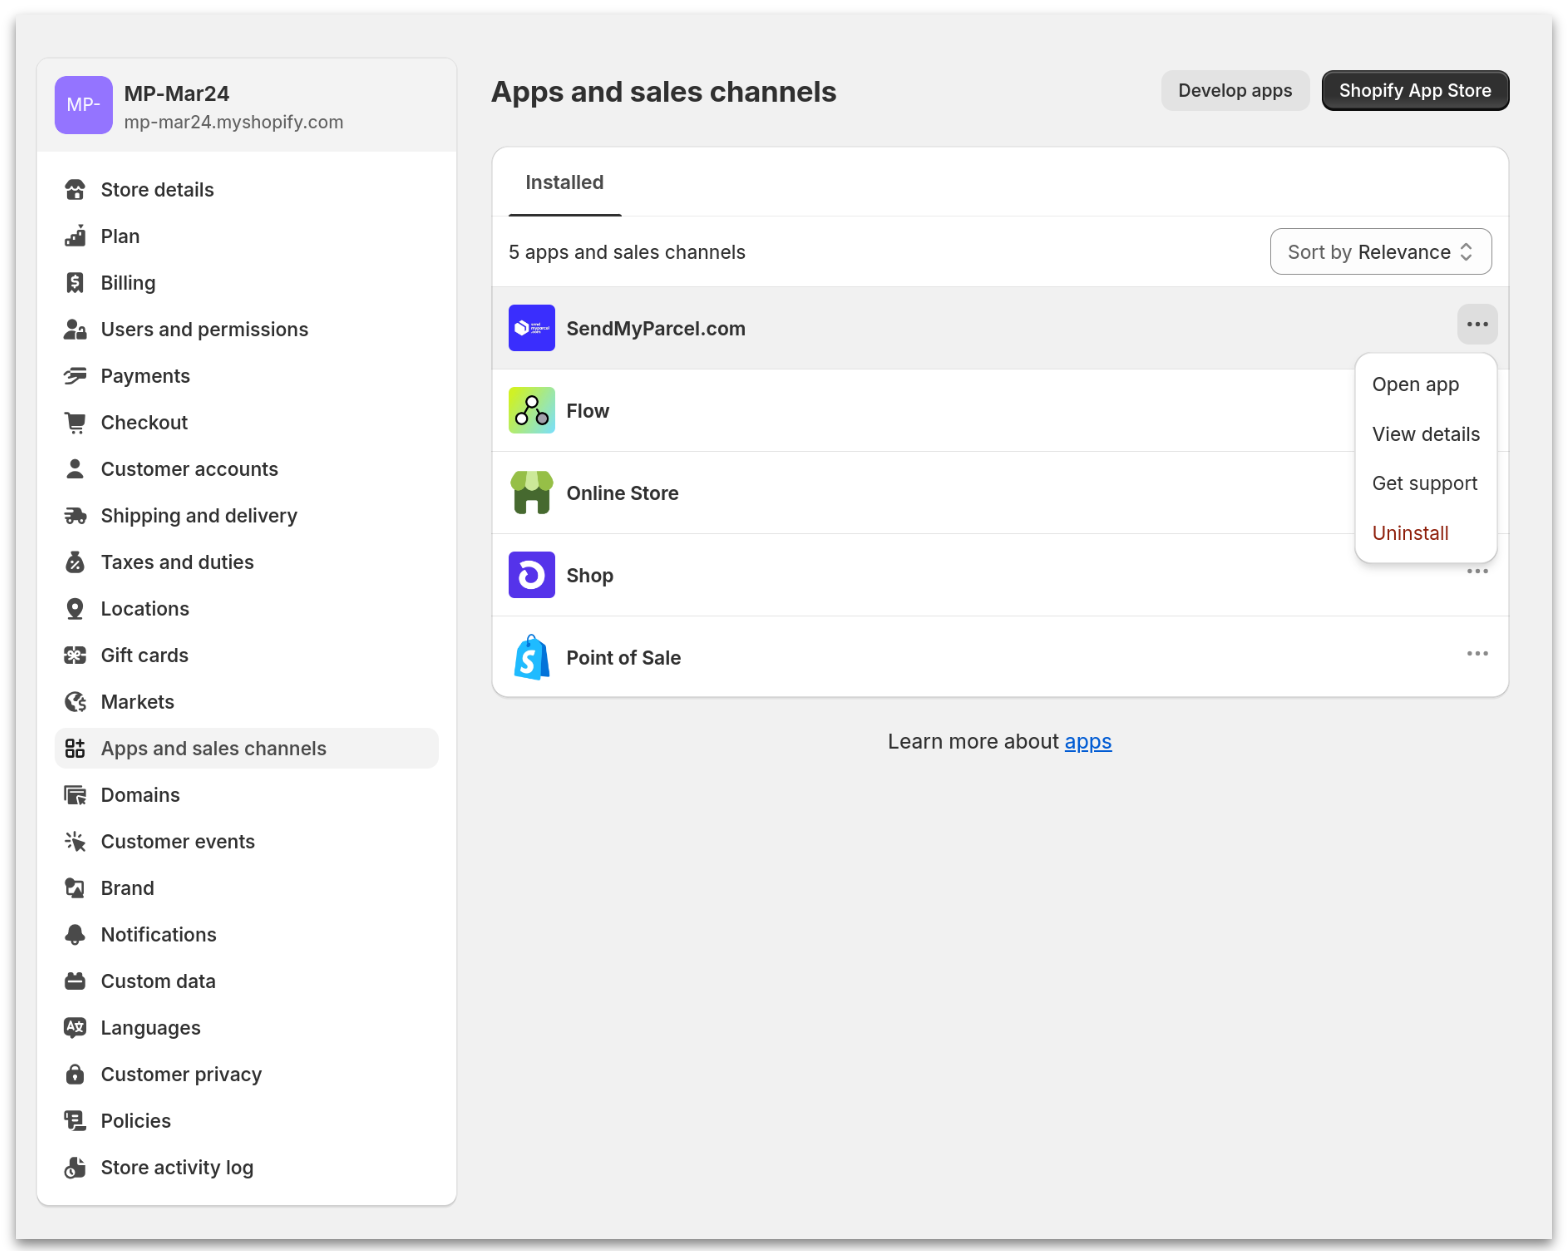
Got to “Settings”, “Apps and sales channels,” followed by clicking the 3 dots to the right of the SendMyParcel.com app and now clicking “Open up.”
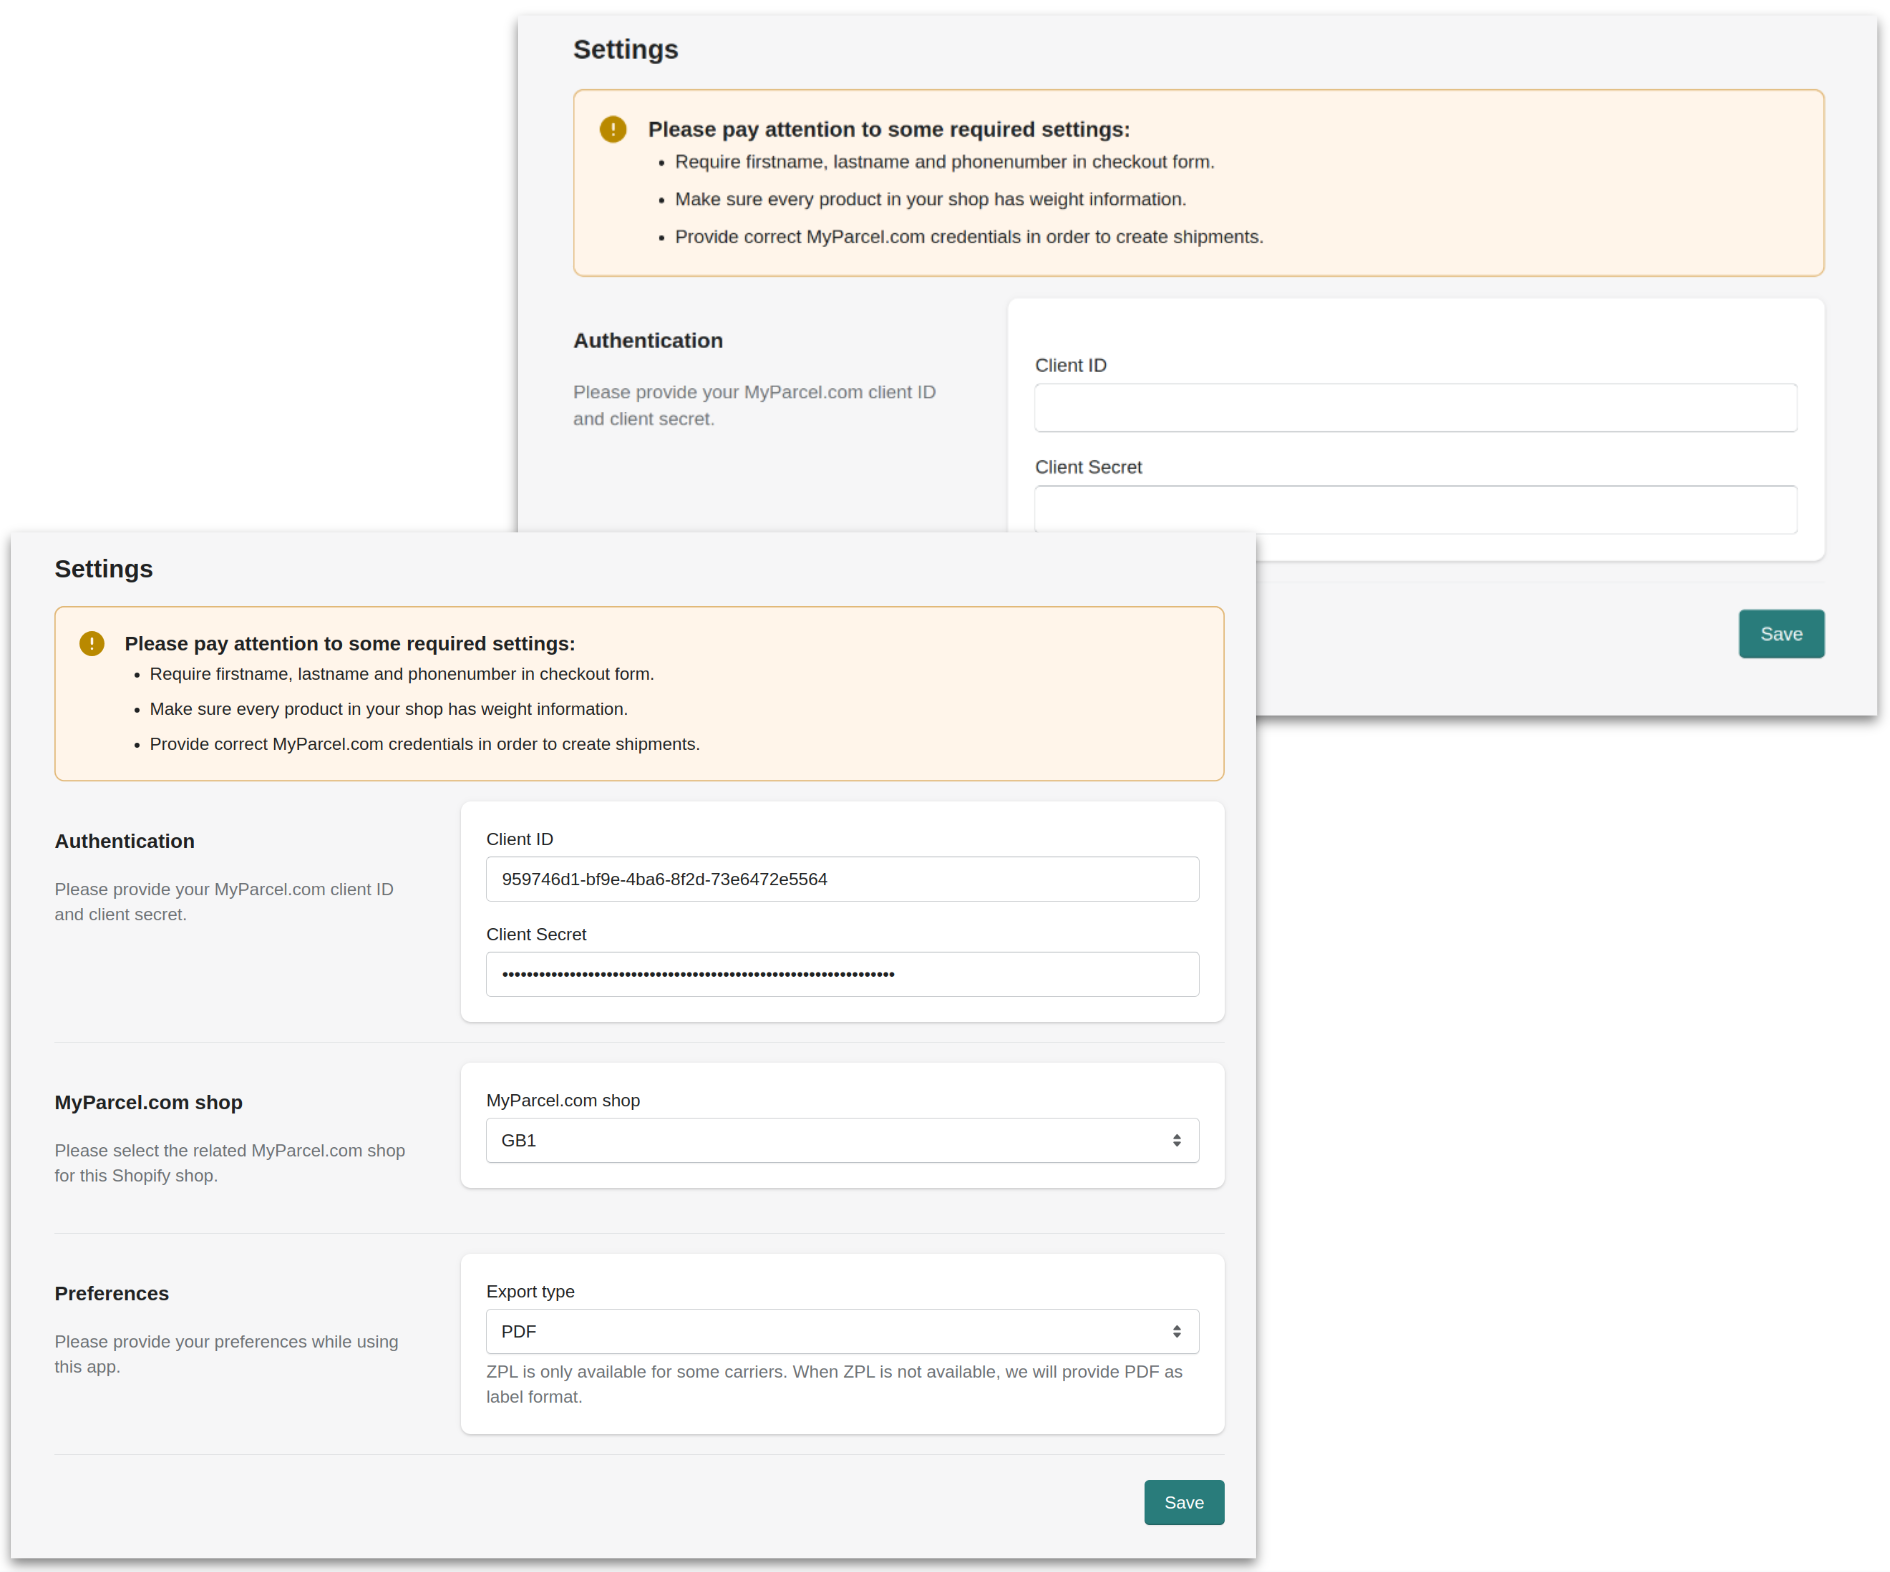
Fill in the Client ID and Client Secret that you generated in step 1 and click “Save.”
Two new fields will appear.
If you have multiple shops, select the correct one.
Confirm the preferred label format and click “Save” one more time.
Your Shopify store is now connected!
3. Checkout shipping options
Go to ‘Shipping and delivery’ in the Shopiffy settings.
Select “General shipping rates.”
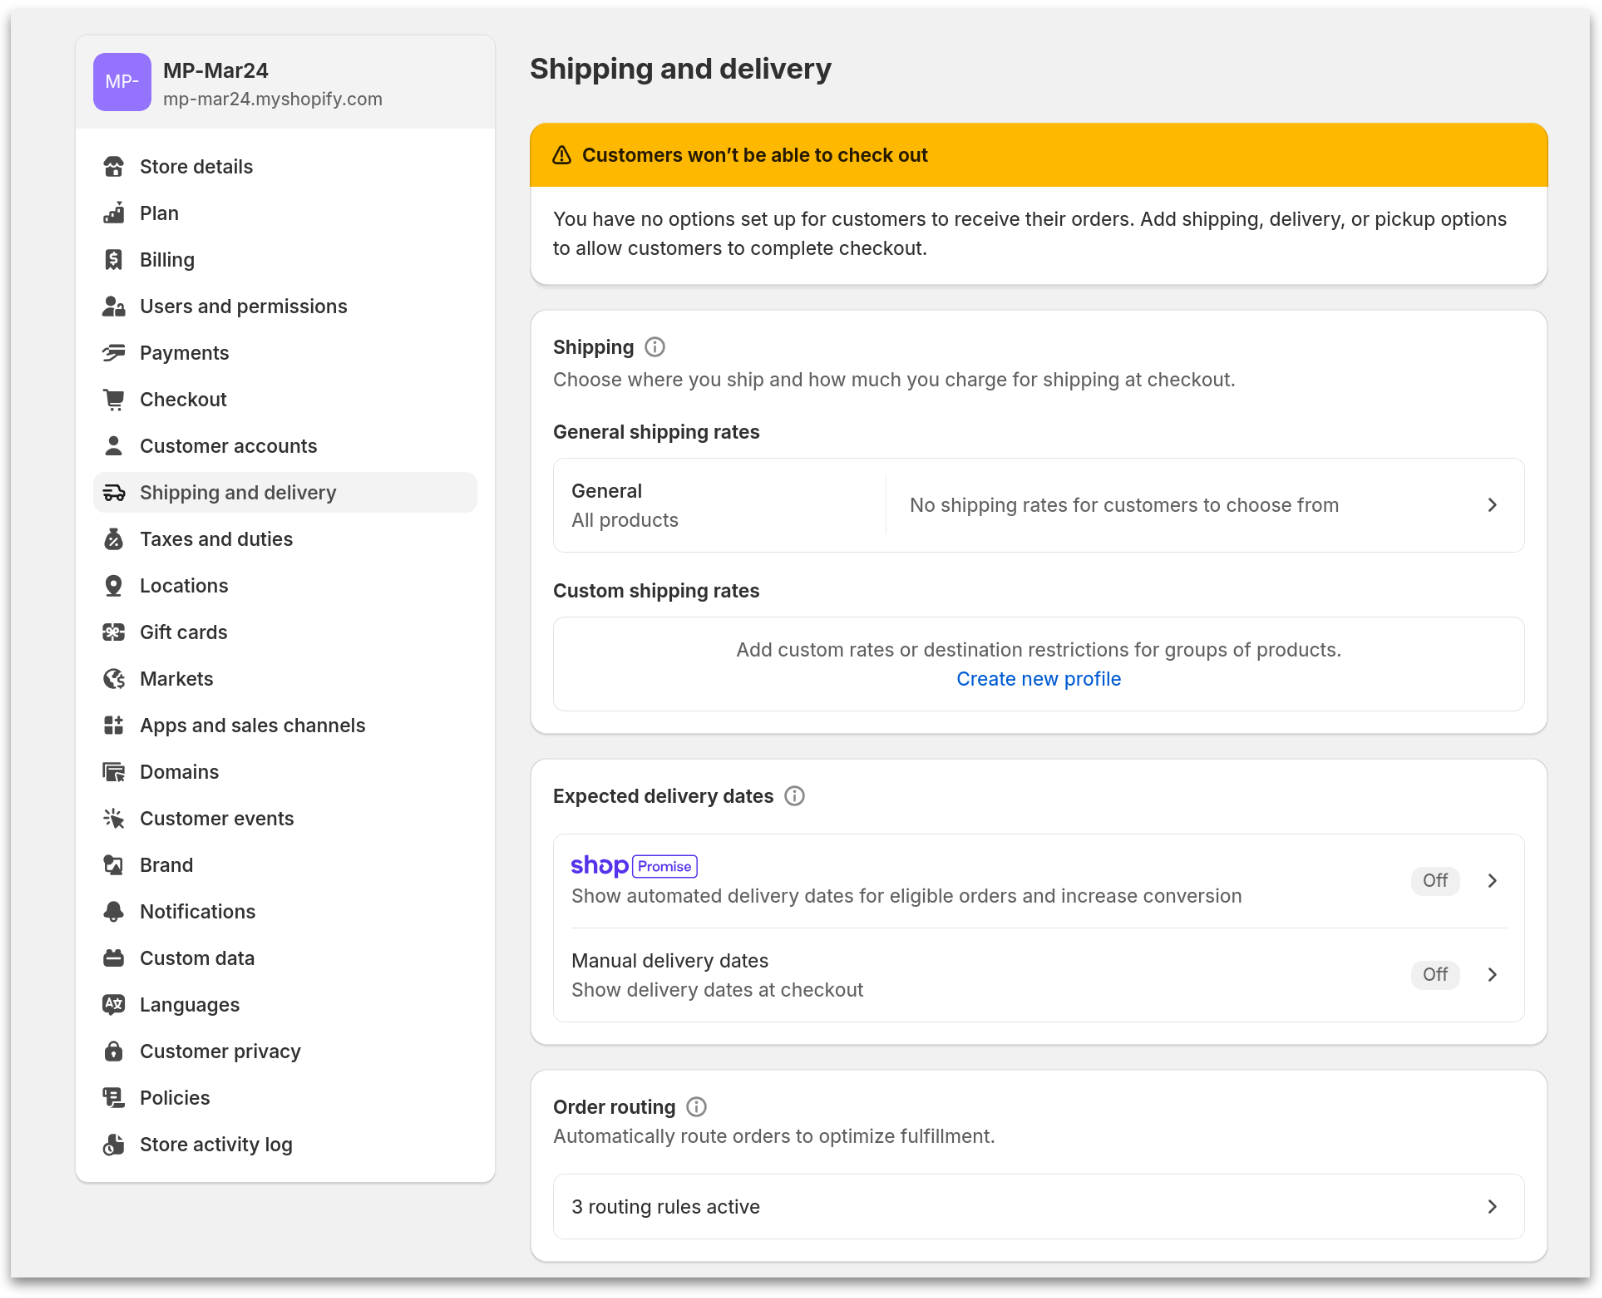
Next to Shipping zones, select “Create zone.”
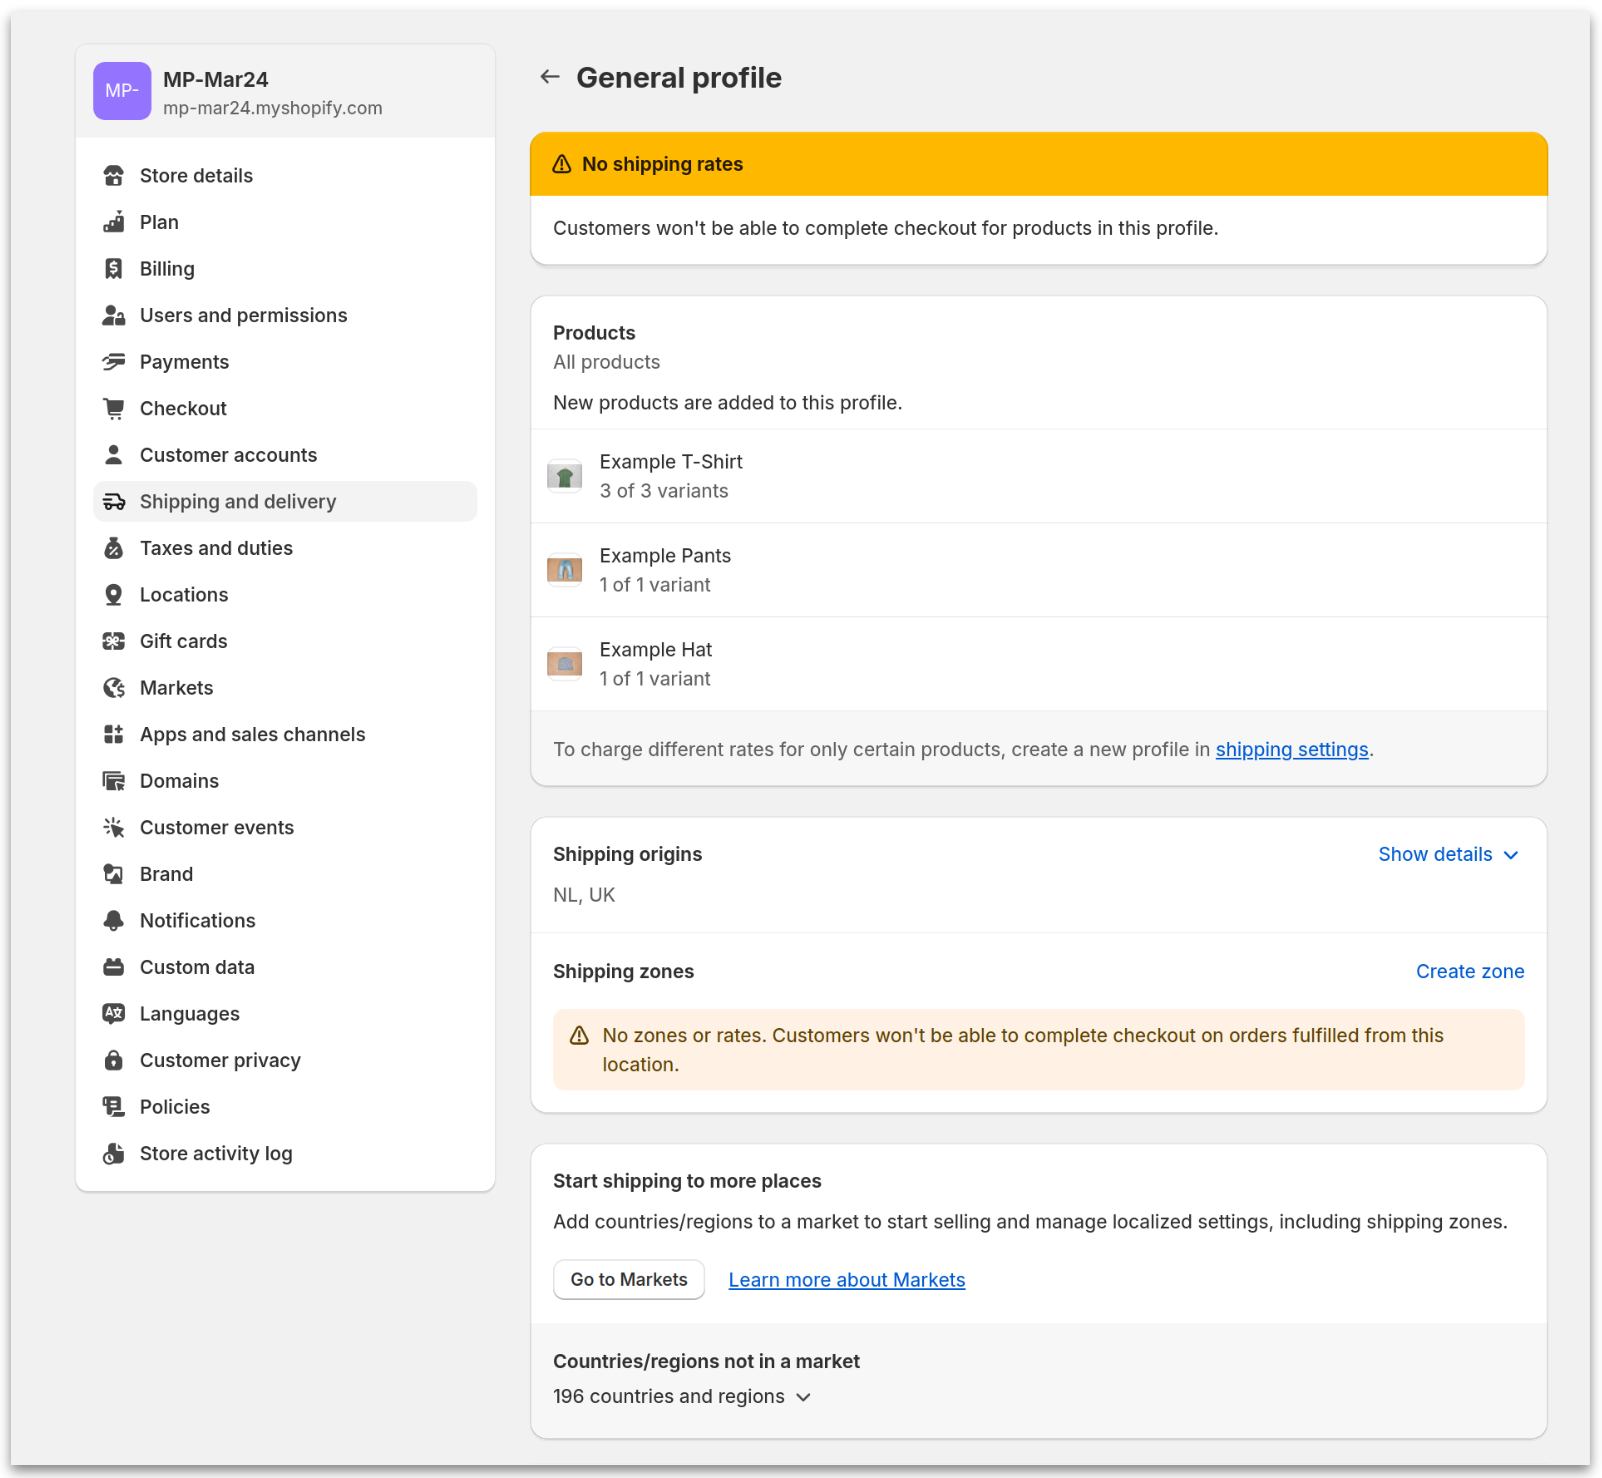
Give the zone a name, select the required countries and then click “Done.”
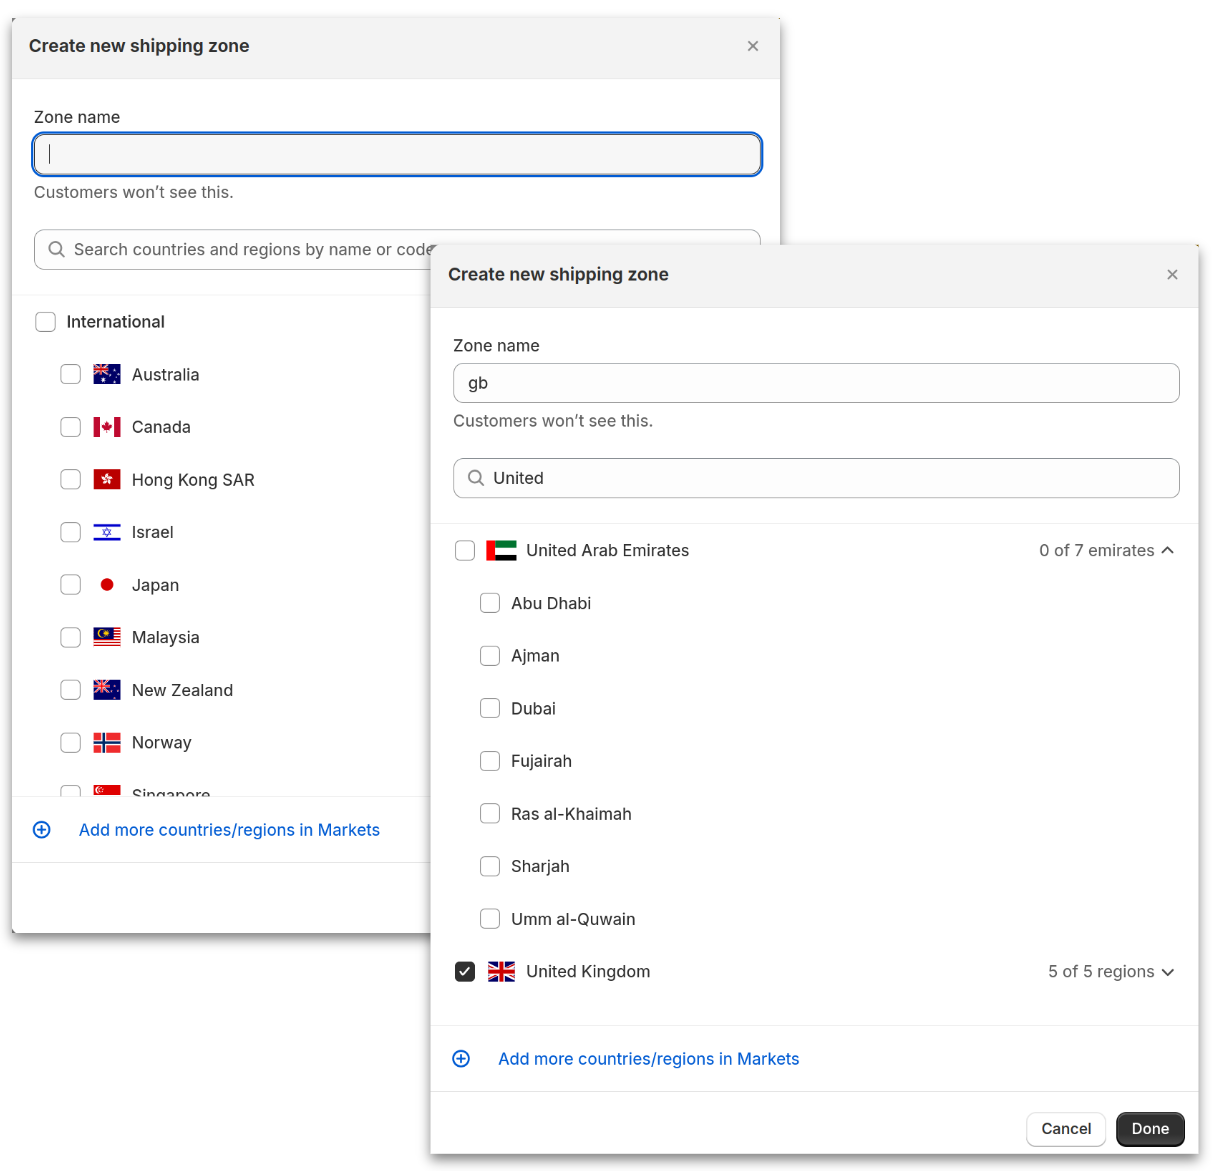
The new zone will now be visible.
All zones require rates.
Underneath the new zone, click “Add rate.”
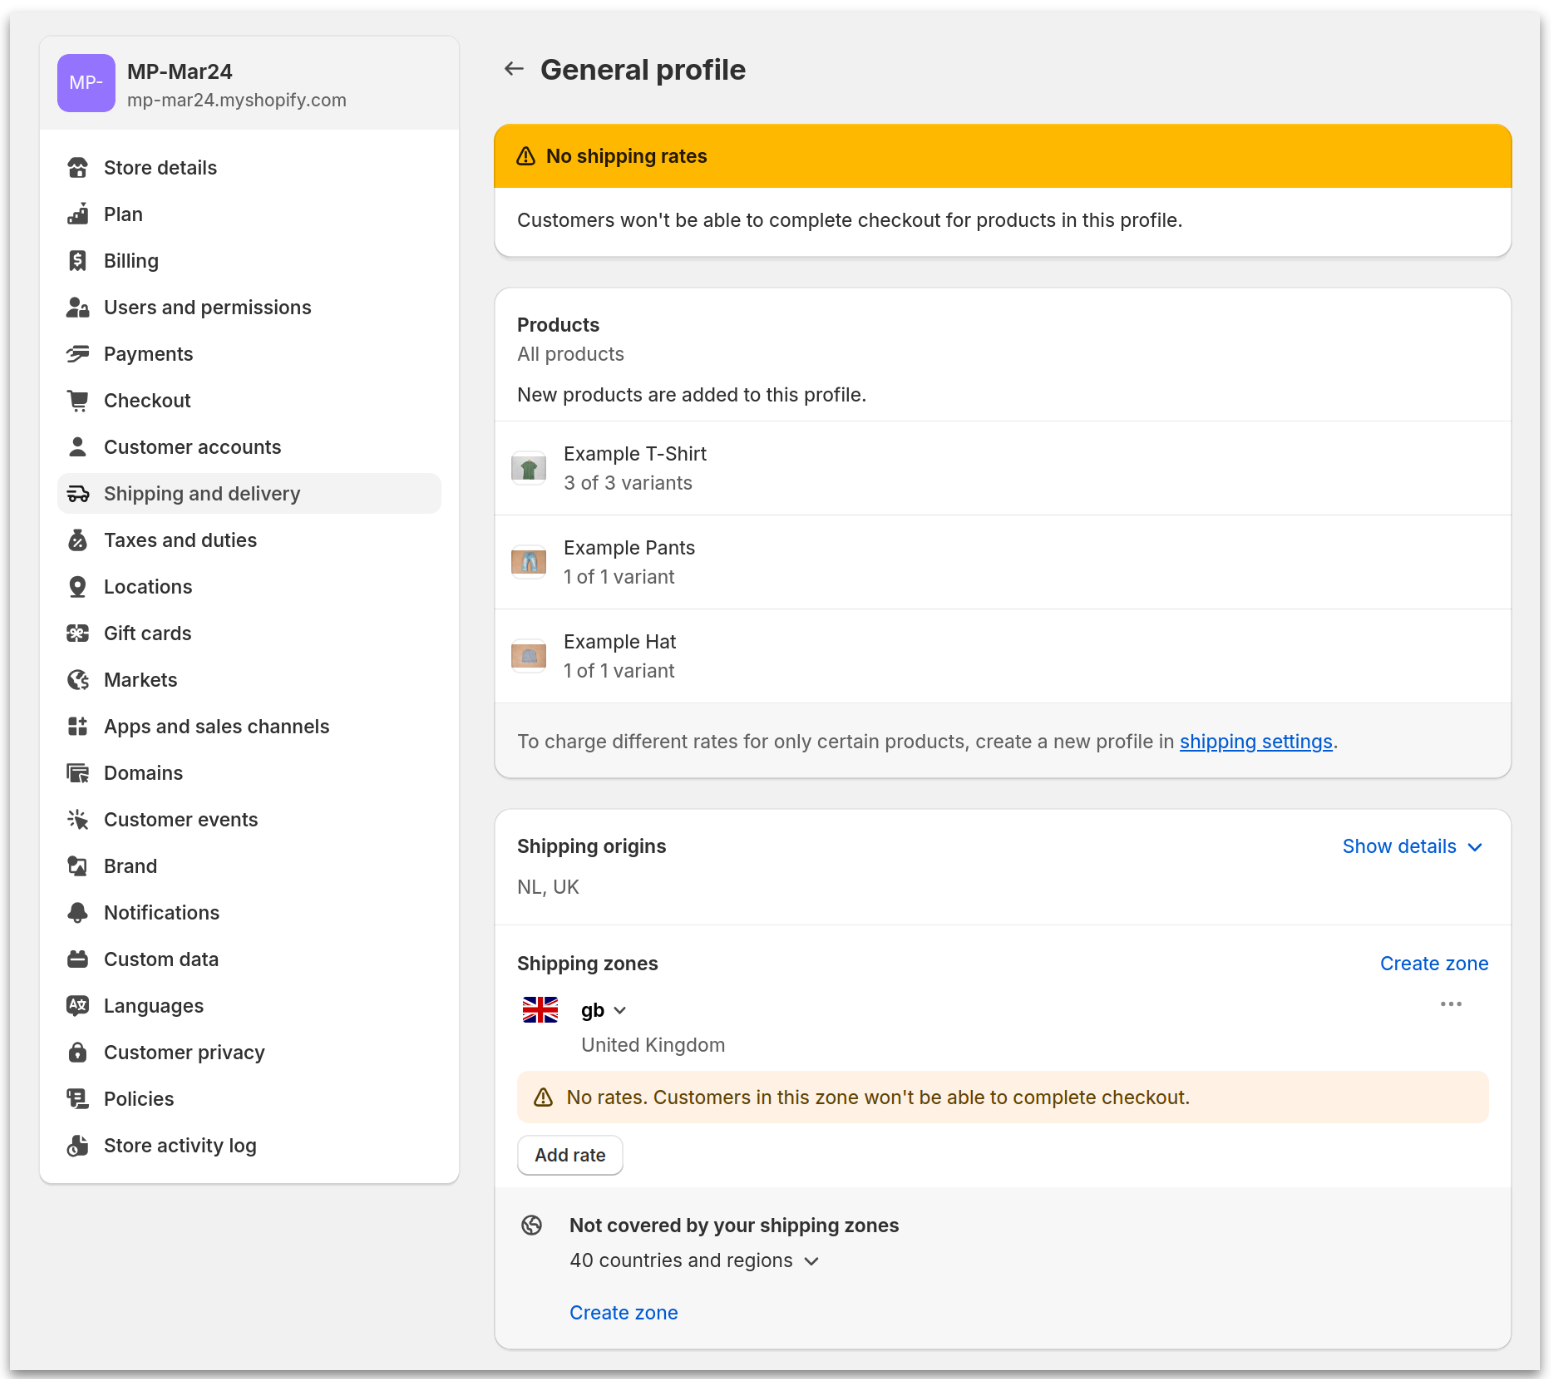
Set the rate name, value and click “Done.”
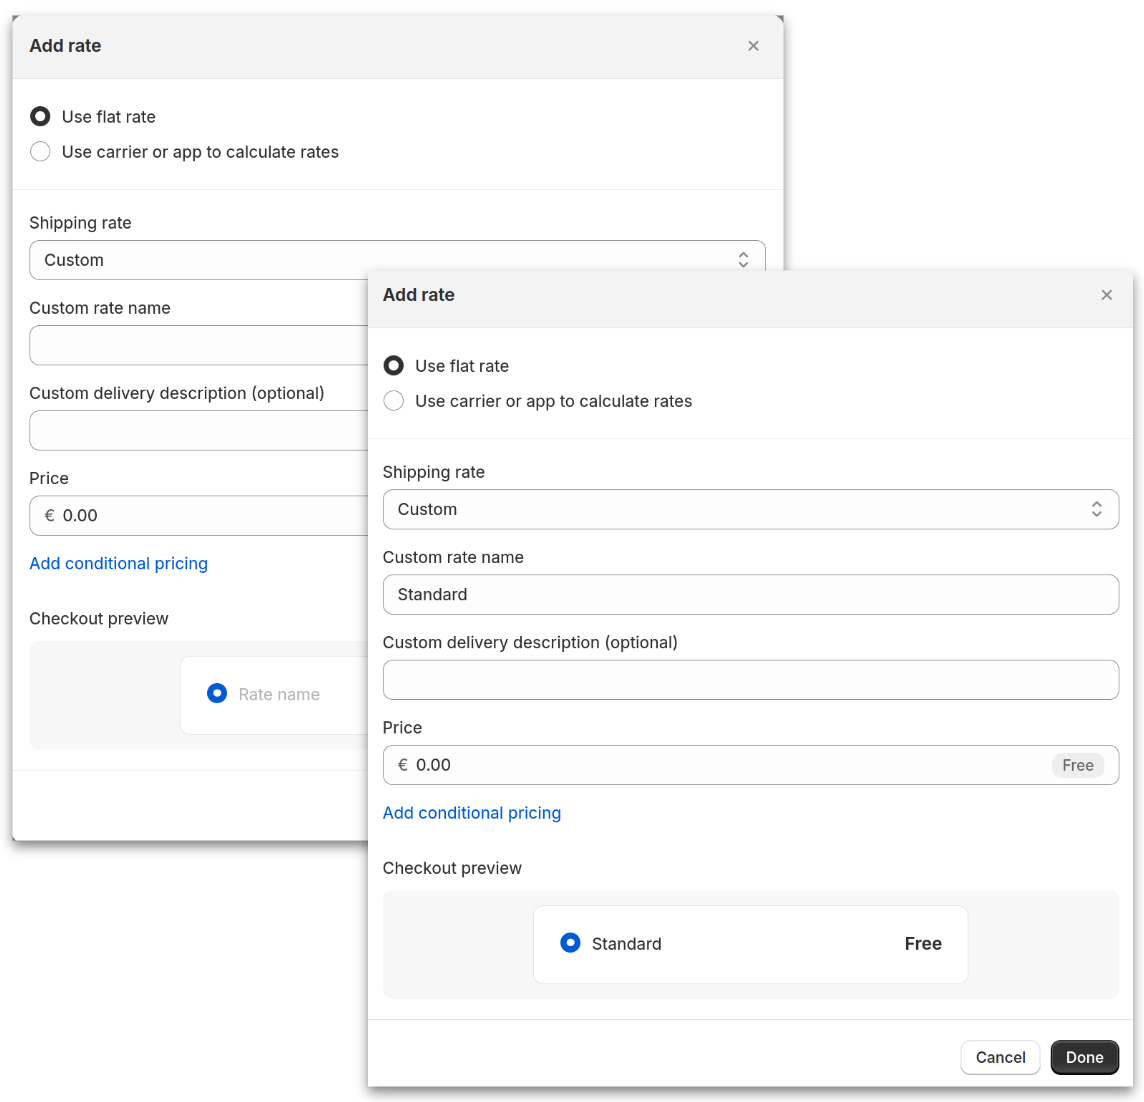
The Rate name that you choose should be copied exactly into our shipping rule tags in order for the system to assign the correct carrier & service as chosen by your customer.
Set as many services rates as needed per zone.
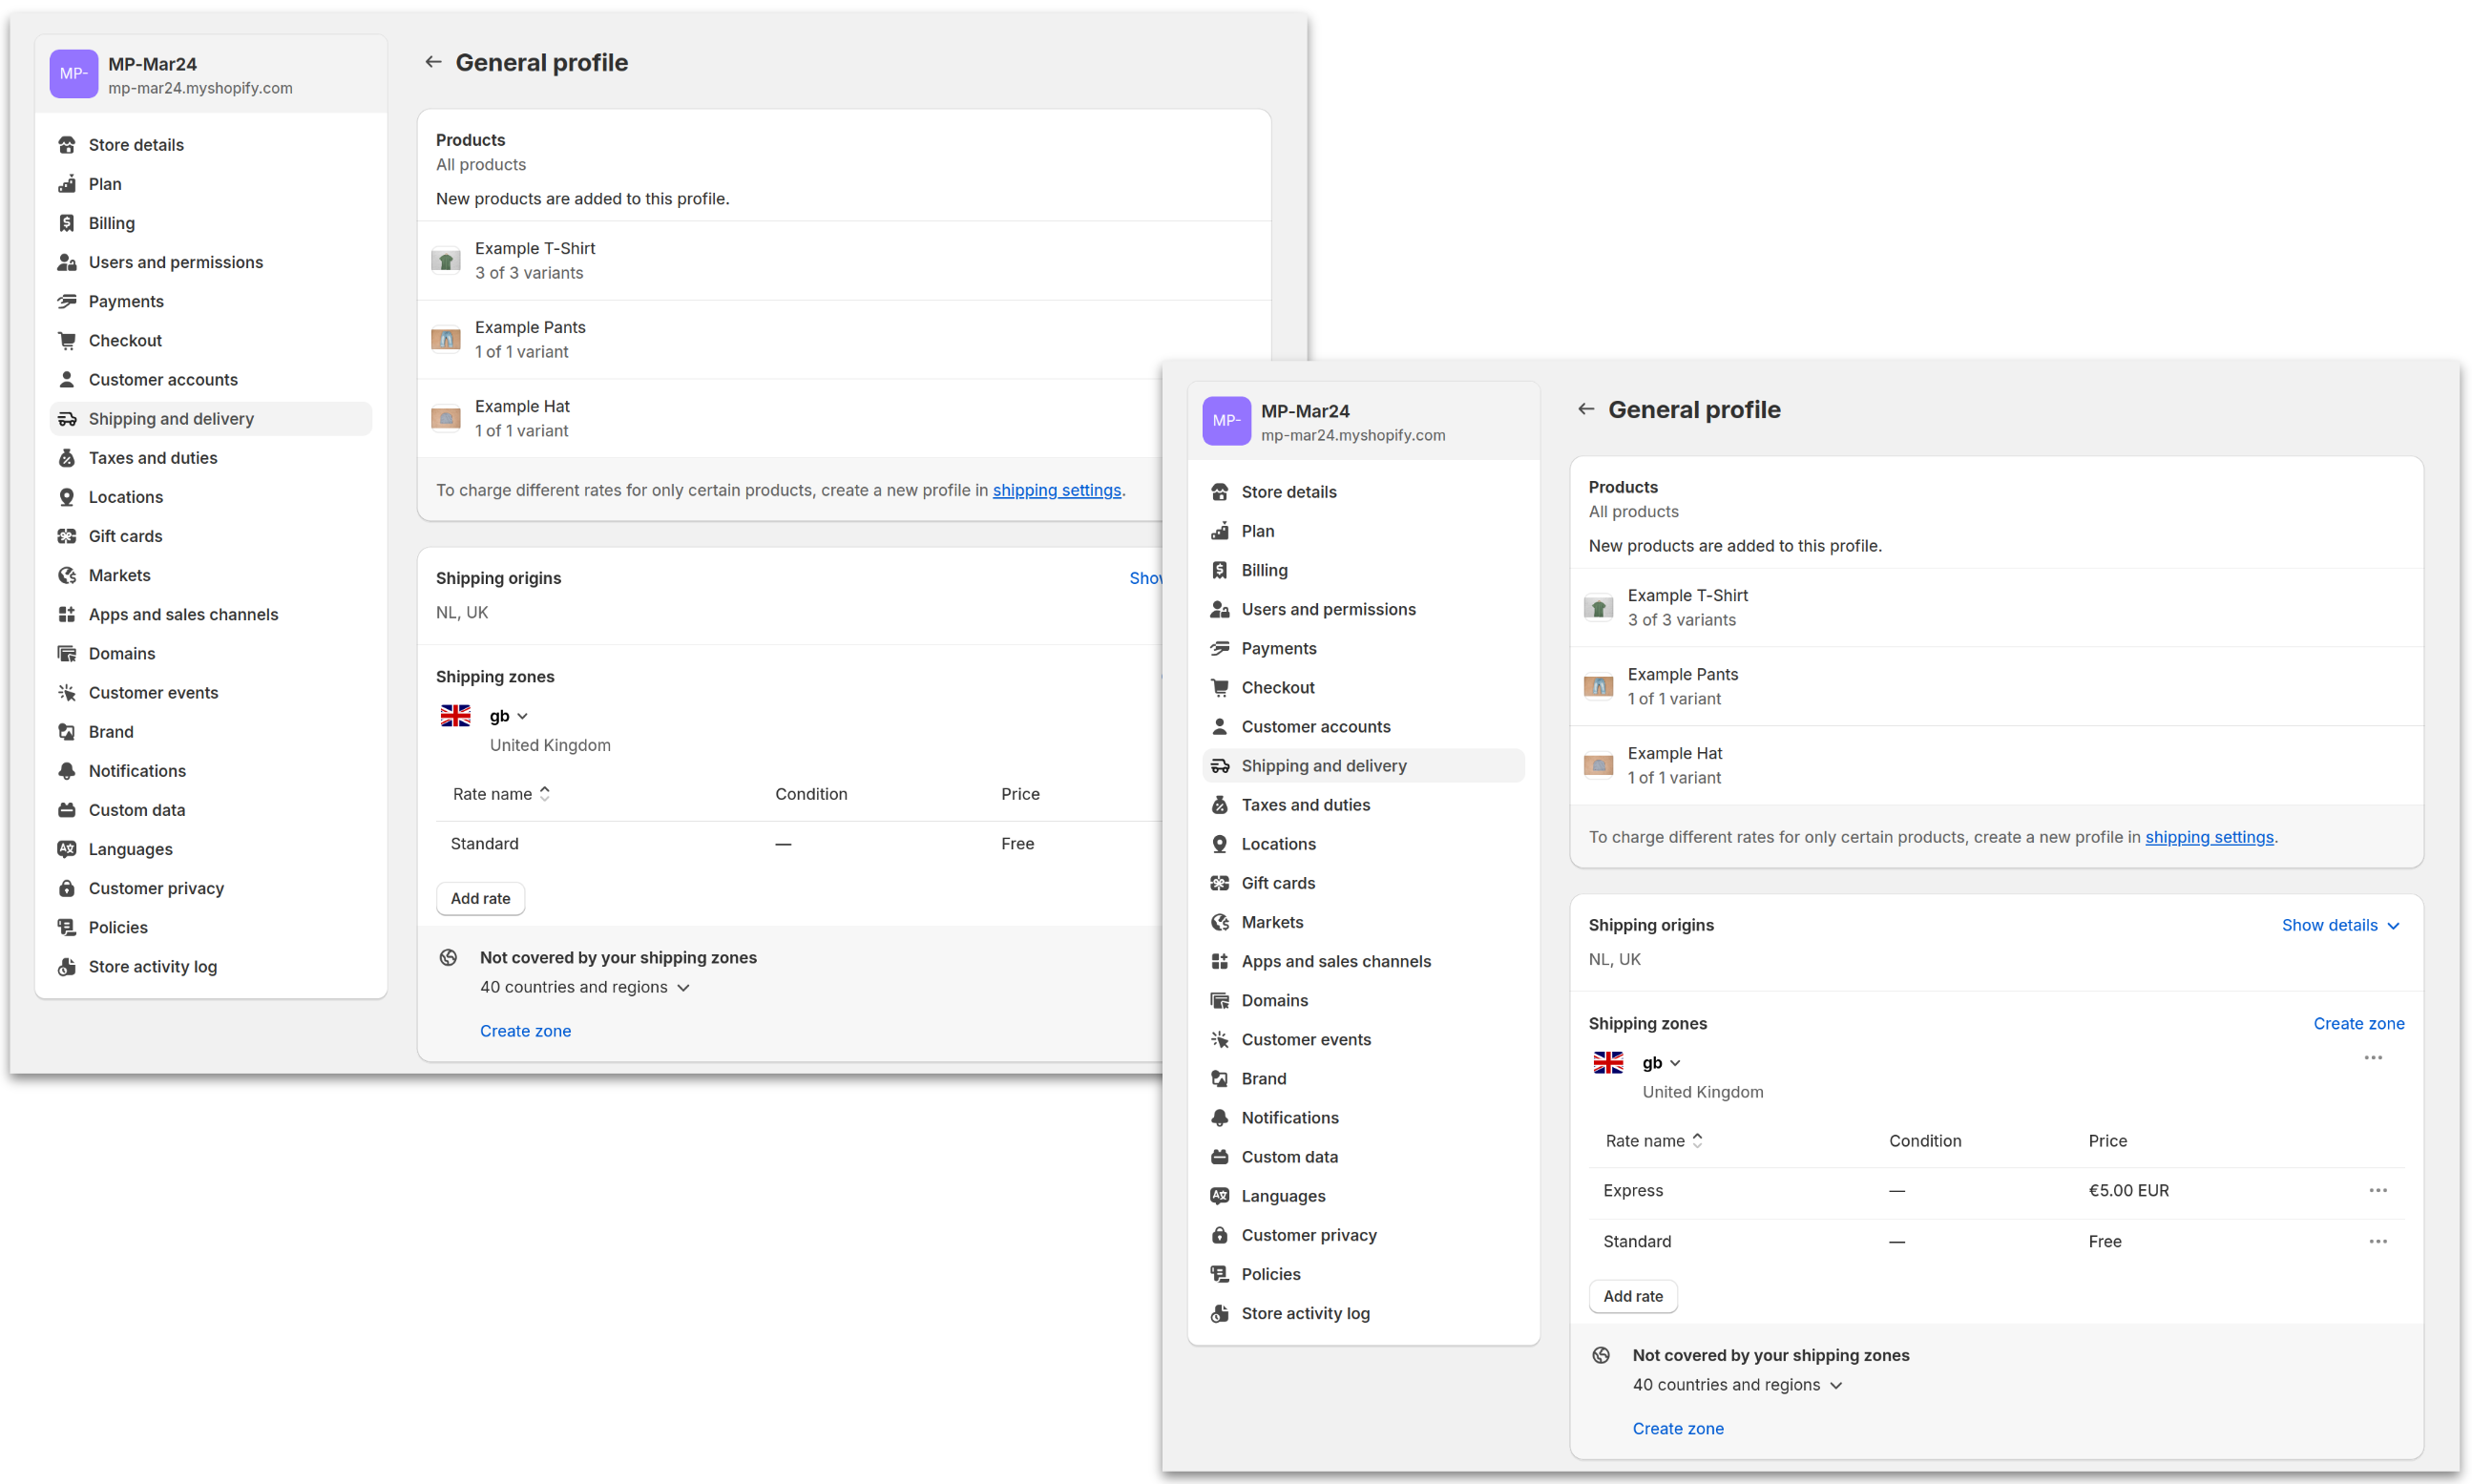
Your delivery options will now be visible in your checkout.
4. Printing labels in Shopify
Select the orders that you want to print labels for.
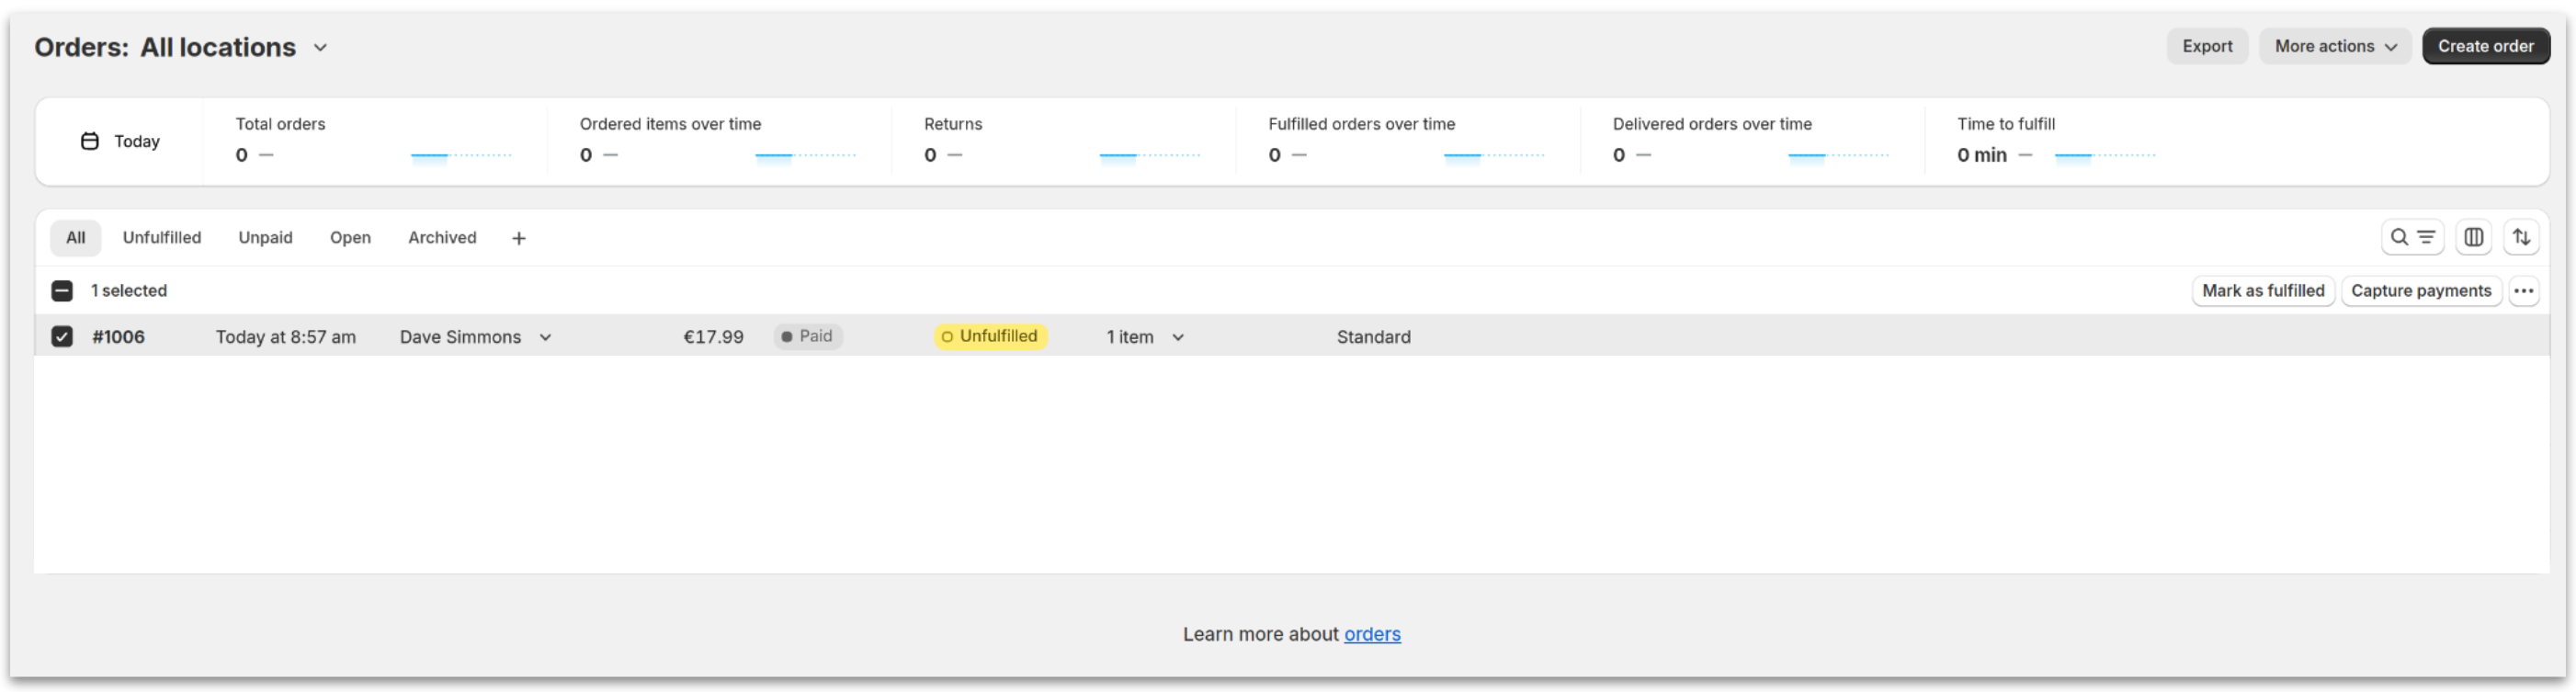
Click on the 3 dots towards the right hand side of the page and select “Print label(s).”
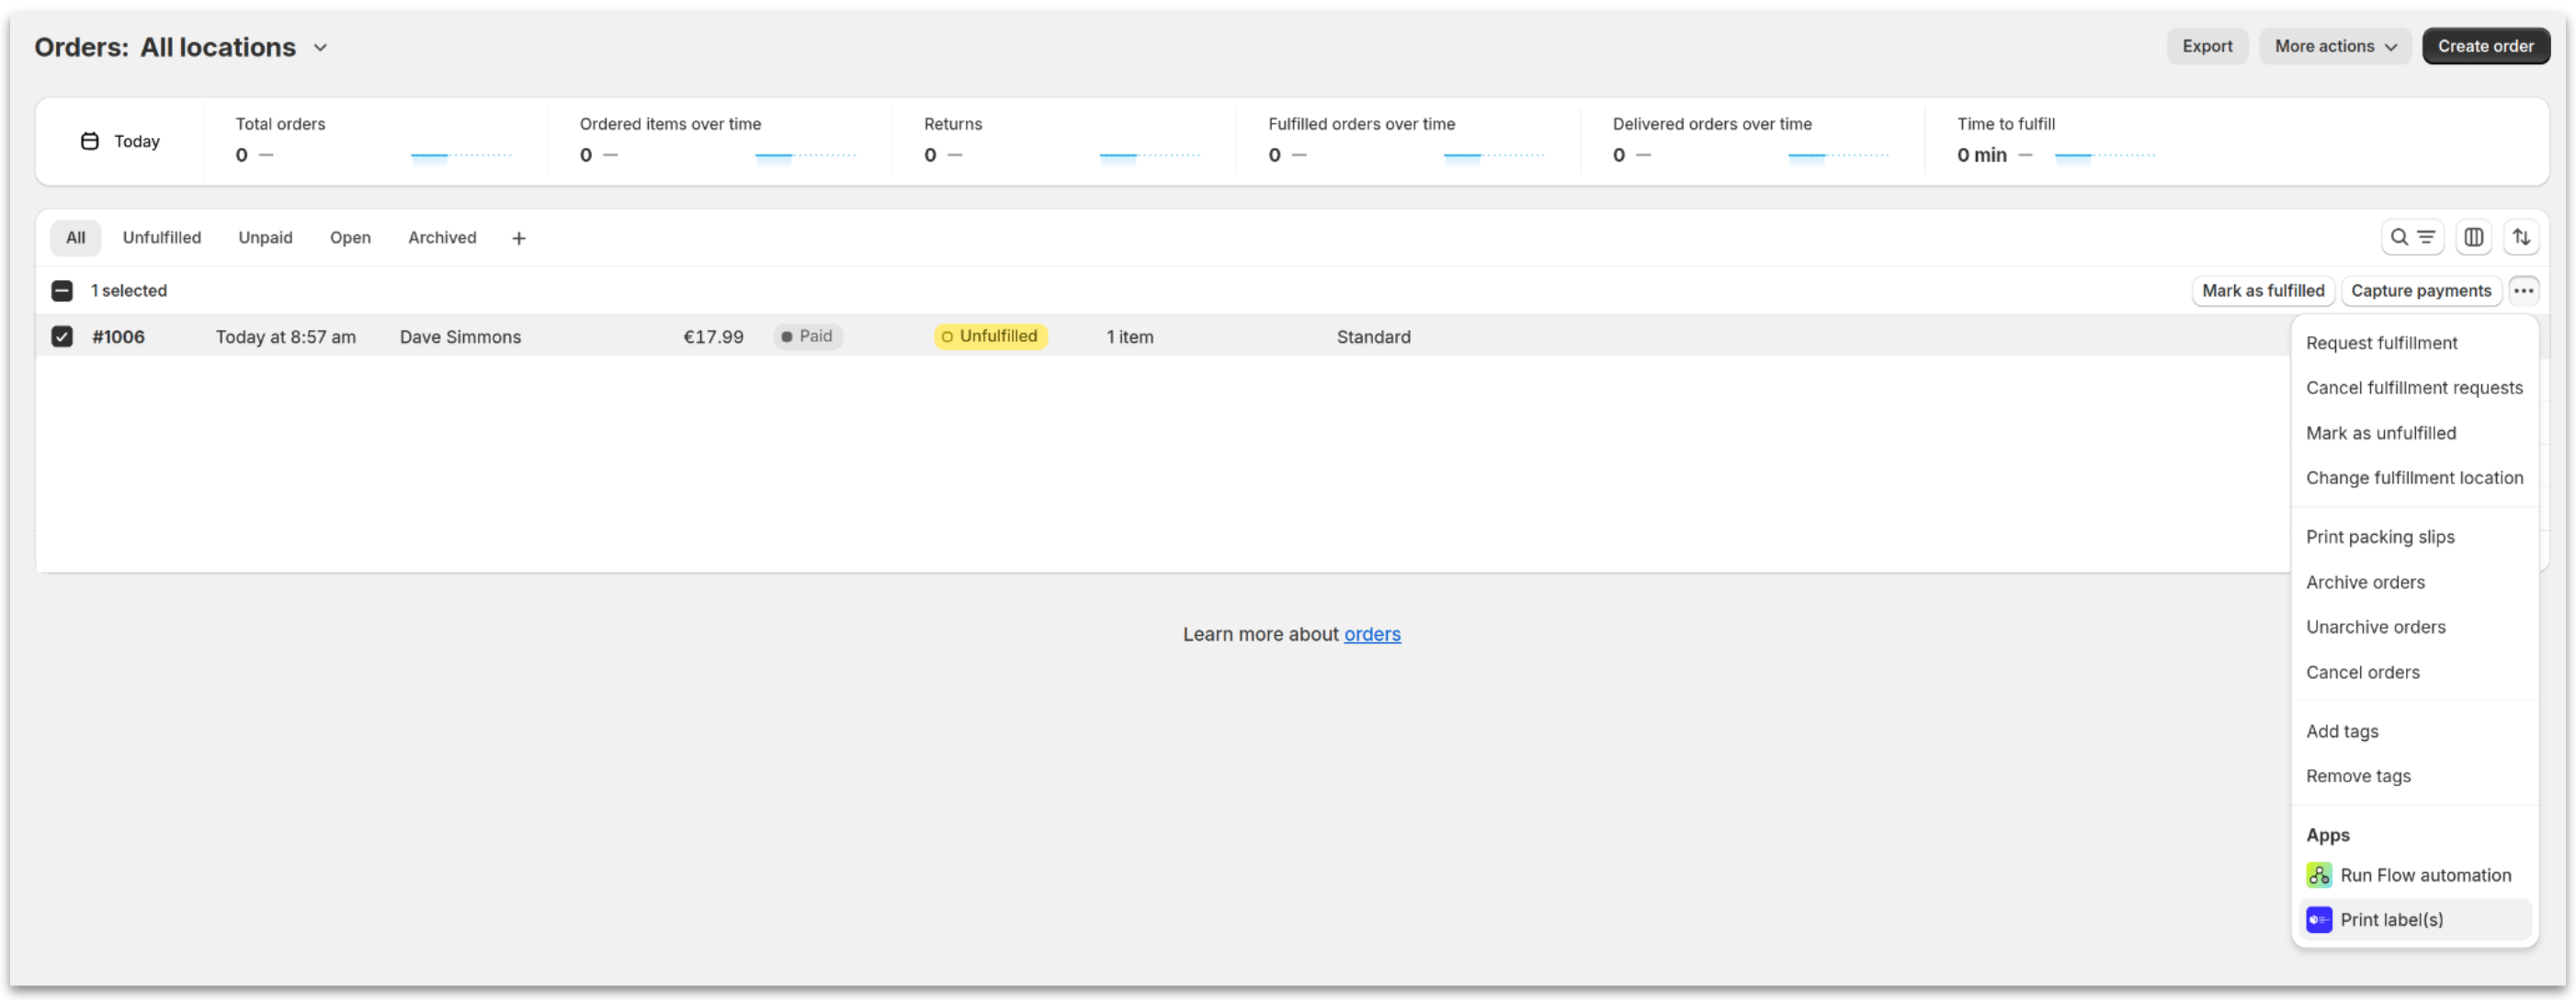
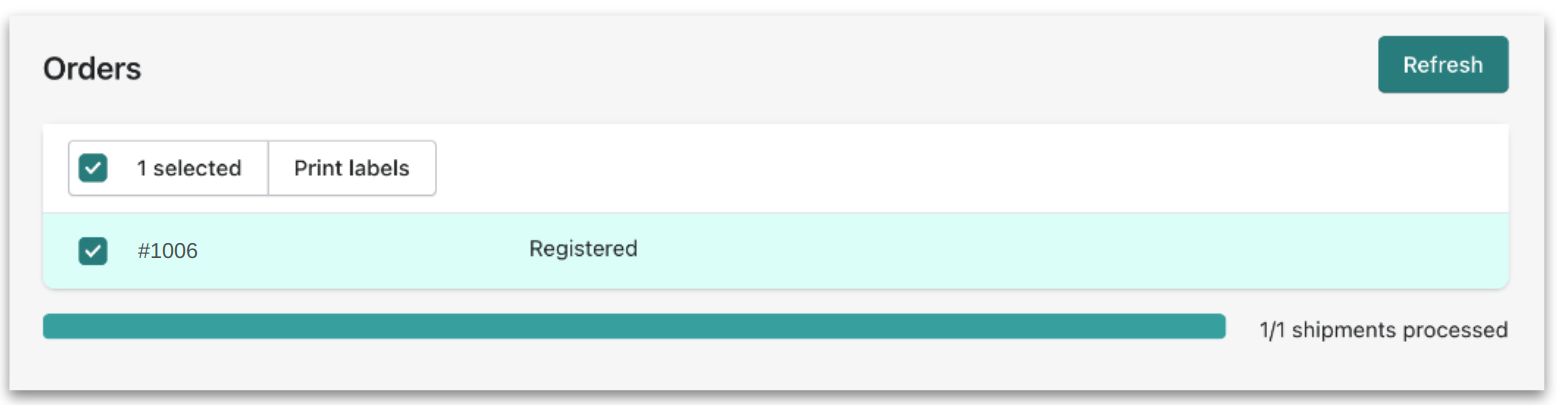
You will be directed to a new screen where the orders will be assigned a carrier & service and registered. The shipment statuses are continually updated until delivered or returned.
Automation rules need to be in place in order to successfully register shipments when using the Shopify app. You can find more information on this here - Shipping Rules
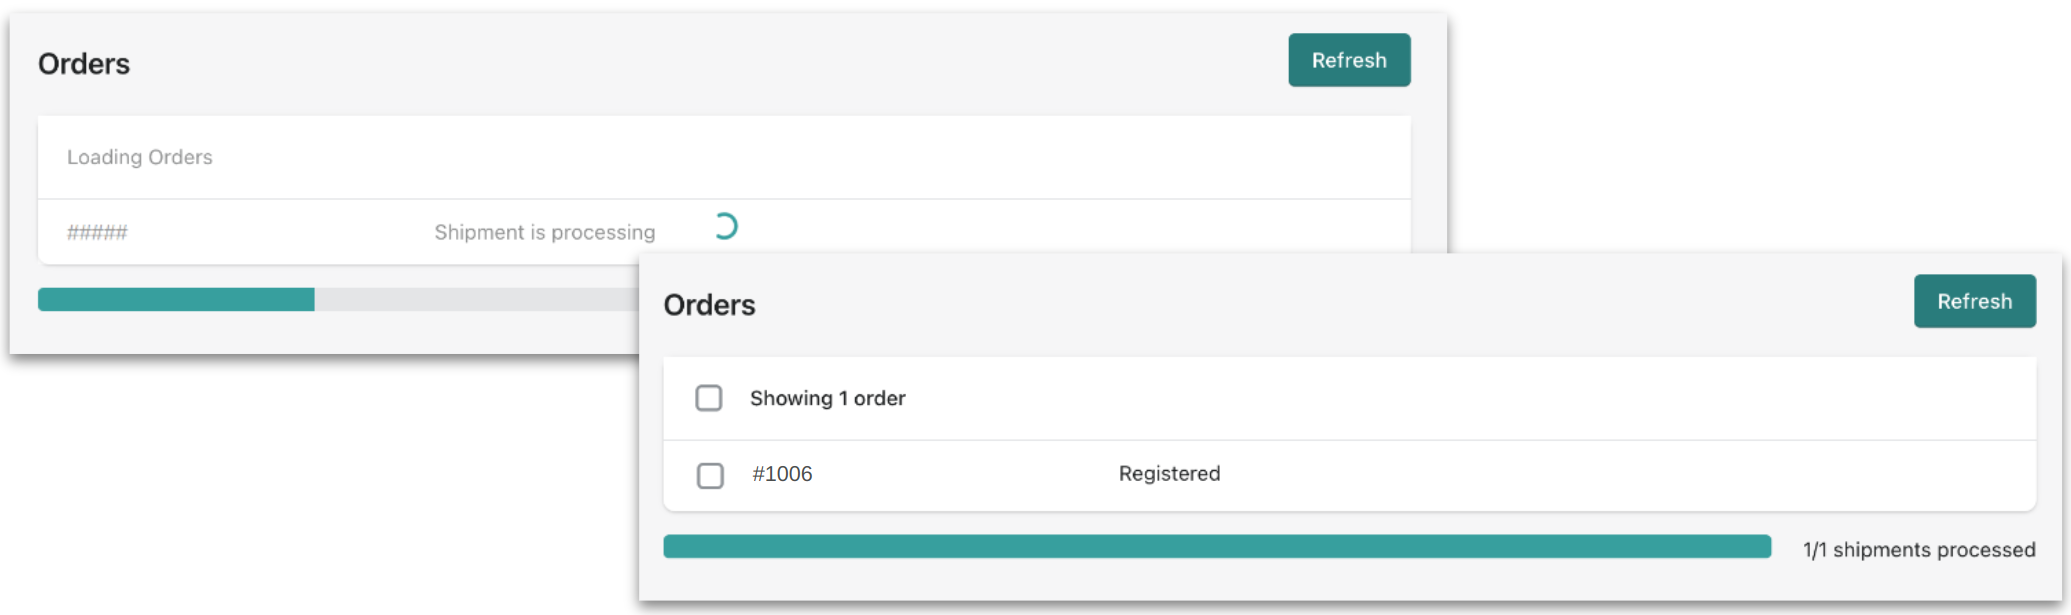
Once the shipment is registered, select it, followed by clicking “Print labels.”
5. Tips
Shopware
1. Create a connection in Shopware
1.1 Create a Role
The integration requires permissions to be set in shopware.
Go to Settings -> System -> Users & permissions and click on “Create role”.
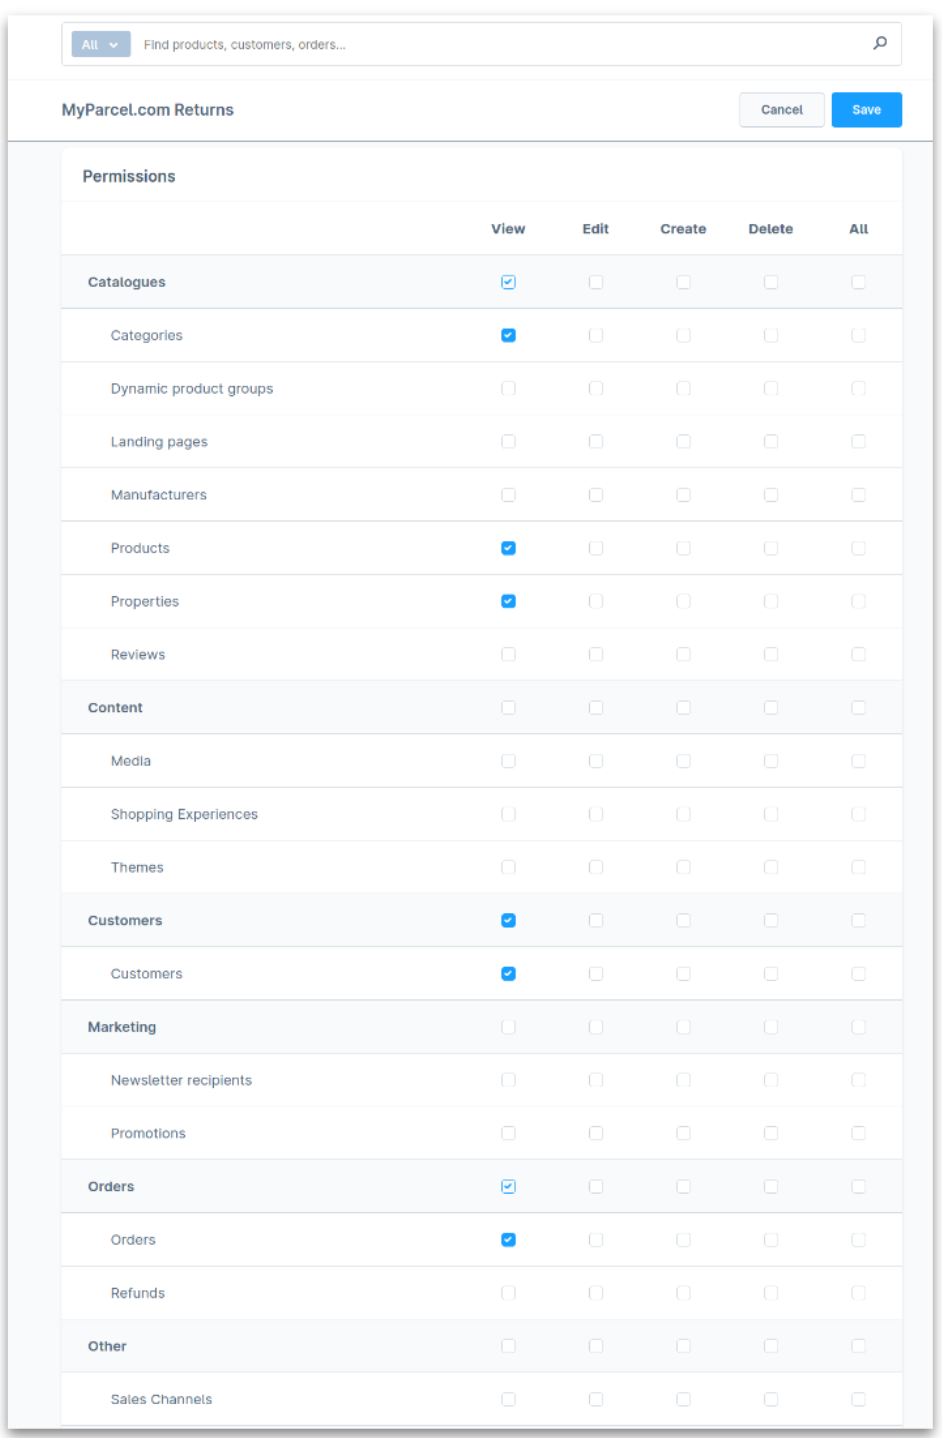
Next, enter the name "MyParcel.com” and select the following View permissions from the table:
Categories
Products
Properties
Customers
Orders
Click “Save.”
1.2 Create an integration in Shopware
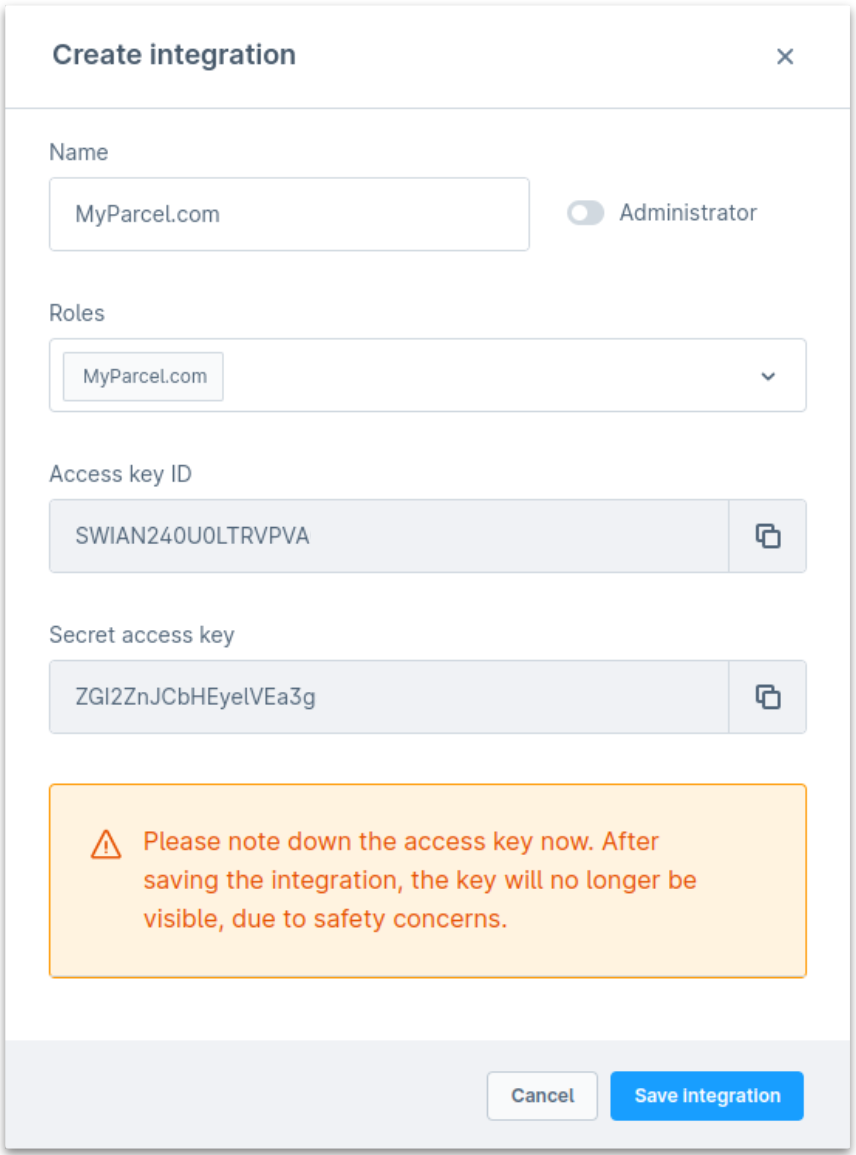
Go to shopware Settings -> System -> Integrations. Then click on "Add integration".
Give the integration a recognisable name, for example 'MyParcel.com.'
Select the role that was created in the previous step
Copy the “Access key ID” and “Secret access key” and keep them somewhere safe.
Click “Save Integration.”
2. Connecting Shopware to MyParcel.com
Navigate to the Shipping integration setting in MyParcel.com and click “Connect” under Shopware. Now paste the Shopware credentials into their respective fields and click “Connect”
Use Storefront URL only. Example: https://myshopwarestore.com
Shopware is now connected and ready for processing returns.
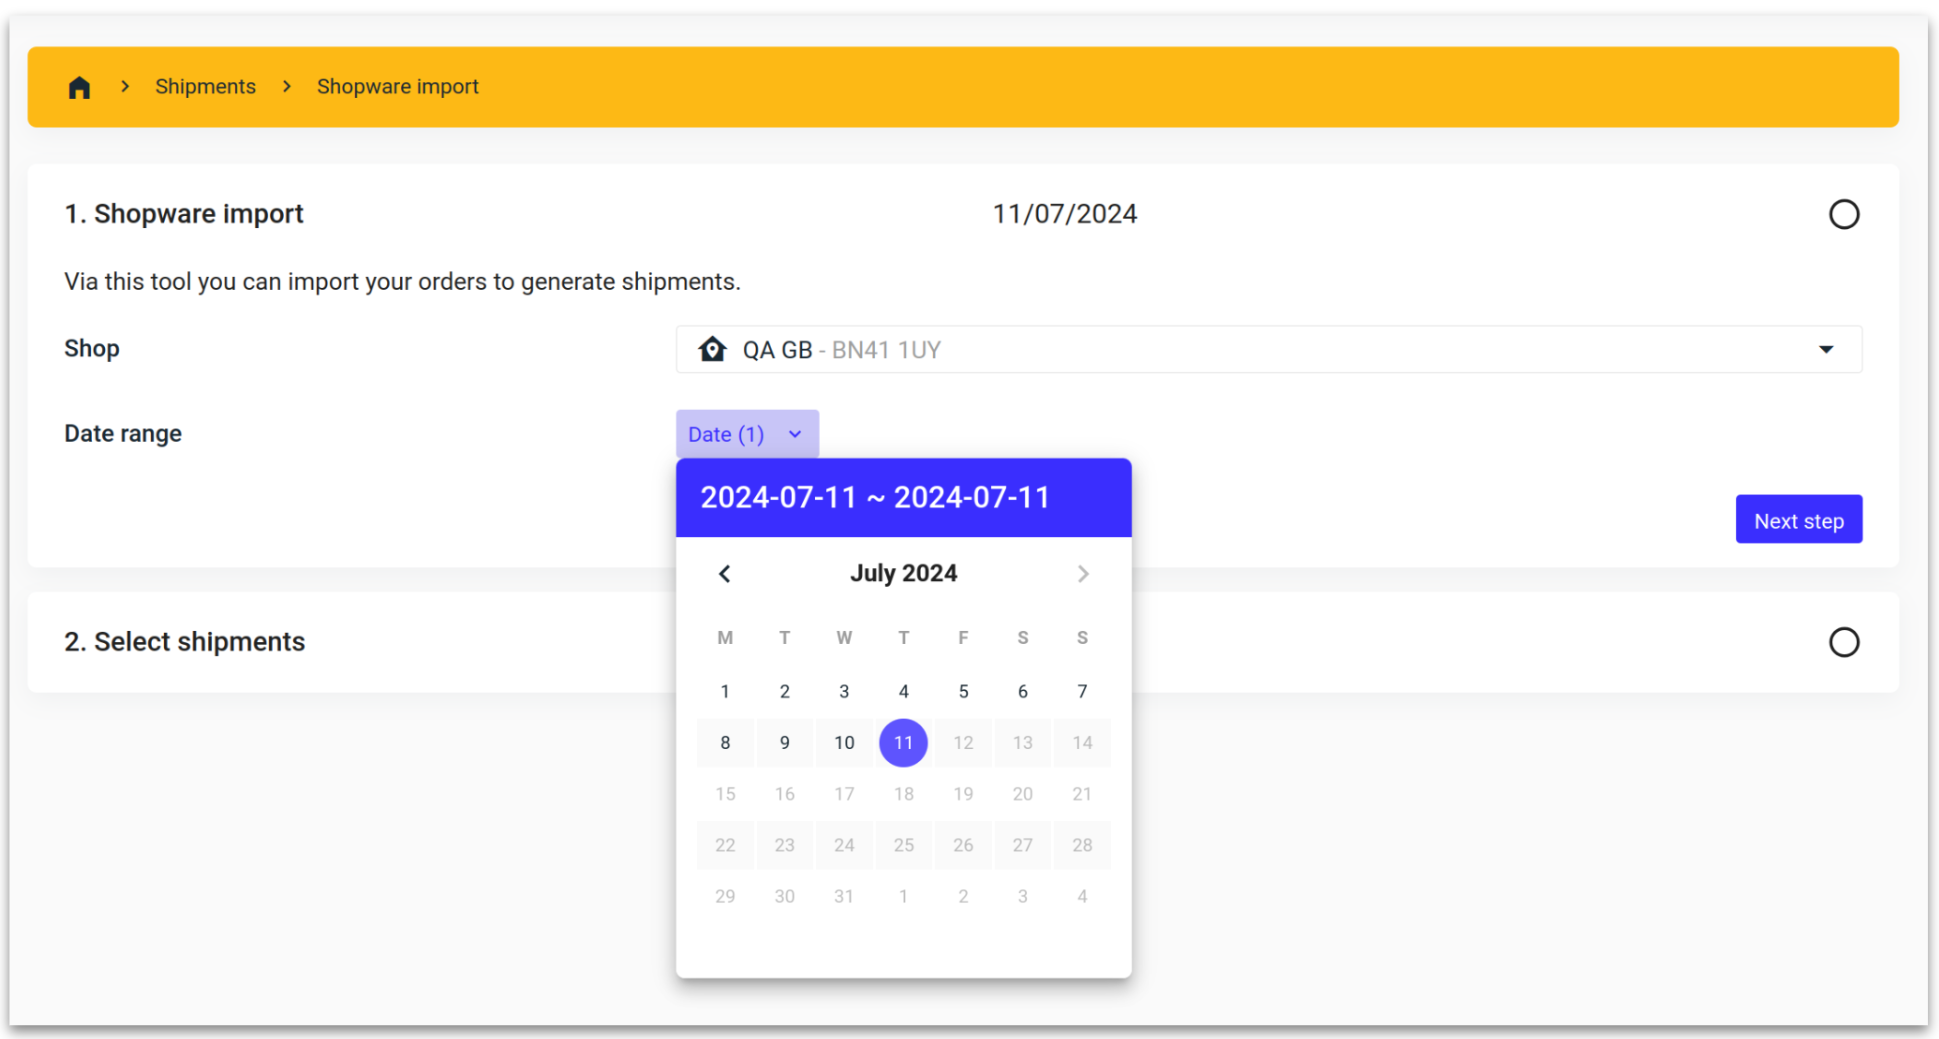
3. Importing orders from Shopware
Select the “Import” button on the right hand side of the Shipment overview, followed by the selecting ‘Shopware’.
Select the shop you want to import orders for.
Select a date range of the orders you want to import and then click the “Next step” button.
You can import orders multiple times per day. Any orders that have already been imported will show 'This order is already imported.'
Only orders with an ‘open’ delivery status will be imported.
Your Shopware orders will now be displayed. Select the required orders and click “Import.”
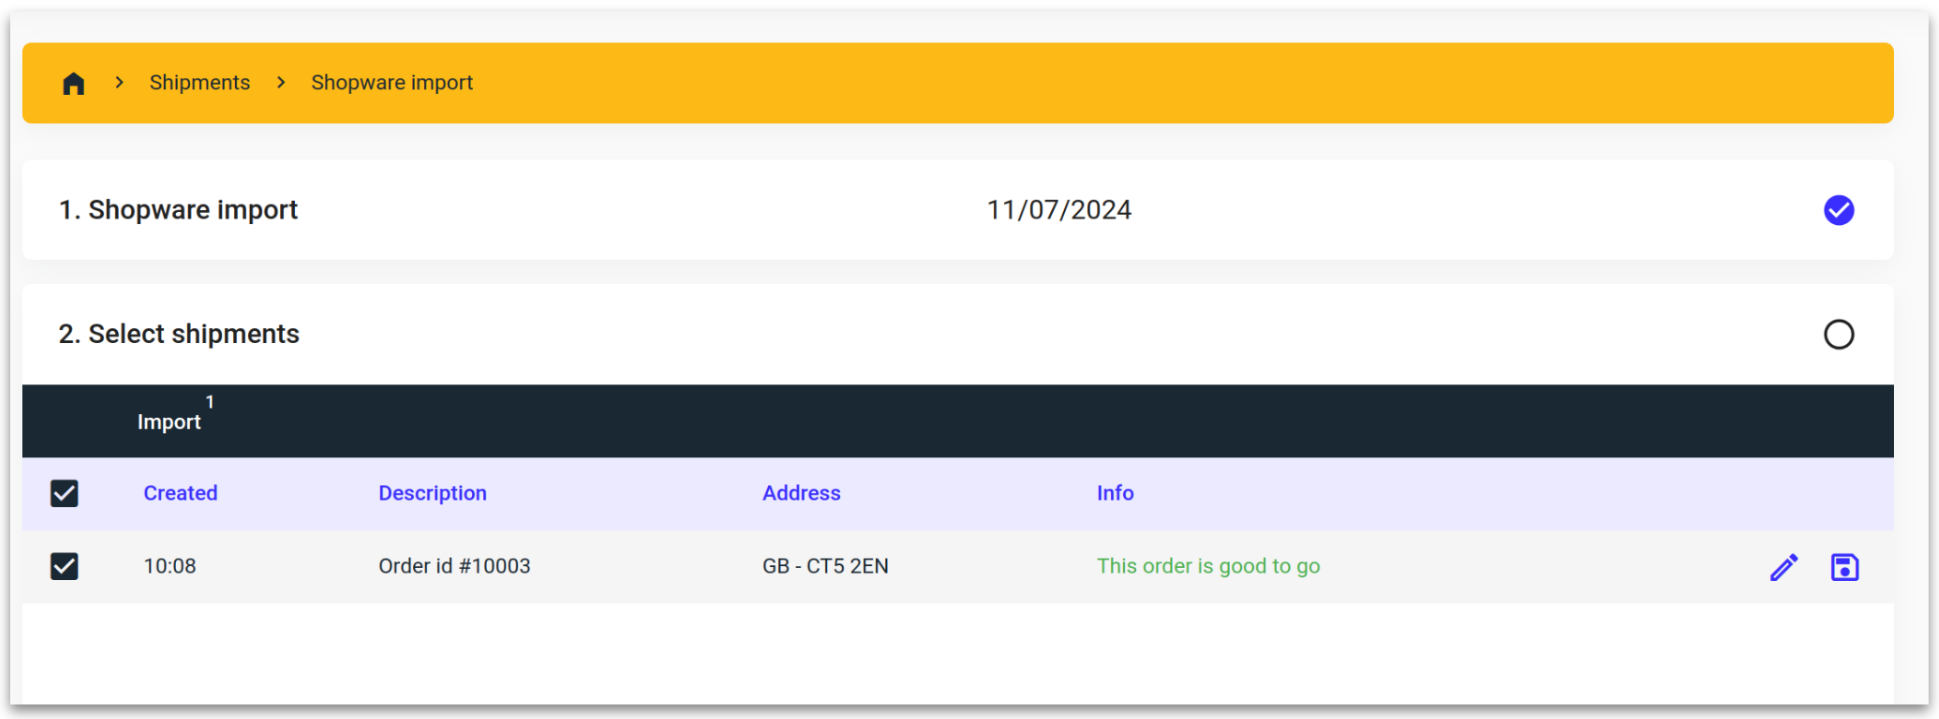
Any orders which might not be needed, such as drop-shipments can be unchecked. This will prevent them from being registered with the carrier.
Any orders missing data can be edited using the pencil icon prior to importing.
An order will be marked as ‘Shipped’ once it’s imported and registered with the carrier.
4. Tips
.png?inst-v=879d298e-0a03-4d5d-93dc-632afd5adfb0)
WooCommerce
Download plugin
Download the WooCommerce zip file - MyParcel.com V3.2.0
You do not need to unzip this file
Connecting WooCommerce
Connecting WooCommerce is done in 3 steps:
Generate the Client ID & Secrect in MyParcel.com.
Import the MyParcel.com WooCommerce plugin zip file.
Connect plugin to the MyParcel.com API
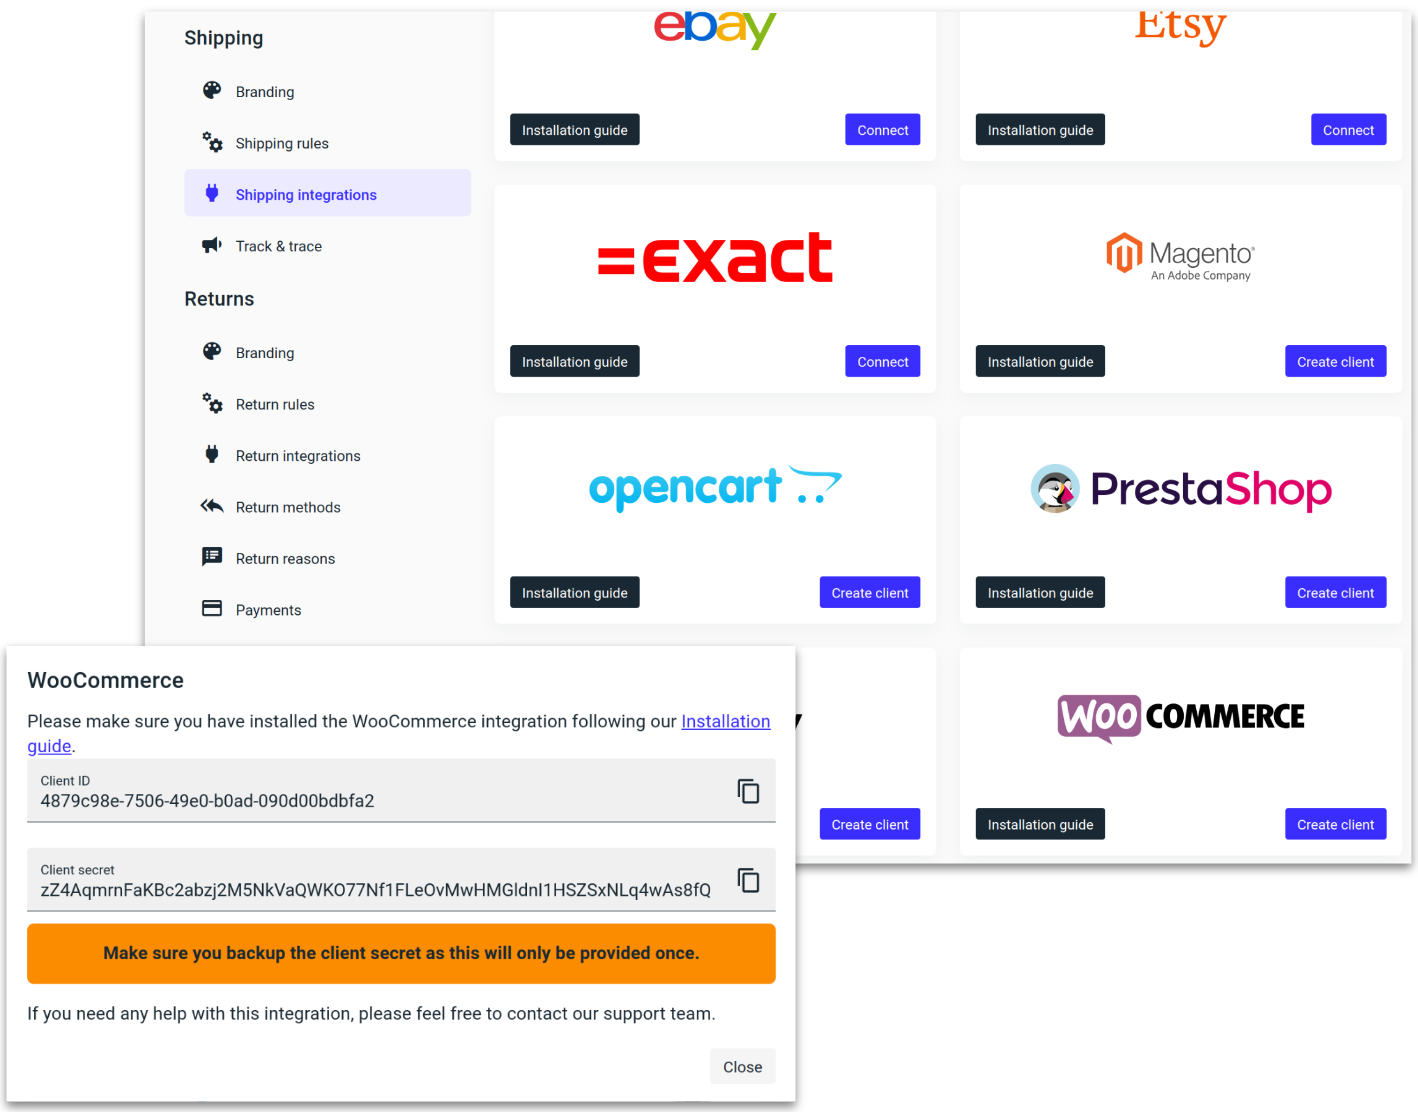
Generate the Client ID & Secrect in MyParcel.com by navigate to the Shipping integration setting in MyParcel.com and click “Create client” under WooCommerce.
Import the MyParcel.com WooCommerce plugin zip file by navigating to Plugins and selecting “Add New.”
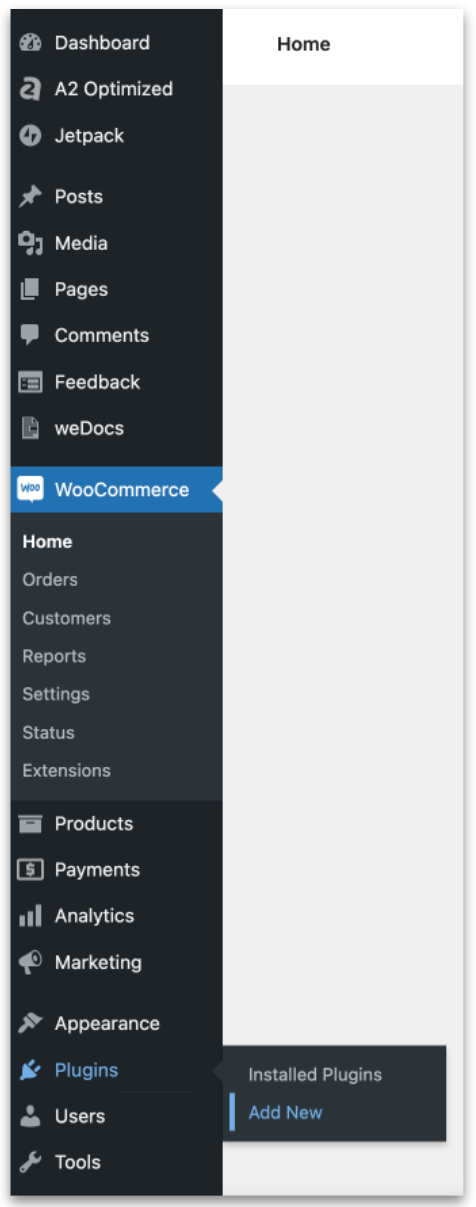
Select “Upload Plugin” towards the top left.

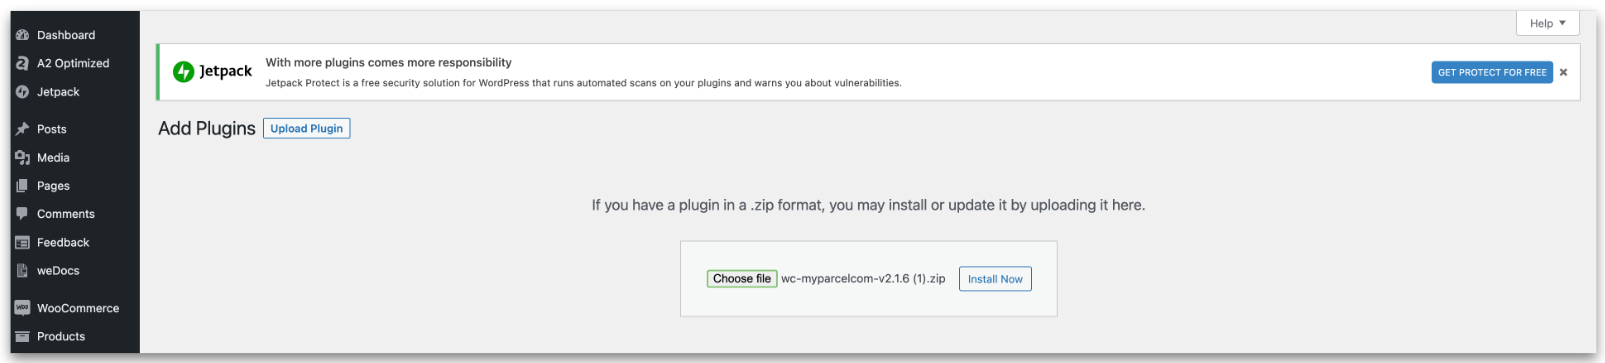
Select the .zip file you downloaded earlier, followed by “Install Now”
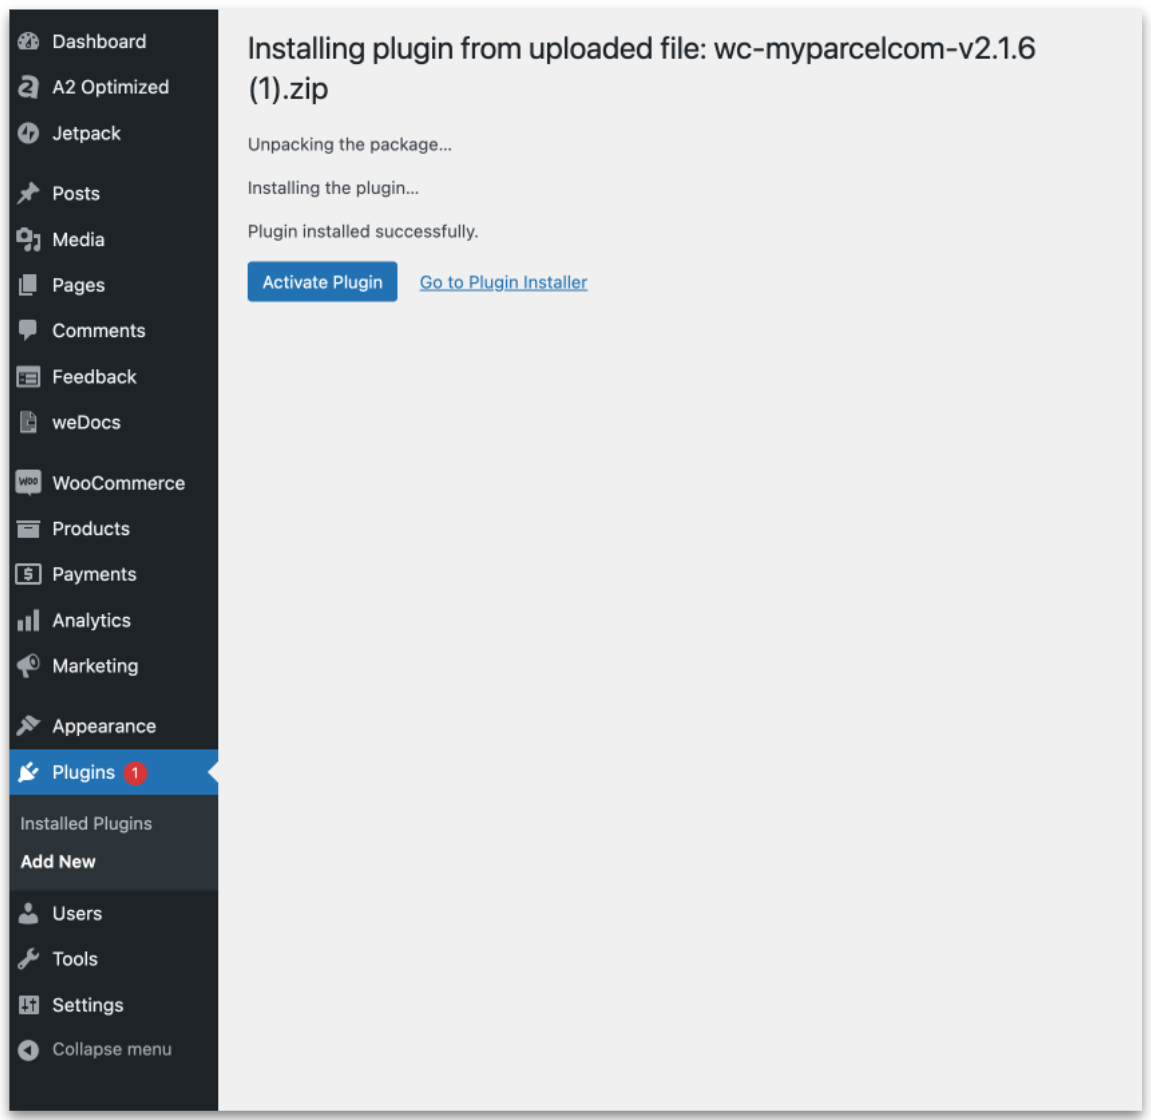
Once the plugin has been installed, click “Activate Plugin.”
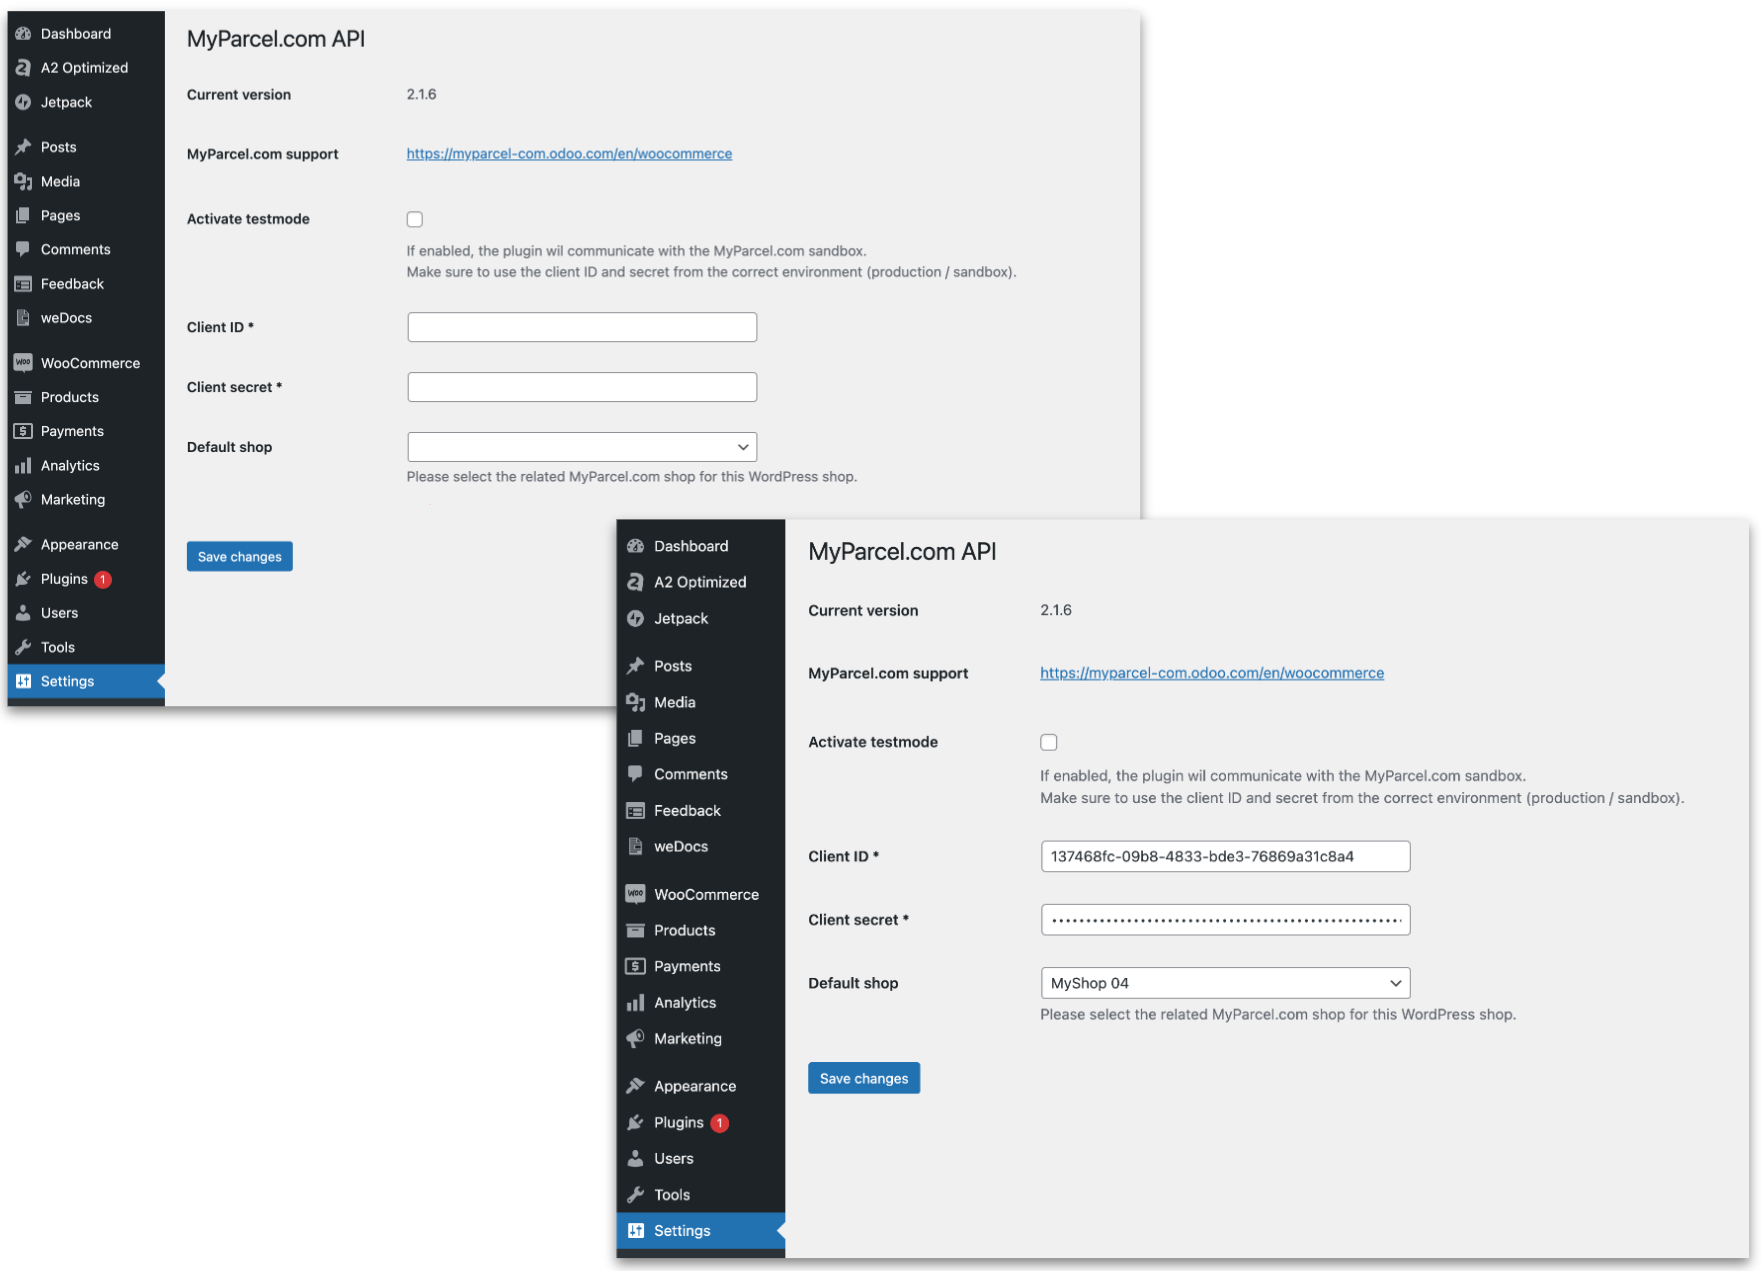
Now go to ‘Plugins’, followed by ‘MyParcel.com API’.

Copy in the Client ID and Client Secret that you generated in step 1 and paste them into their respective WooCommerce fields.
The ‘default shop’ field will now be populated. If you have multiple shops, ensure the correct one is selected and then click “Save changes.:
Your WooCommerce store is now connected!
Checkout shipping options
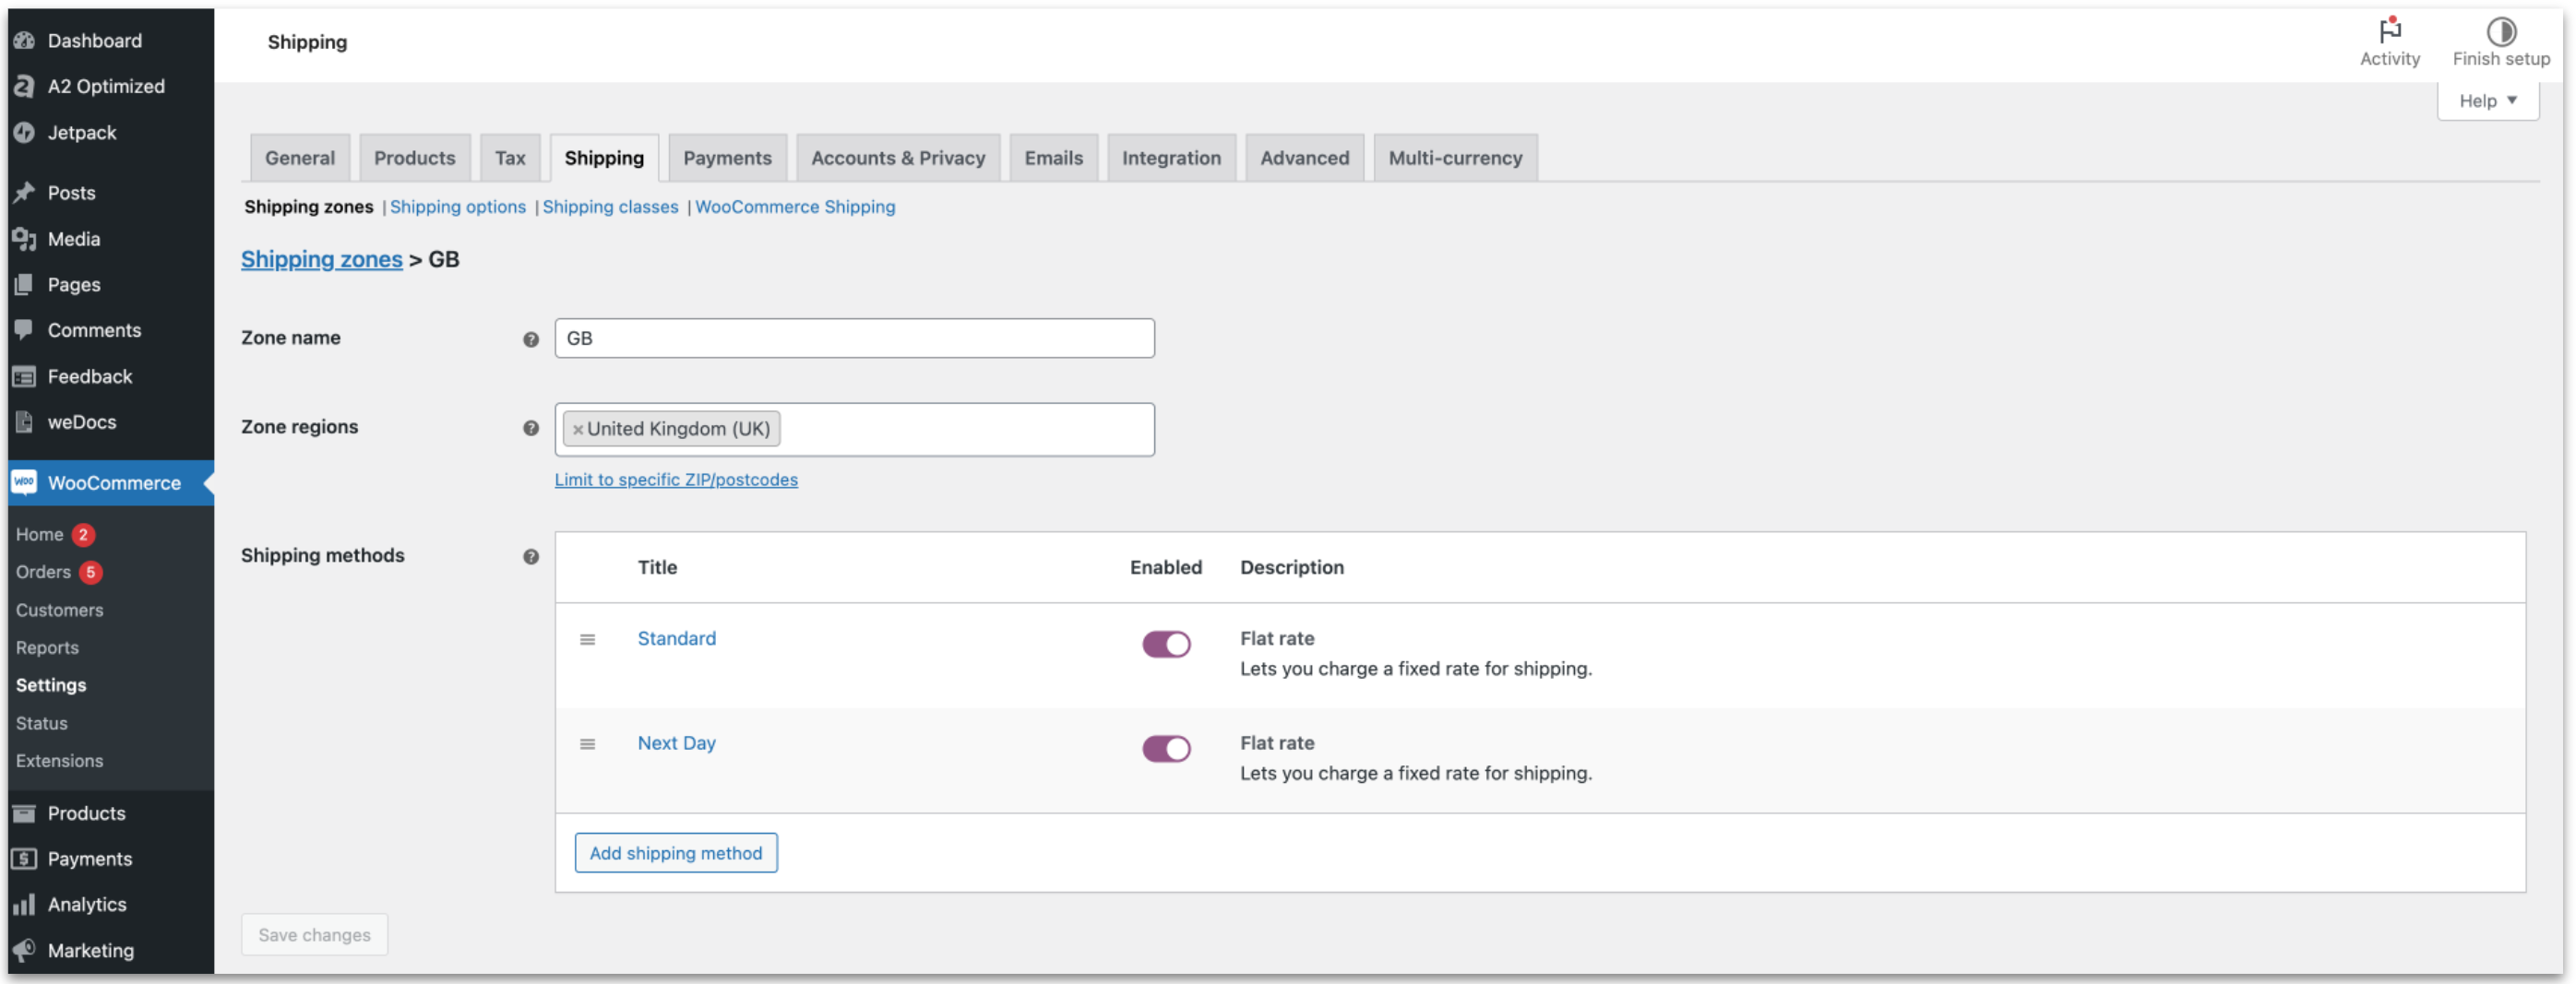
Go to WooCommerce followed by Settings.
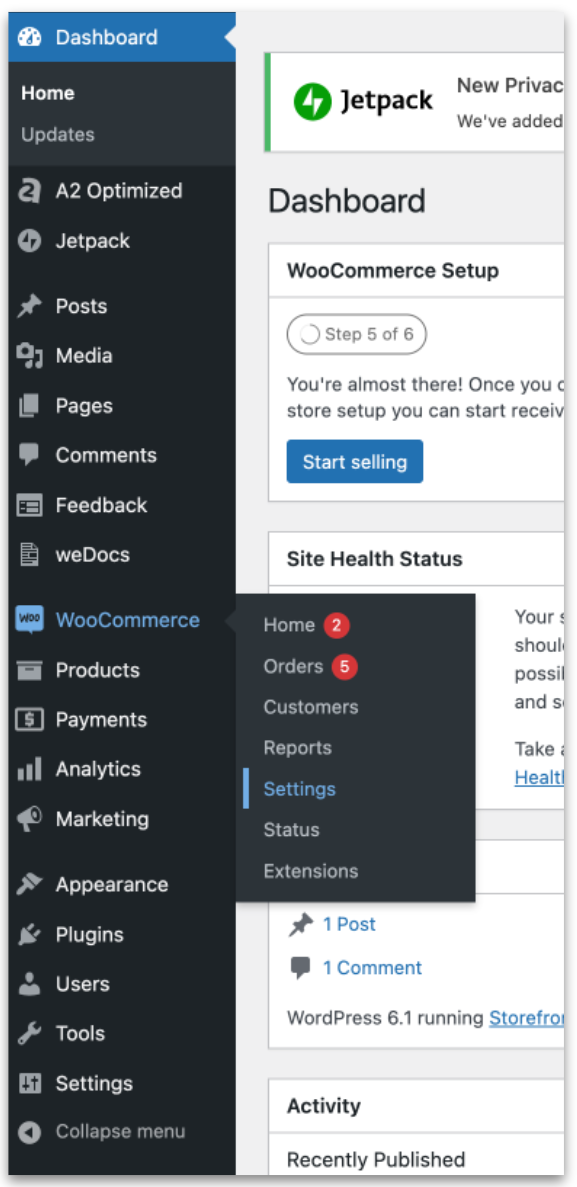
Select the “Shipping” tab, followed by “Add shipping zone.”

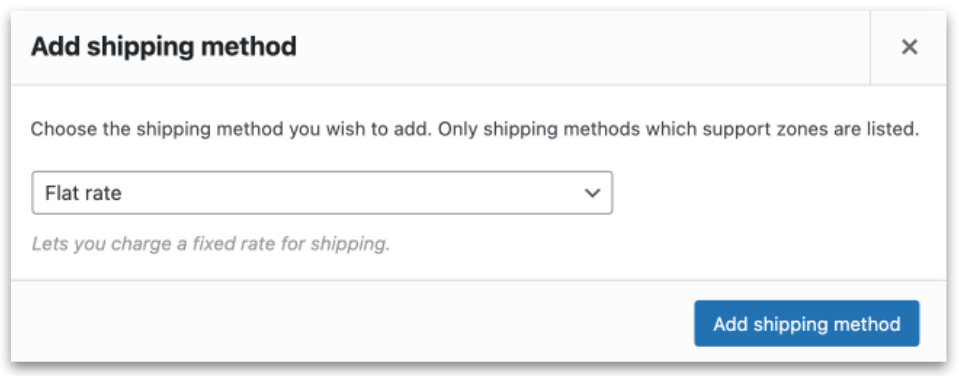
Give the zone a name, select the countries you want to add and then select “Add shipping method.”
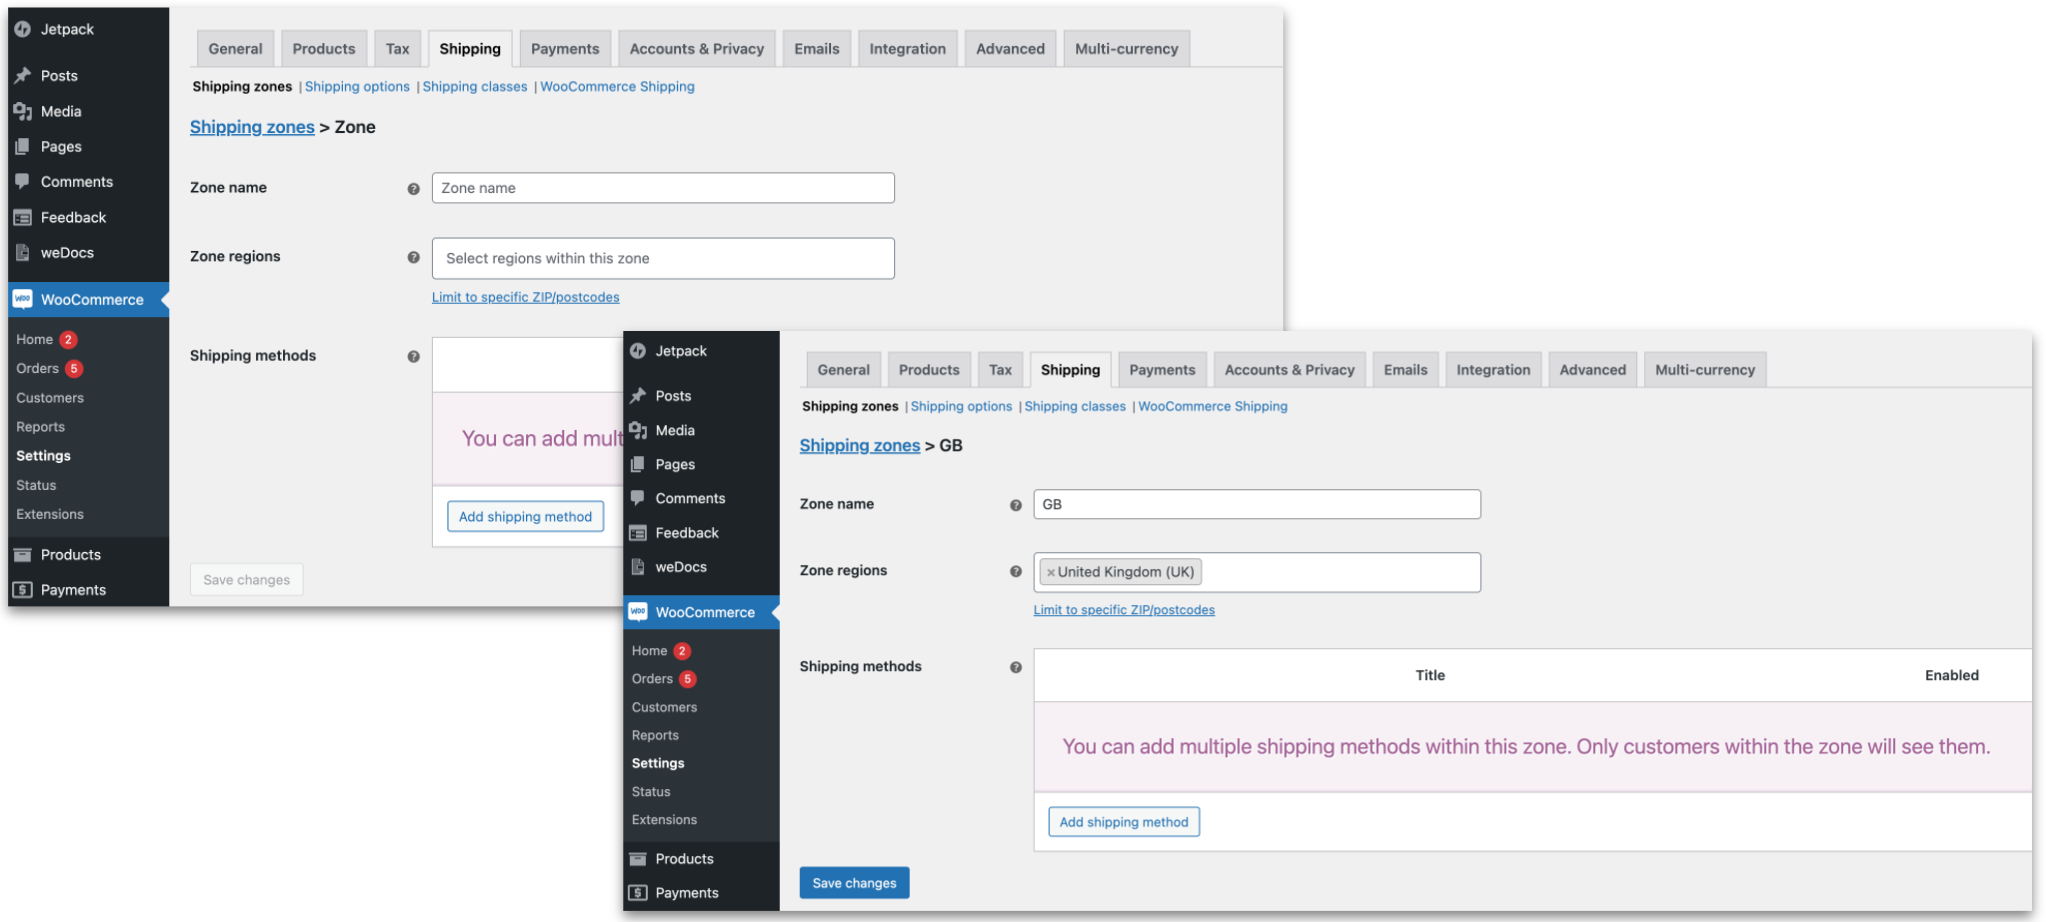
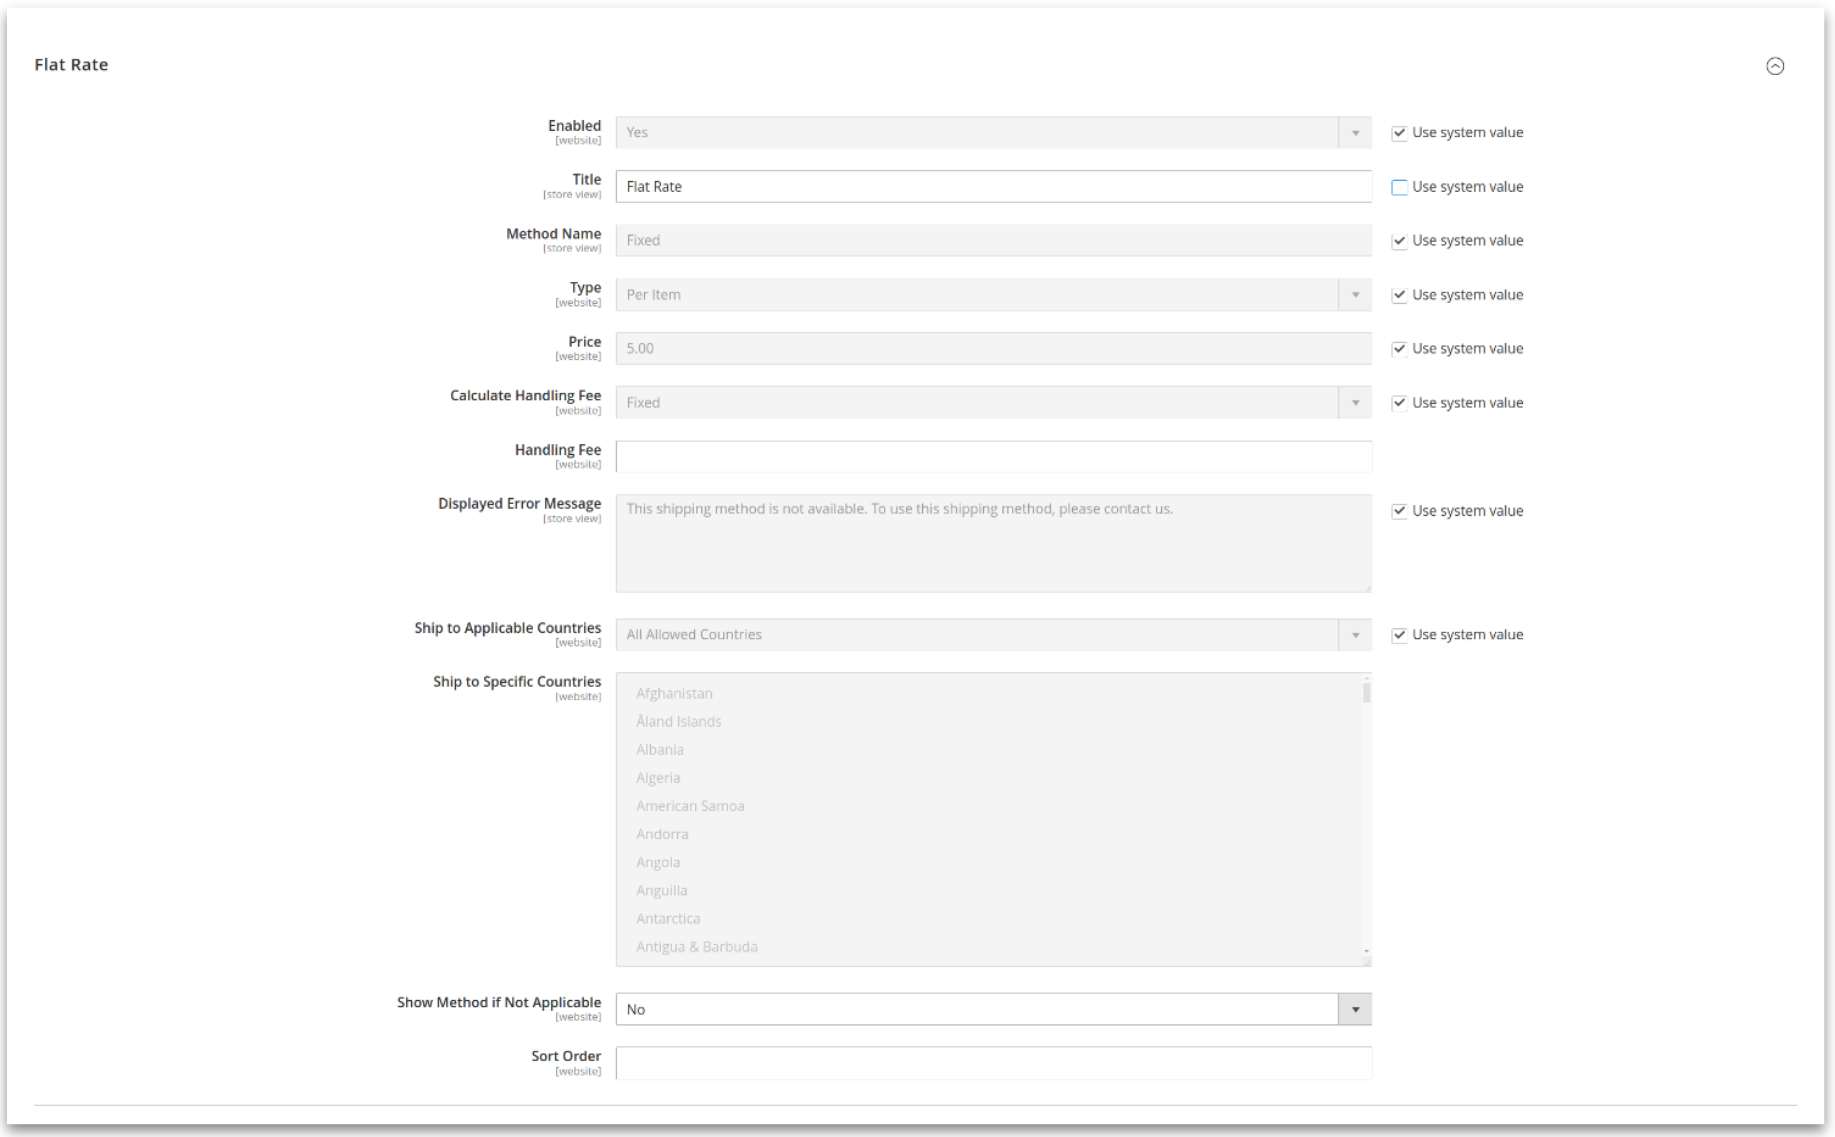
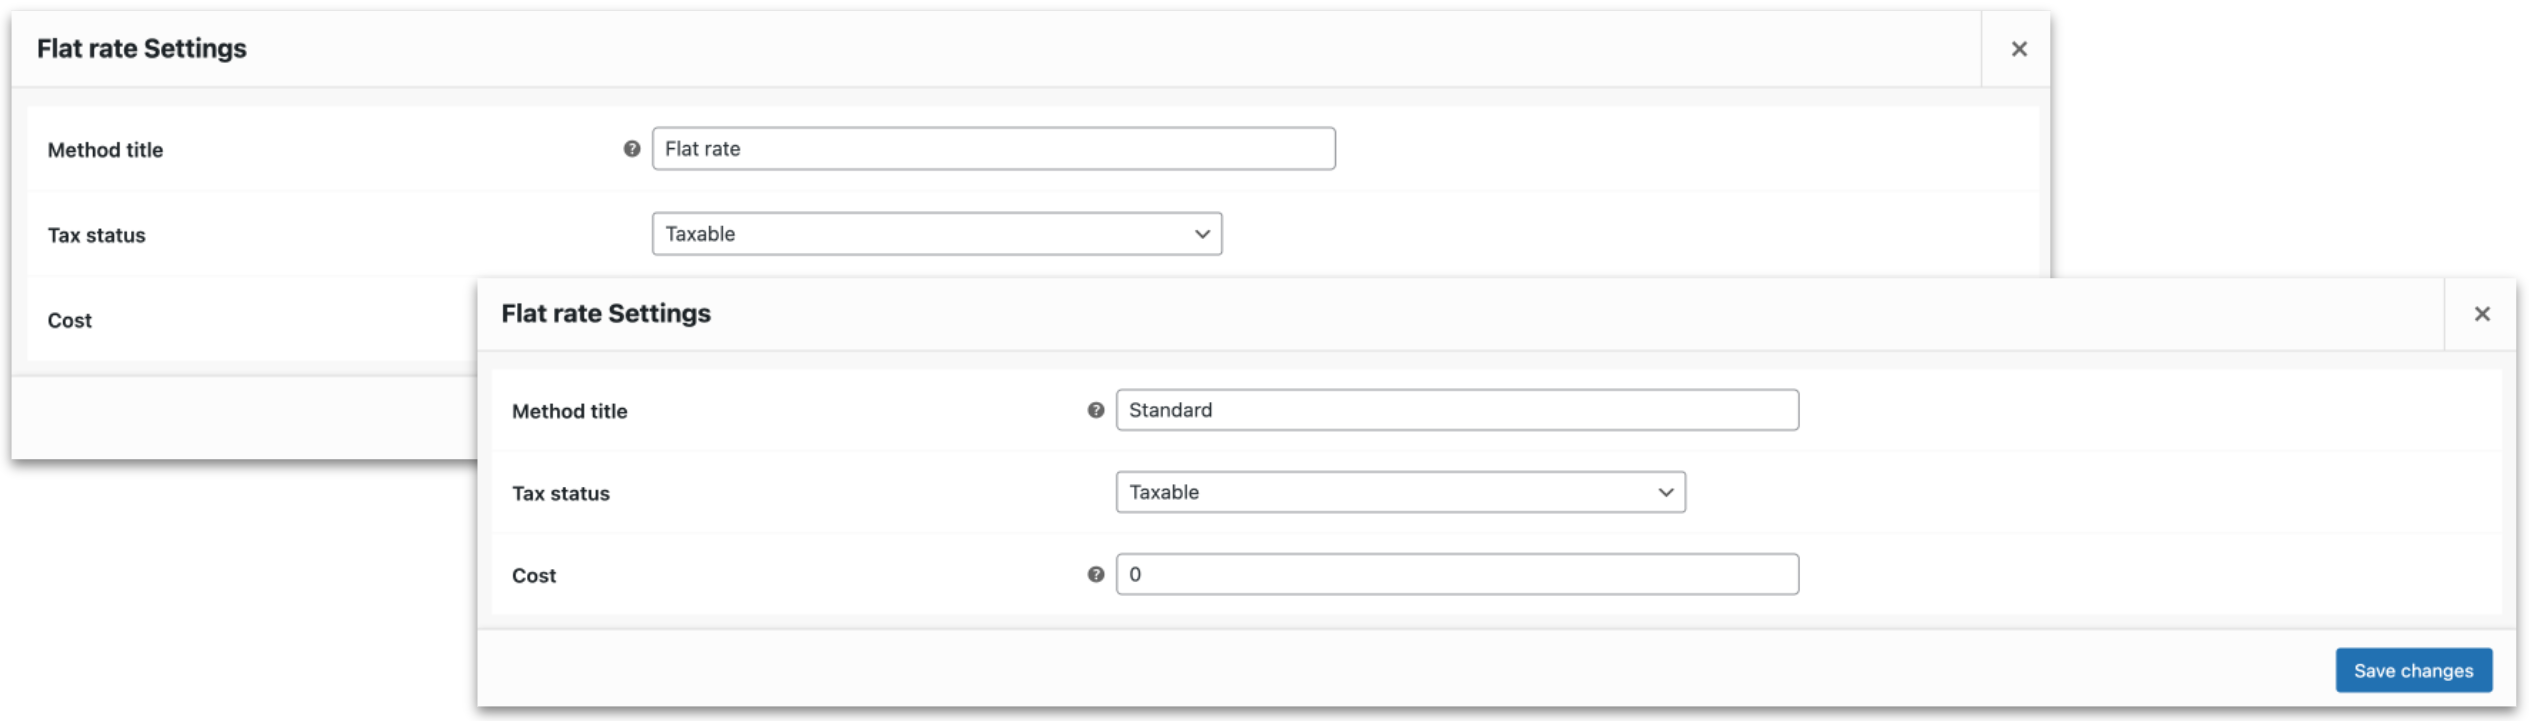
Keep the shipping method as ‘Flat rate’ and click “Add shipping method.”
A general service has now been added.
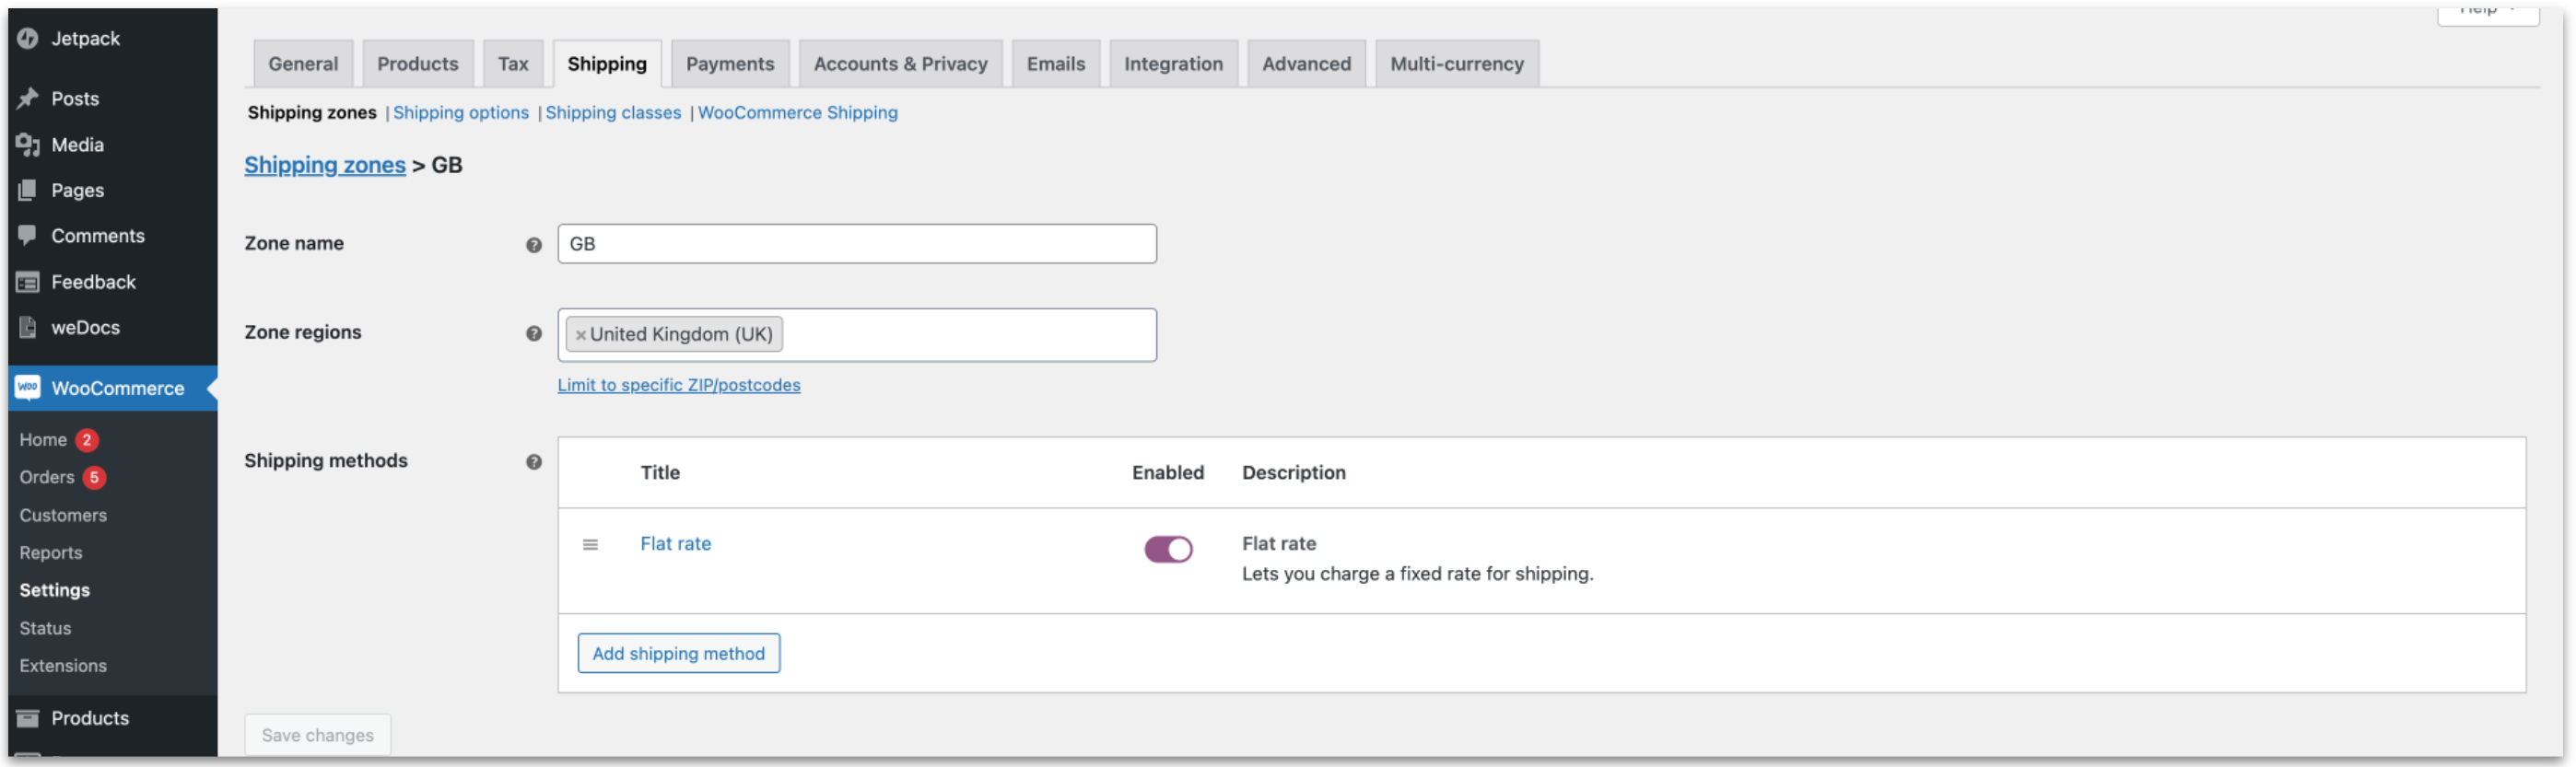
To edit this service hover over the title name and click Edit.

Now you can give the service a customer facing name by changing the Method title and the cost (if any). Now click “Save changes.”
The Rate name that you choose should be copied exactly into our shipping rule tags in order for the system to assign the correct carrier & service as chosen by your customer.
Your delivery options will now be visible in your checkout.

Set as many services rates as needed per zone.
Printing labels in WooCommerce
Select the orders that you would like to print labels for.
Click “Bulk actions” just above the orders overview, forllowed by Export orders to MyParcel.com

Now click “Apply”
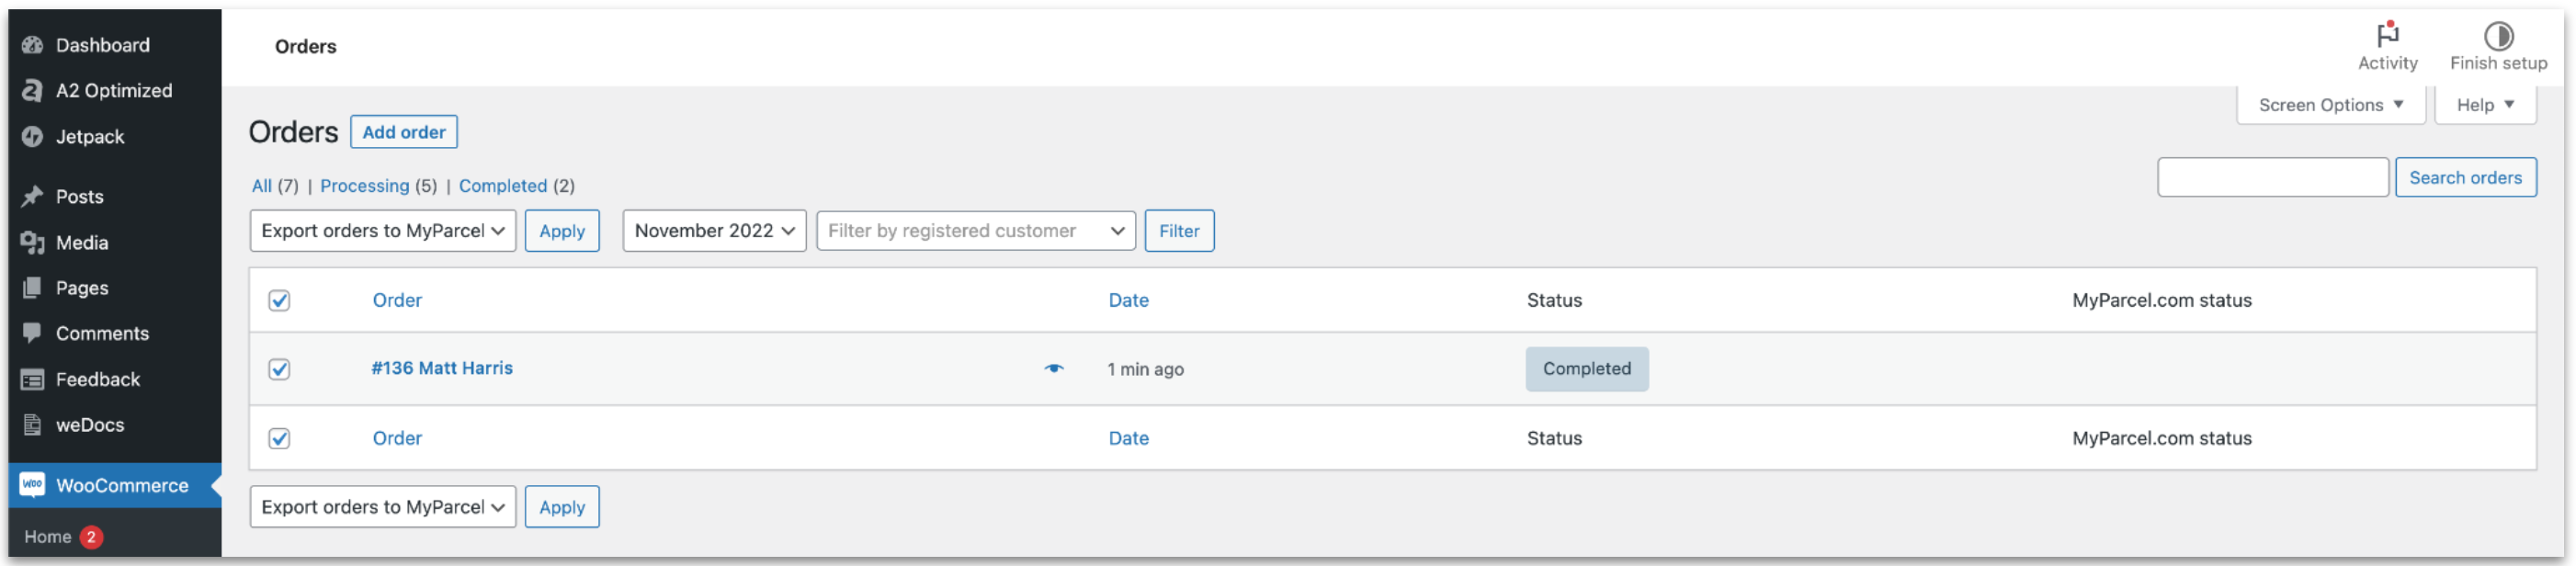
The order will now be exported to MyParcel.com and assigned a carrier & service.
In the MyParcel.com status column of WooCommerce the shipment will go from Concept to Registered - The statuses are continually updated until delivered or returned.
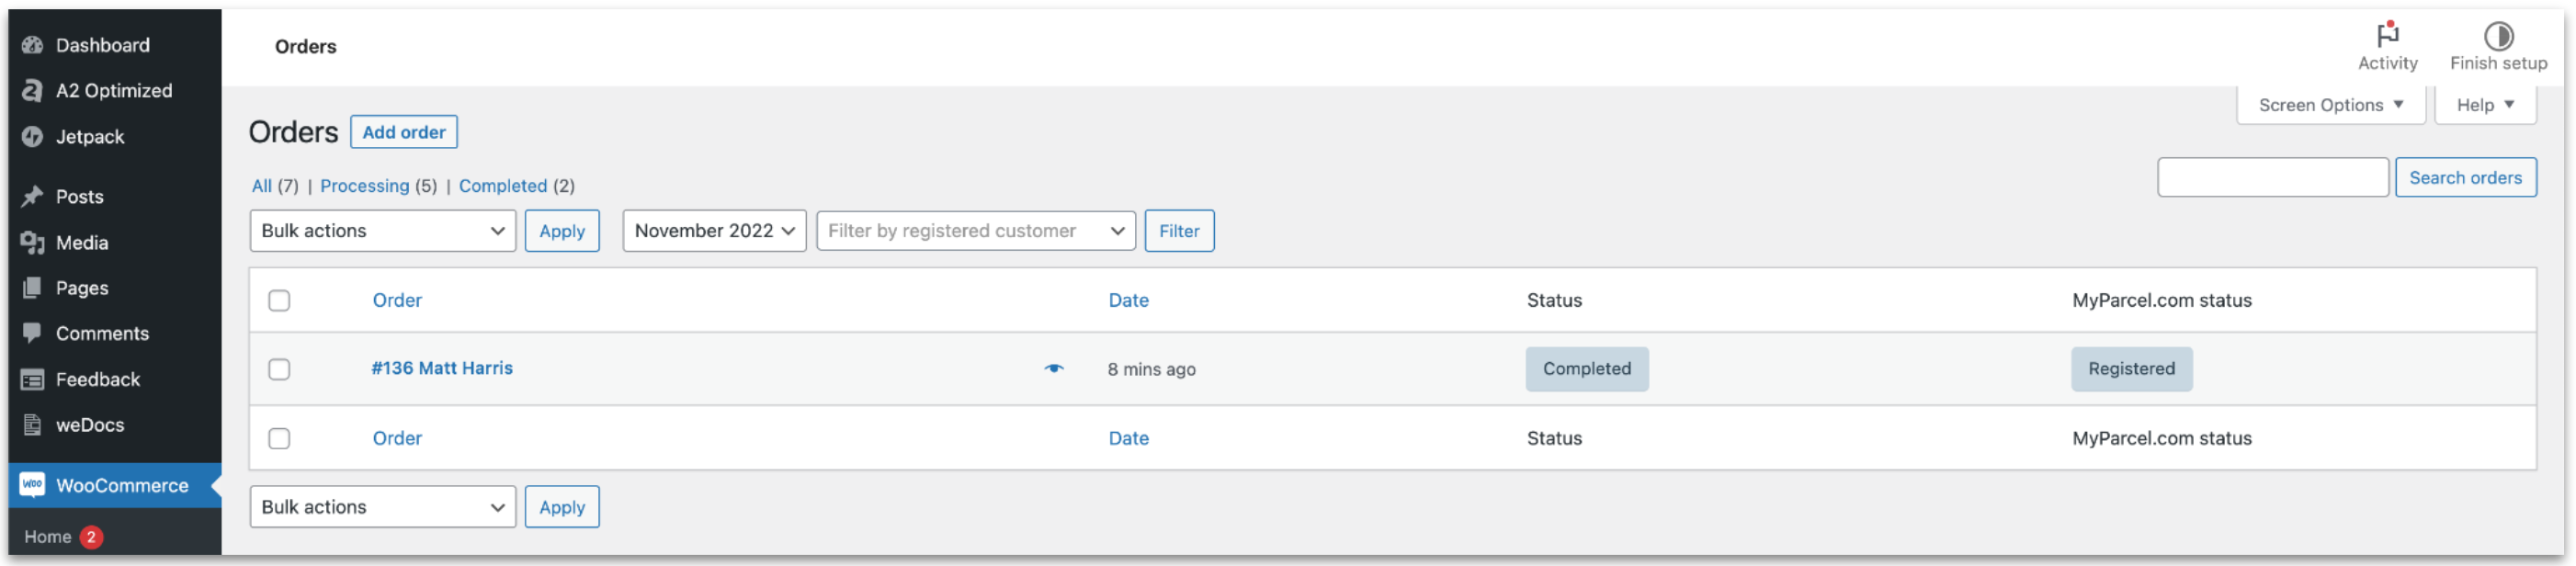
4. The label is now ready to be downloaded, select “Bulk actions” again. Followed by Print MyParcel.com label.
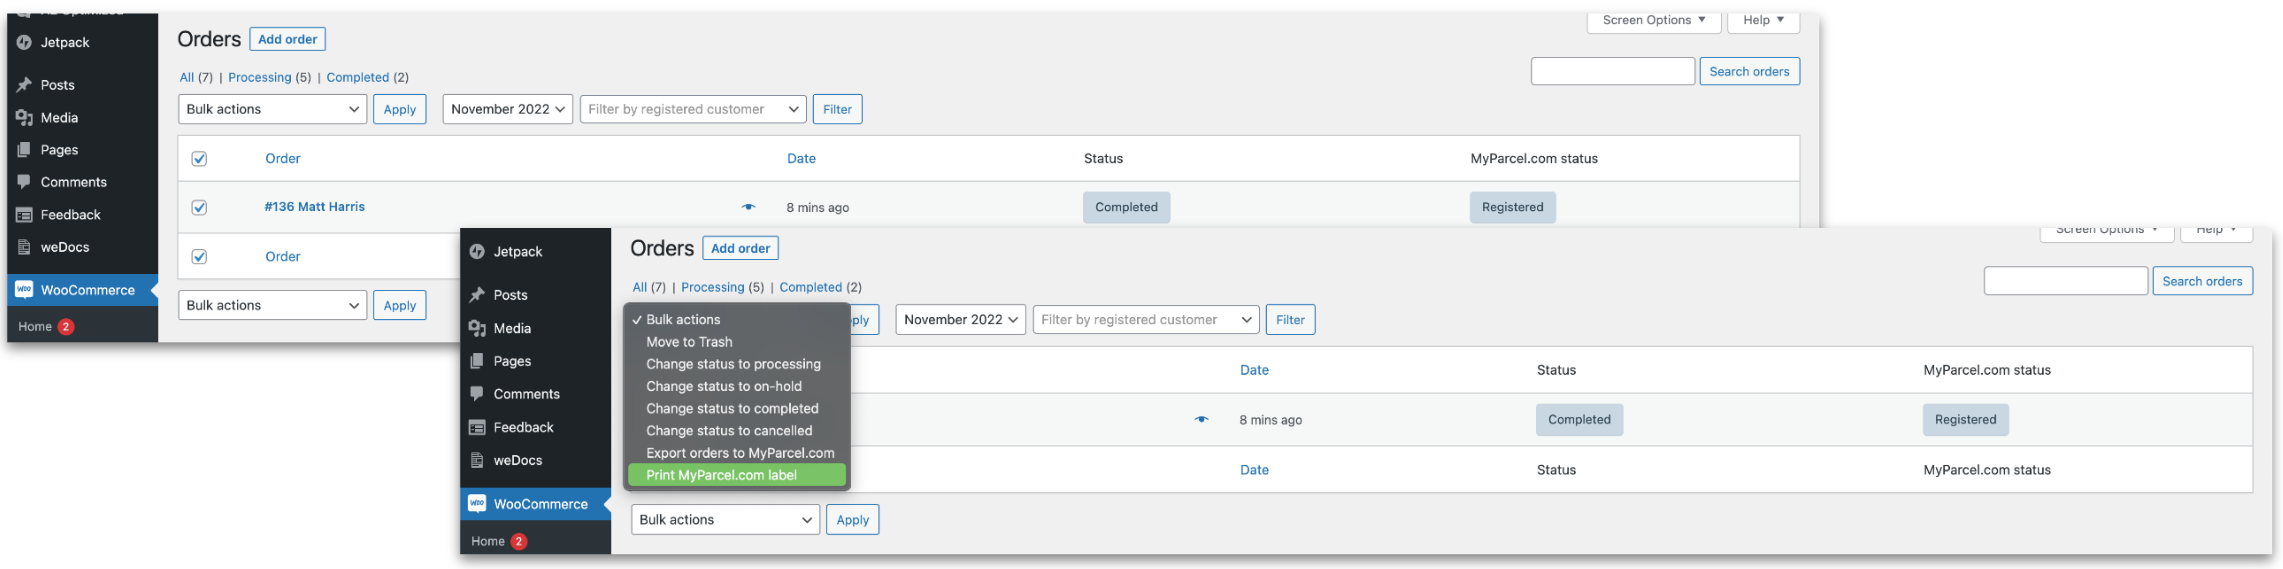
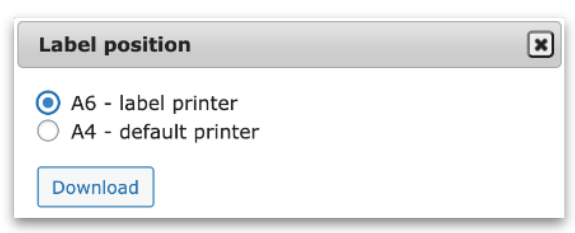
On the pop-up, select the label size and click Download.